How to use Reconstro, A to Z
Every part of the app explained the same simple way — what it is, when you use it, and the step‑by‑step to do it, with a picture for each. Projects, the heart of Reconstro, is covered in full detail.
Your first look
Where everything lives and what the home screen is telling you.
1.1 The home dashboard
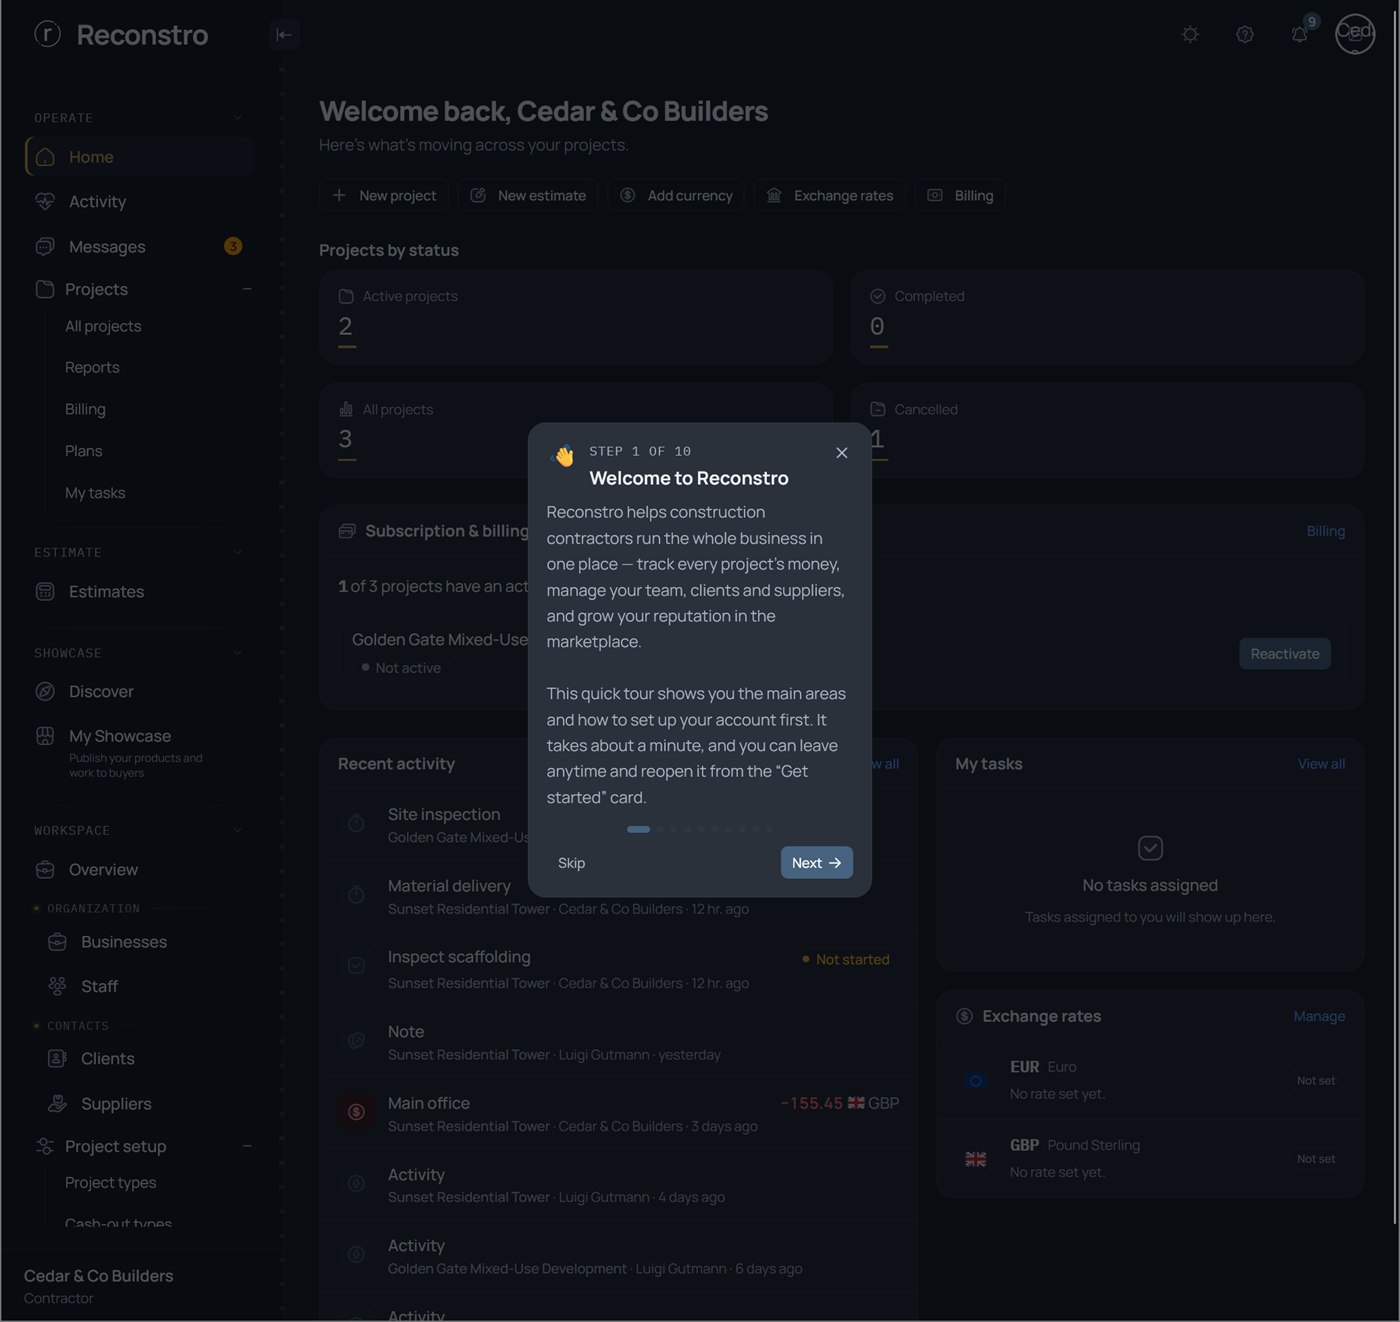
Your command centre. It shows your projects by status, the latest activity across every job, the tasks assigned to you, your currencies' exchange rates, and quick buttons to start anything.
Every time you sign in — it's the fastest way to see what moved since you were last here and jump straight to the thing that needs you.
Step by step
- Sign in — you land on Home.
- Read Projects by status (Active / Completed / Cancelled) for a one-glance health check.
- Scan Recent activity to see the newest events across all your projects.
- Use the quick actions at the top — New project, New estimate, Add currency — to start work without hunting through menus.
- A short guided tour opens on first login; reopen it any time from the "Get started" card.
Short version: How to create a project
Your company, before the projects
Reconstro hangs everything off a business. Set these up once and every project inherits them.
2.1 Businesses
A business is your company profile — a head office, a branch, or a trading name. Projects, quotations and your public storefront all attach to a business, so it's the foundation everything sits on.
Right at the start, before your first project. Add more later when you open a new branch or run a second trading name.
Step by step
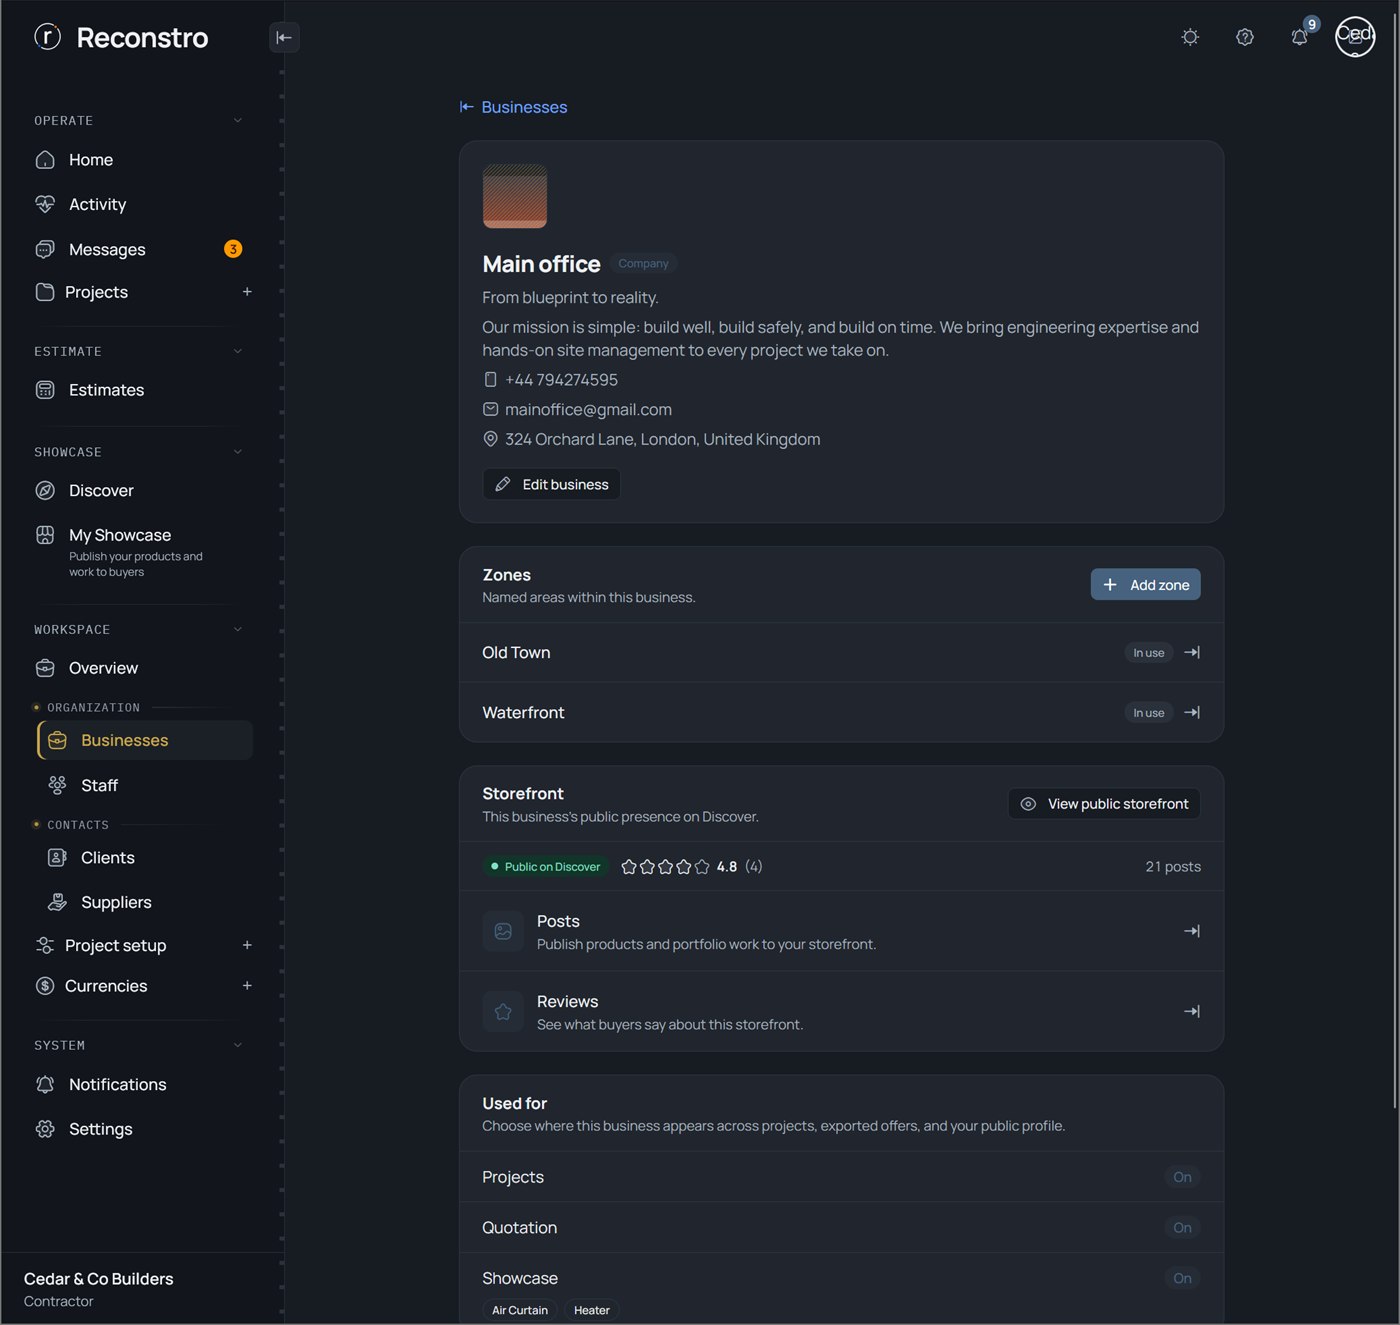
- Open Organization → Businesses.
- Your default Main office is already there. Open it, or press + Office to add another.
- Fill in name, type (Company / Office / Individual), address and contact details.
- Under Used for, choose where it appears: Projects, Quotation (letterhead on offers), and Showcase (public storefront).
- Save. It's now selectable when you create a project or an estimate.
The three "Used for" switches — explained
You fill in a business's details once, then flip three independent switches to decide where it may appear. Turn on any combination.
| 🧱 Projects | 📄 Quotation | 🏬 Showcase | |
|---|---|---|---|
| What the switch does | Lets this business be the office / branch on a project | Makes it the letterhead on your exported offers | Gives it a public storefront on Discover |
| Who sees it | You & your team (internal) | Your project owner (on the offer they receive) | The public & buyers (on Discover) |
| Turn it on when… | this office actually runs jobs | you send branded quotes from this entity | you want to be found and sell publicly |
| It unlocks | Zones + project assignment | Your name, logo & address on the offer | Posts, reviews, ratings & categories |
| Cedar & Co example | "Main office" runs the London projects | Offers go out as "Cedar & Co Builders, London" | Storefront: 4.8★, 21 posts, Air Curtain / Heater |
Short version: Manage businesses
2.2 Zones
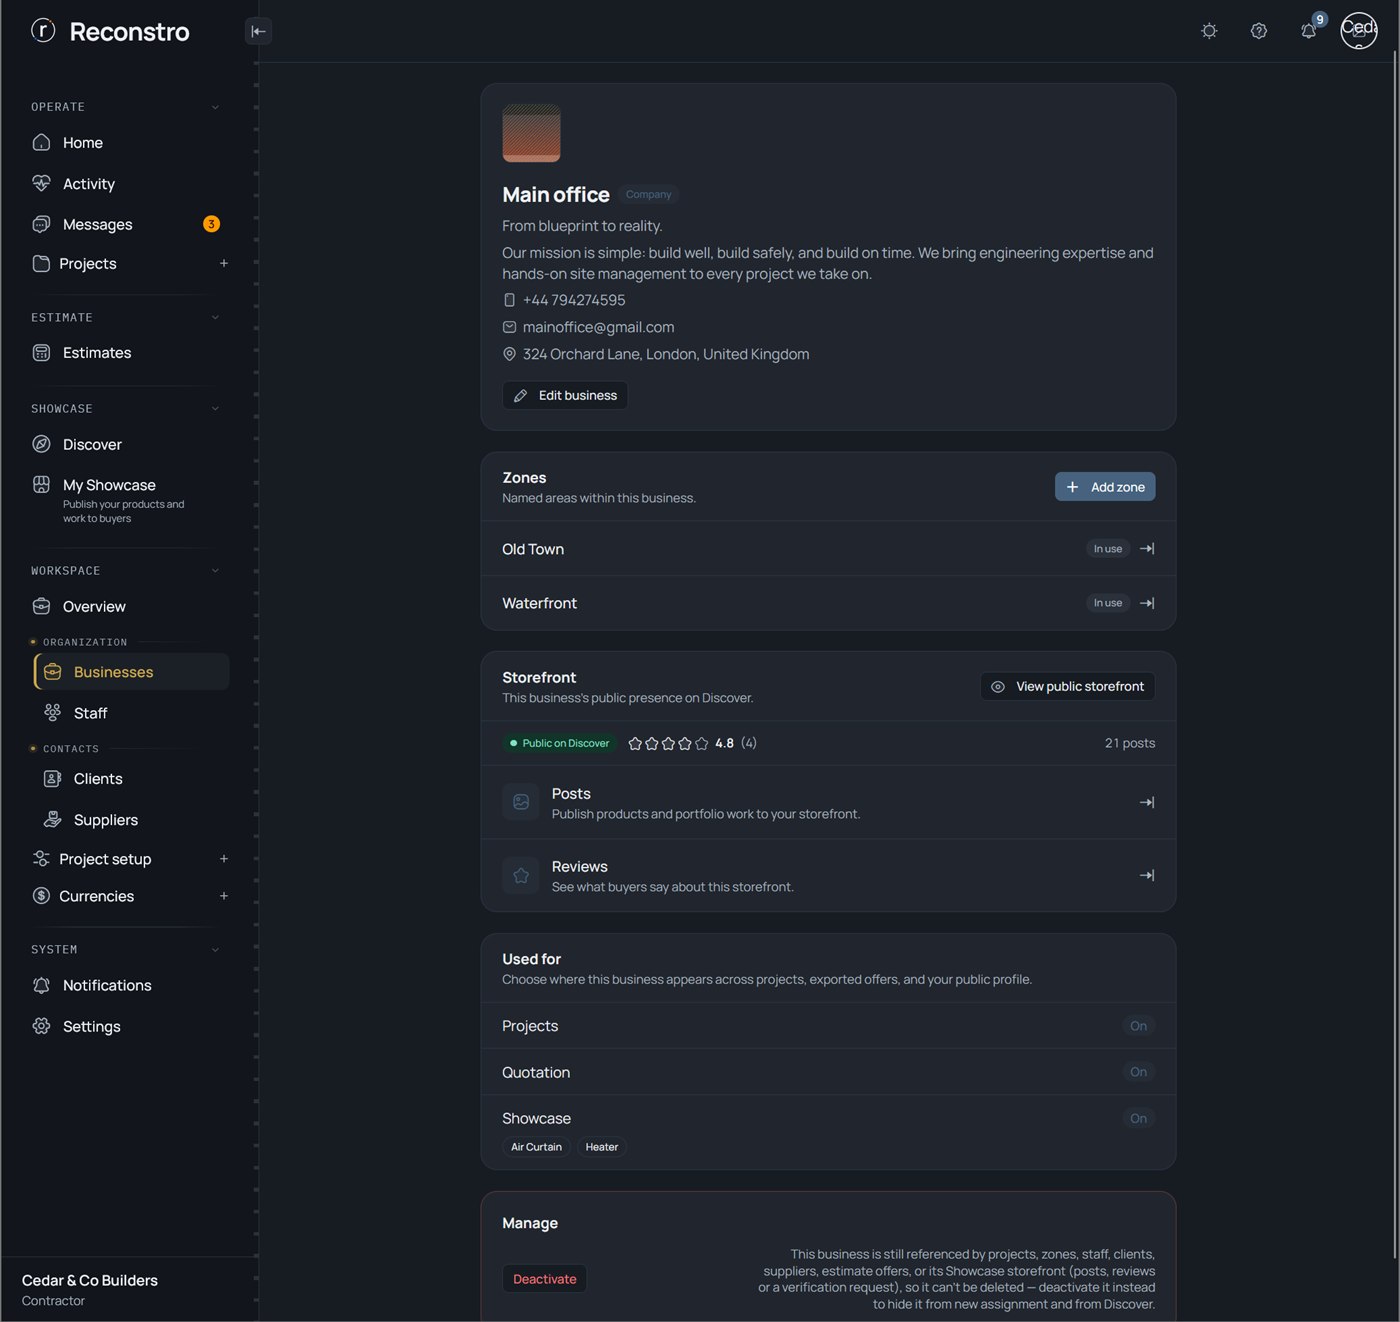
A zone is a named area inside one business — a label for where a job is: a district, site or neighbourhood like "Old Town" or "Waterfront". You split the city or region you work in into the patches you actually operate in, then tag each project with one.
When you work across several areas or sites and want to organise, filter and report your projects by location. If you only ever work in one place, a single zone is plenty.
Step by step
- Open a business under Organization → Businesses — one that's turned on for Projects (zones only live under a project-running business).
- In the Zones card press + Add zone, give it a name such as "Waterfront", and save.
- Optional: draw the zone's outline on the map. Reconstro then centres a project's address map there and gently warns if an address falls outside the zone — a helpful nudge, never a hard block.
- When you create a project, choose its Zone. From then on every project is tagged by area.
- Later, filter and group projects by zone — for example "show everything in Waterfront".
Short version: Manage zones
2.3 Storefront (public on Discover)
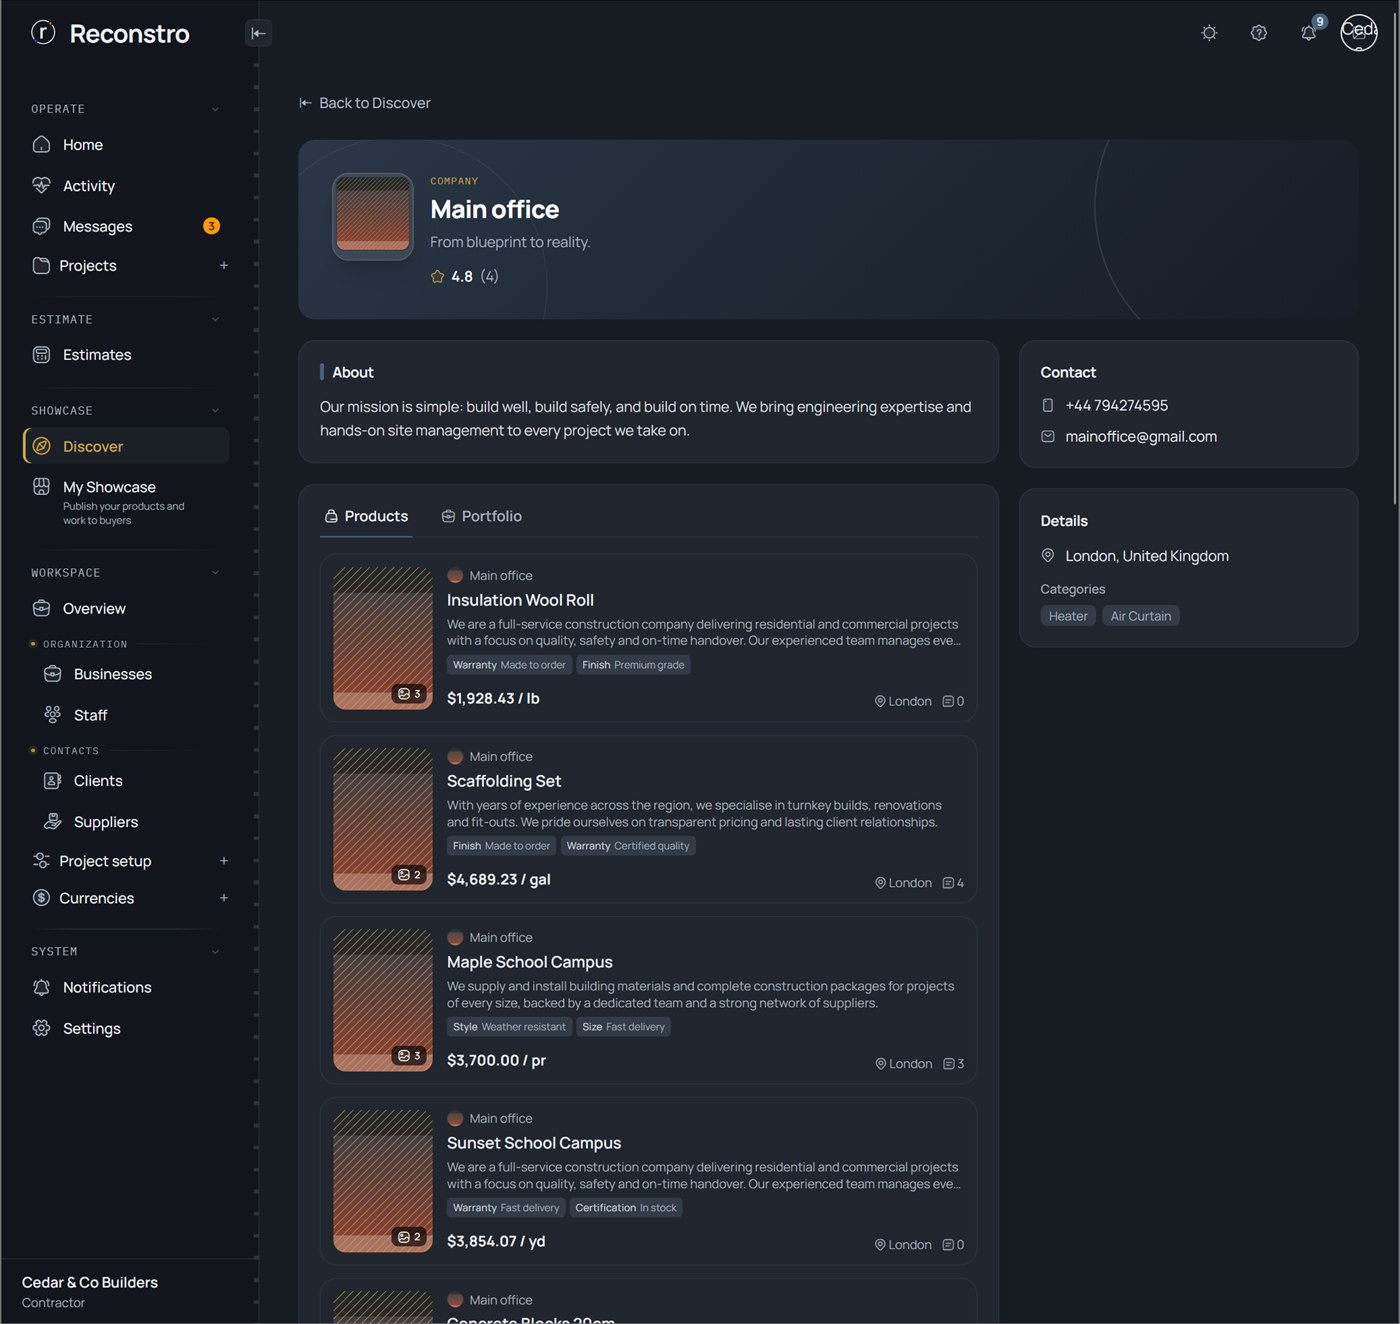
The public face of a business on Reconstro's Discover feed — a storefront with your posts, star reviews and a verified badge.
When you want to market your work publicly and let other businesses find, review and message you.
Step by step
- Open a business and find the Storefront card.
- Turn on Public on Discover, then press View public storefront to see it as visitors do.
- Add Posts (products and portfolio work), request Verification, and read your Reviews.
2.4 Staff & permissions
Logins for your team, each with permissions that control exactly what they can see and do.
When you bring people on and want them working in Reconstro with the right level of access.
Step by step
- Open Organization → Staff and press + Add staff.
- Enter their details and tick the permissions they should have.
- Reconstro creates the login and shows you a secure hand-off (copy / WhatsApp / email) to send them.
- Toggle a staff member active or inactive at any time.
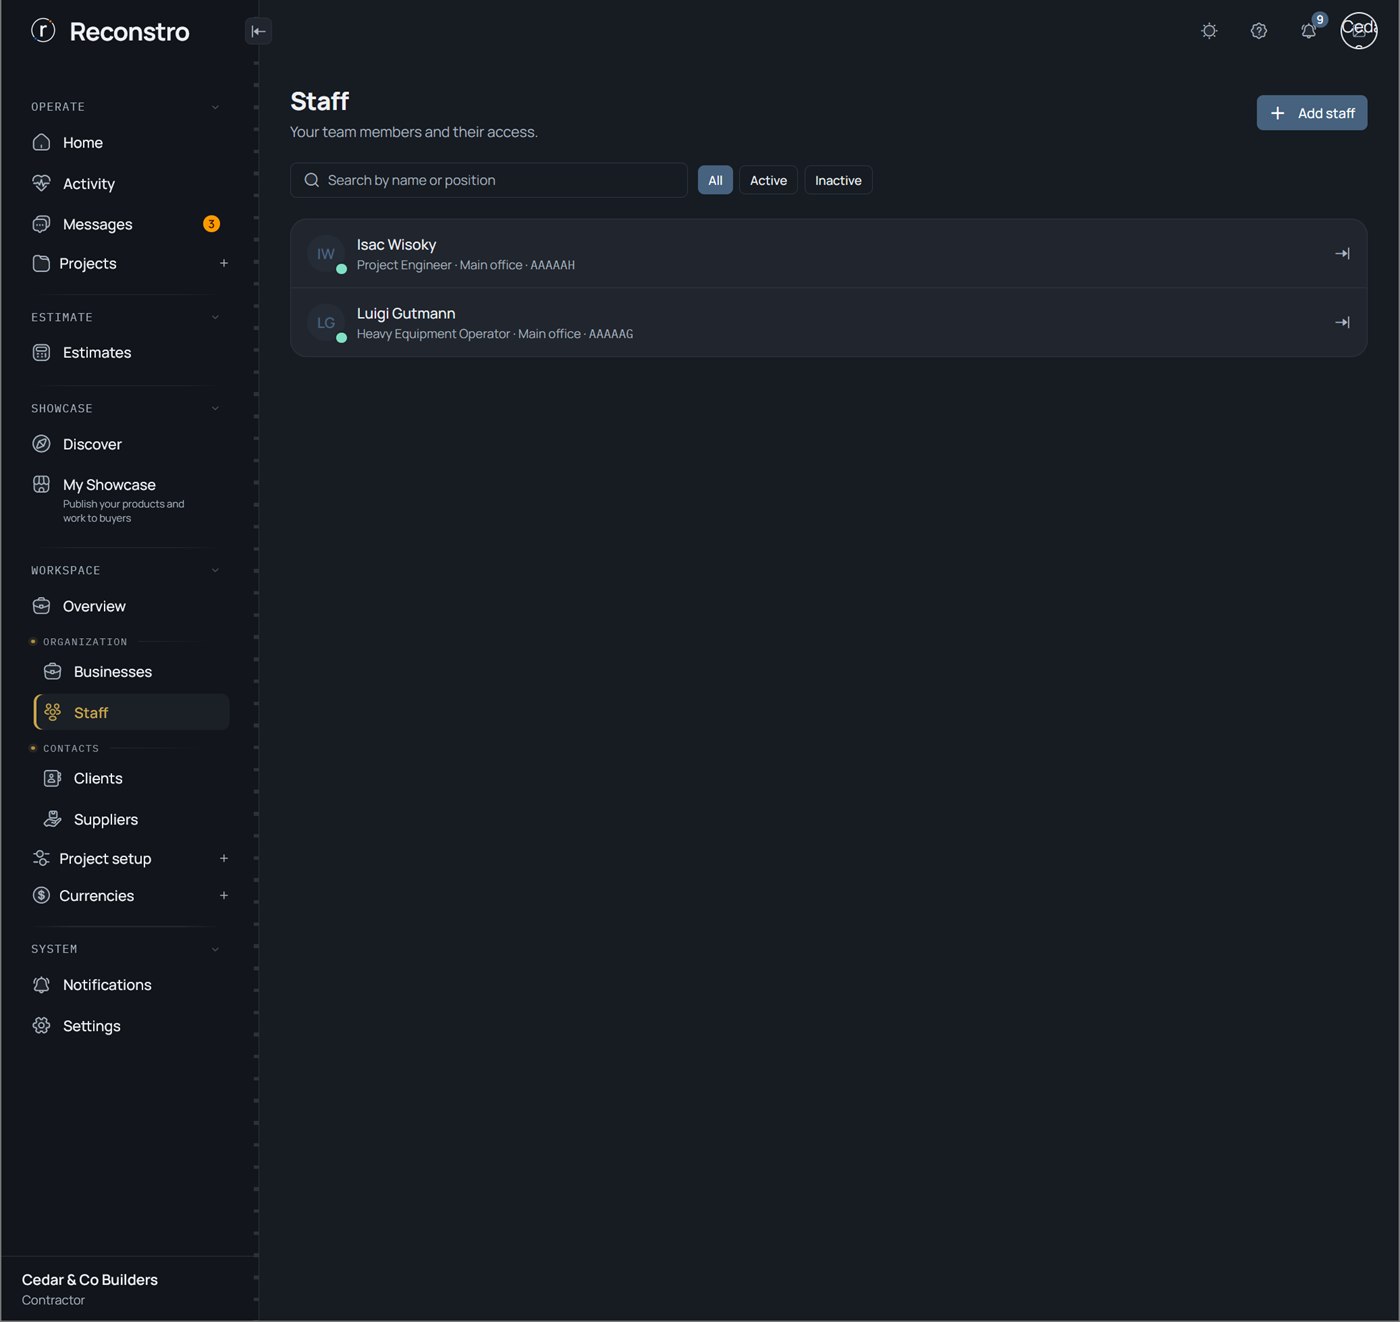
Short version: Add staff
2.5 Project owners
The people or companies you build for. A project owner can be attached to projects and invited to a read-only project portal.
Before (or while) creating a project, so the job is tied to the person paying for it.
Step by step
- Open Contacts → Project owners and press Add.
- Enter name, phone, email and address, then save.
- The project owner is now selectable as the owner of a project.
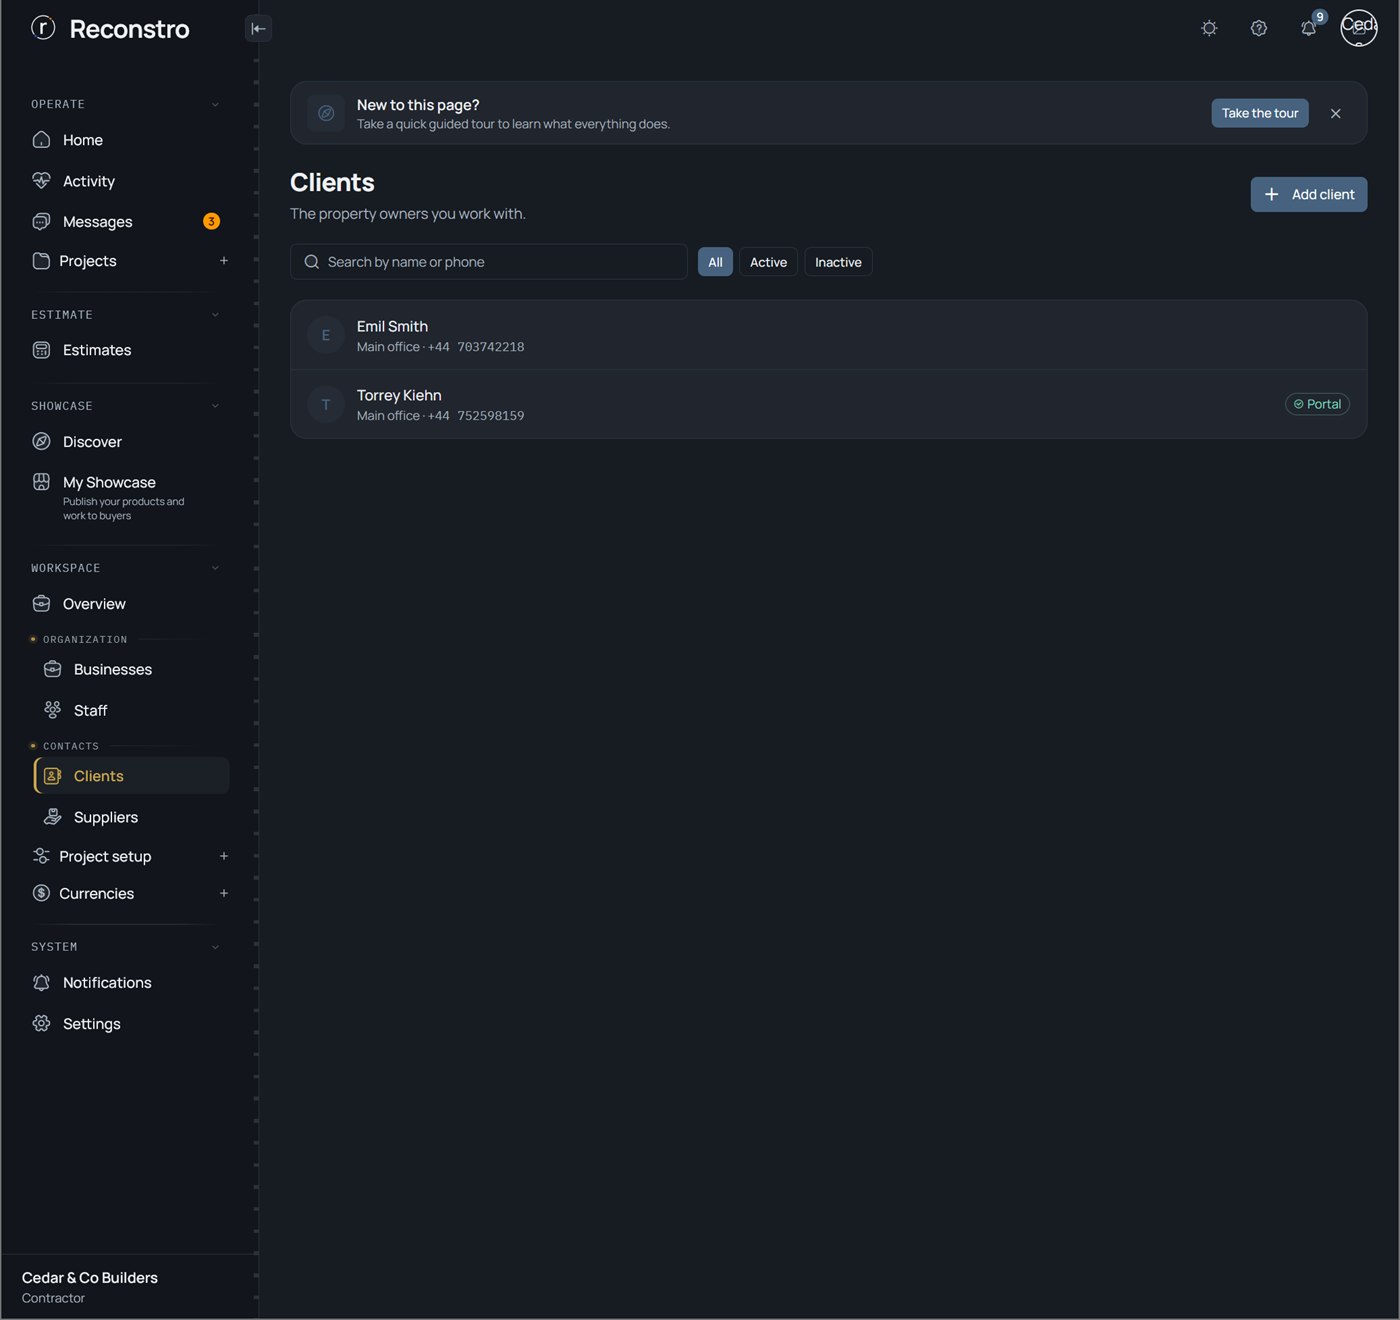
Short version: Add a project owner
2.6 Suppliers
The vendors you buy materials and services from. Purchases and payments are recorded against a supplier, giving you a running statement per supplier.
Before recording purchases, so every expense links to who you bought it from.
Step by step
- Open Contacts → Suppliers and press Add.
- Enter the supplier's details (and optionally link them to their public storefront).
- Save — the supplier is now selectable when you record a purchase.
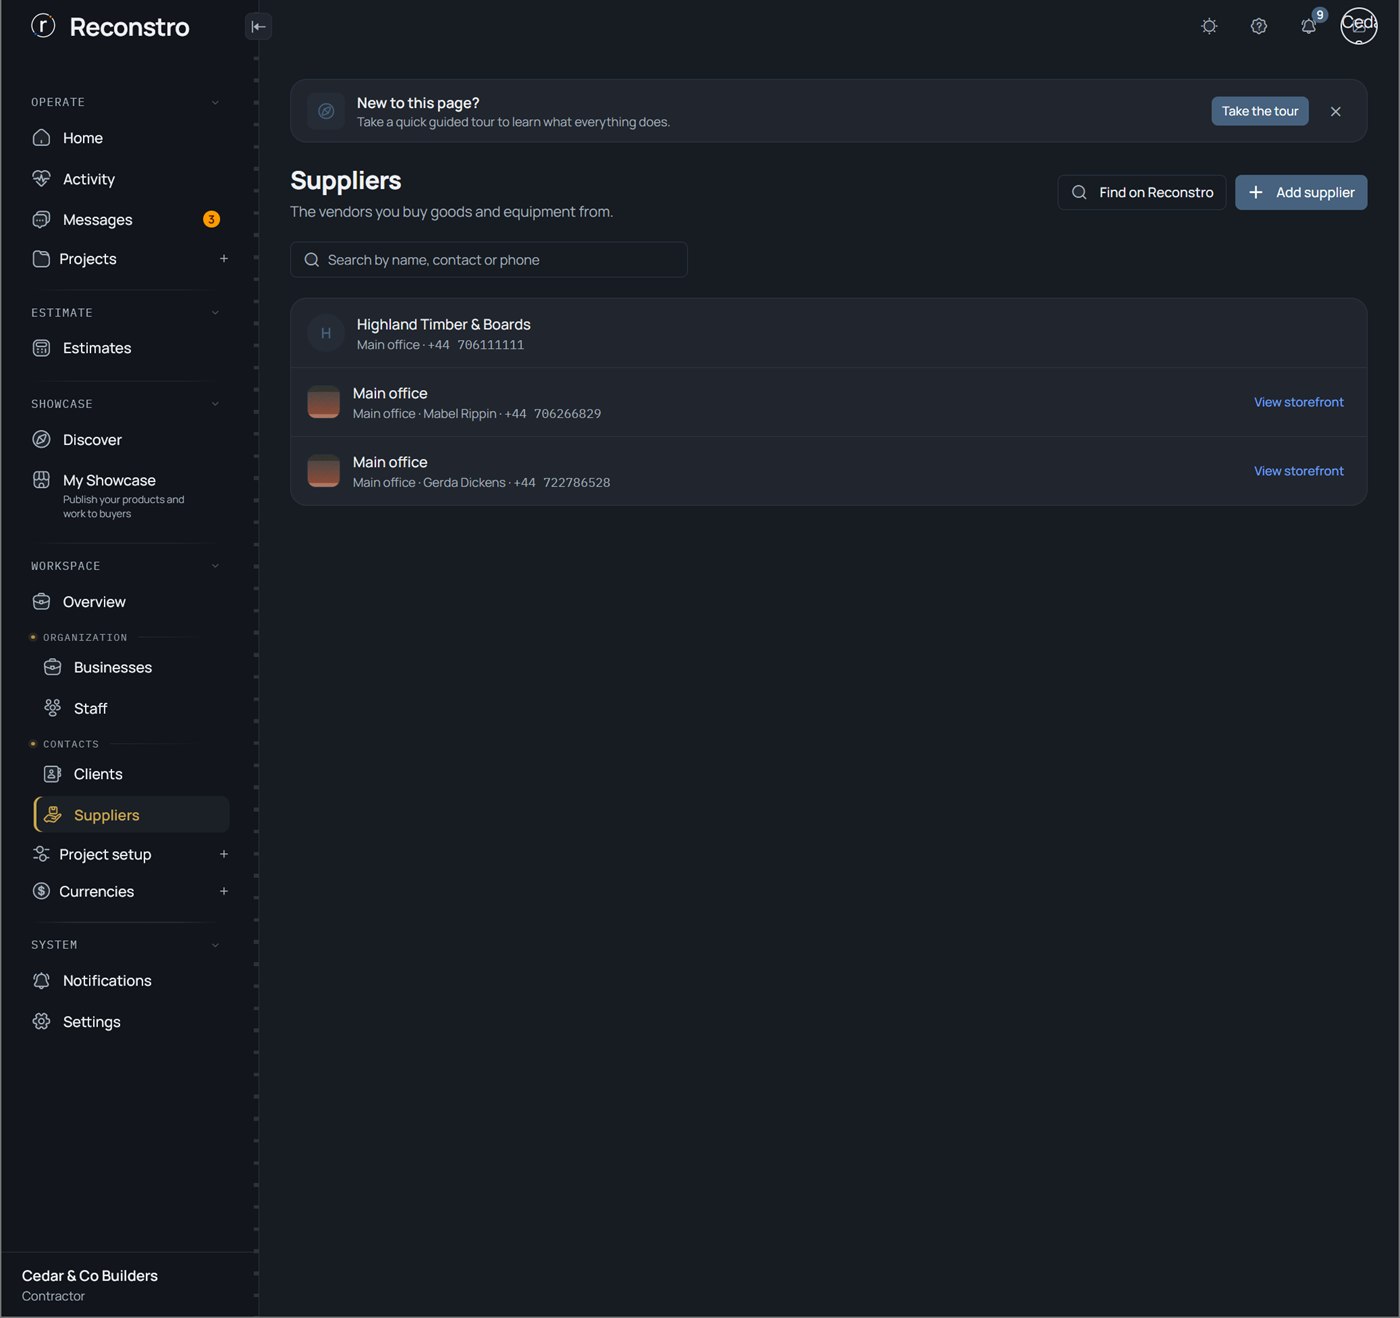
Short version: Add a supplier
2.7 Currencies & exchange rates
The currencies you work in — one default (base) plus any additional ones — and the exchange rates between them.
When a project takes payments or pays suppliers in more than one currency.
Step by step
- Open Currencies and press + Add currency to activate the ones you use (e.g. GBP, EUR, USD).
- Open Exchange rates → Manage and set the rate for each non-default currency.
- Those currencies are now selectable on projects and transactions.
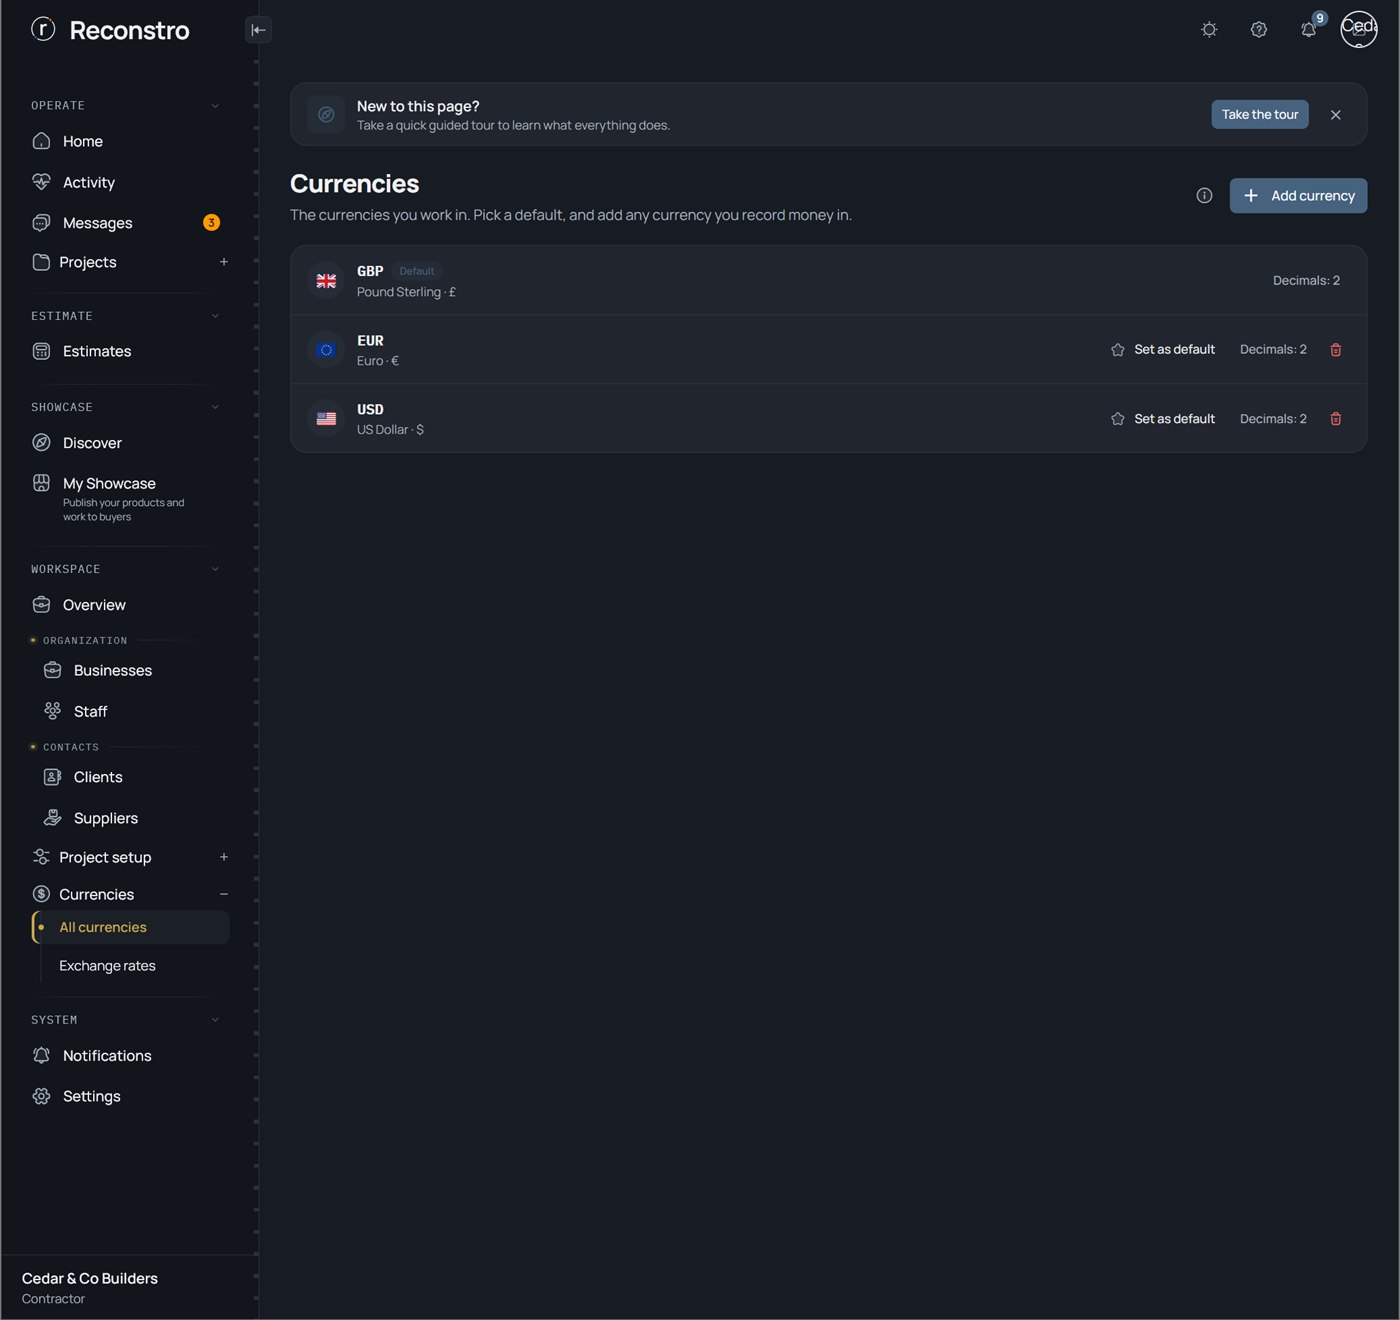
Short version: Add a currency
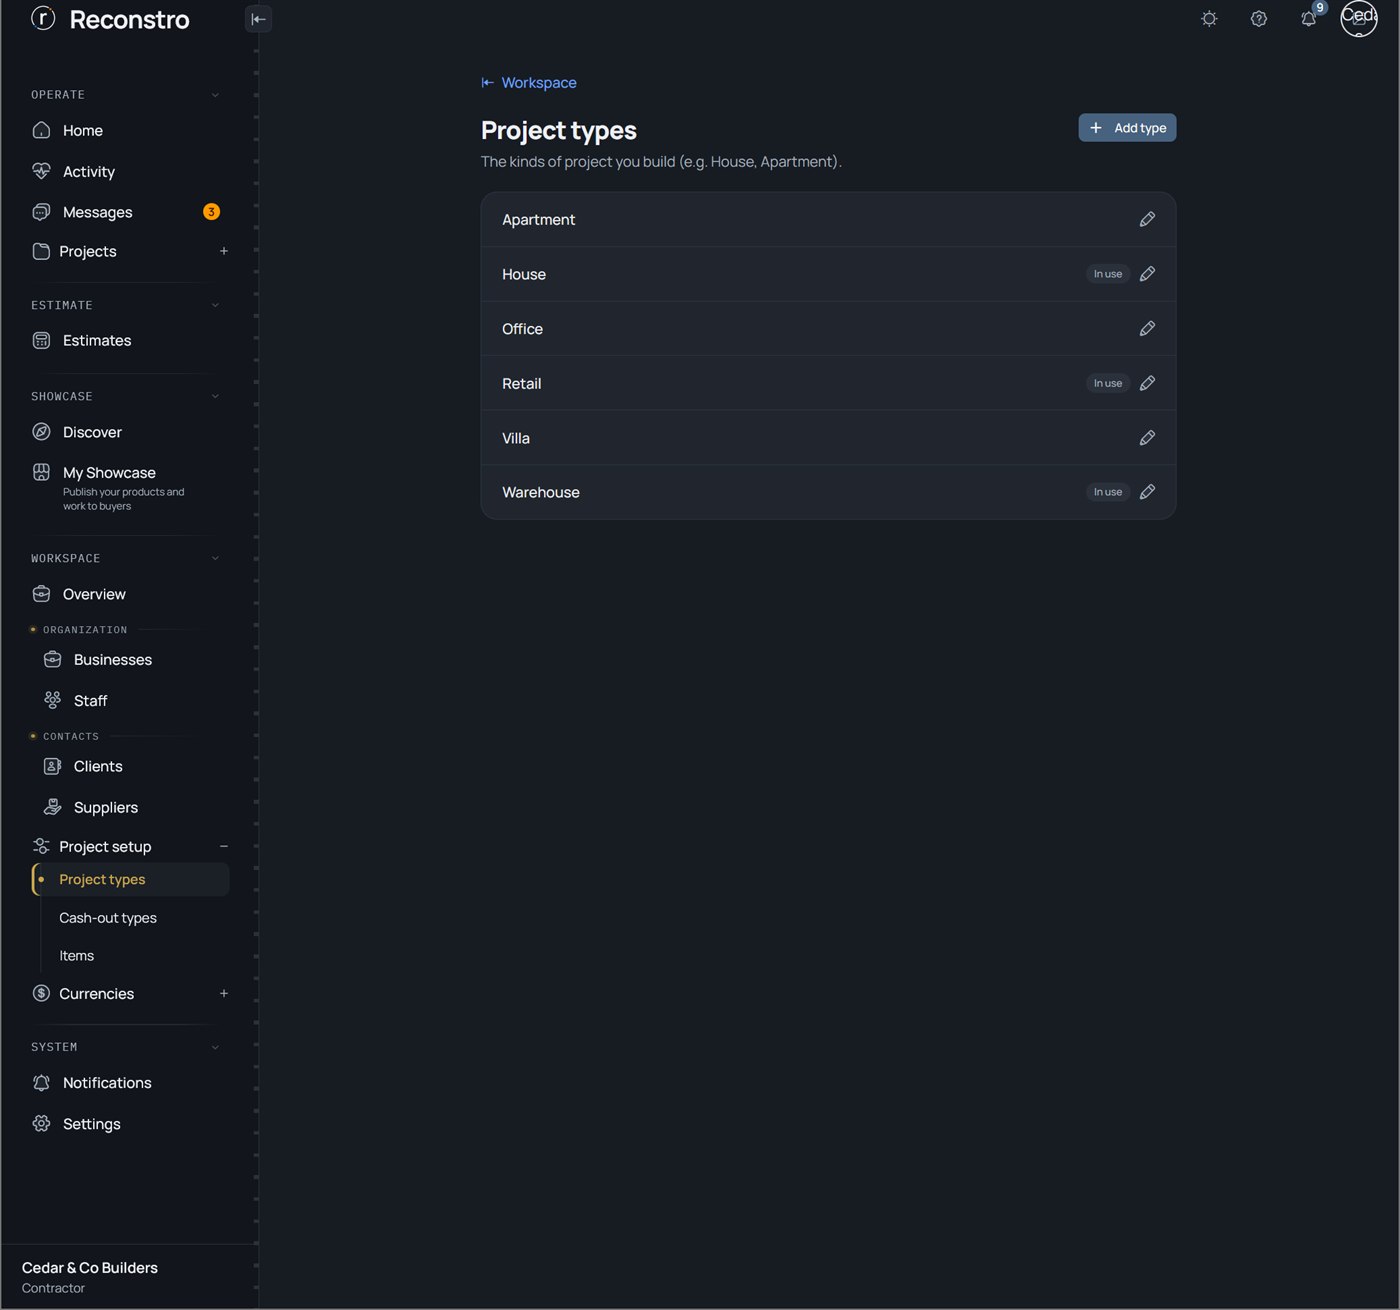
2.8 Project types & cash-out types
Your own dropdown lists — the kinds of project you build (House, Villa, Office…) and the categories of expense (fuel, wages, permits…).
Once, up front, to tailor the choices so your projects and expenses are categorised your way.
Step by step
- Open Project setup in the sidebar.
- Under Project types and Cash-out types, add or edit the entries you need.
- They now appear as options when creating projects and recording money out.
Everything about a project
A project is where all the work lives — its money, stages, tasks, activity, team and documents in one place. This section covers every part in detail.
3.1 What a project is
A project is one piece of work — a build, a fit-out, a design, a client engagement. It holds its budget and cash flow, its work broken into stages, its tasks and site activity, its documents, and the team assigned to it. Everything about that job is under one roof.
You create one project per job. It's the thing you open every day to see money in and out, progress, and what's next.
3.2 Create a project
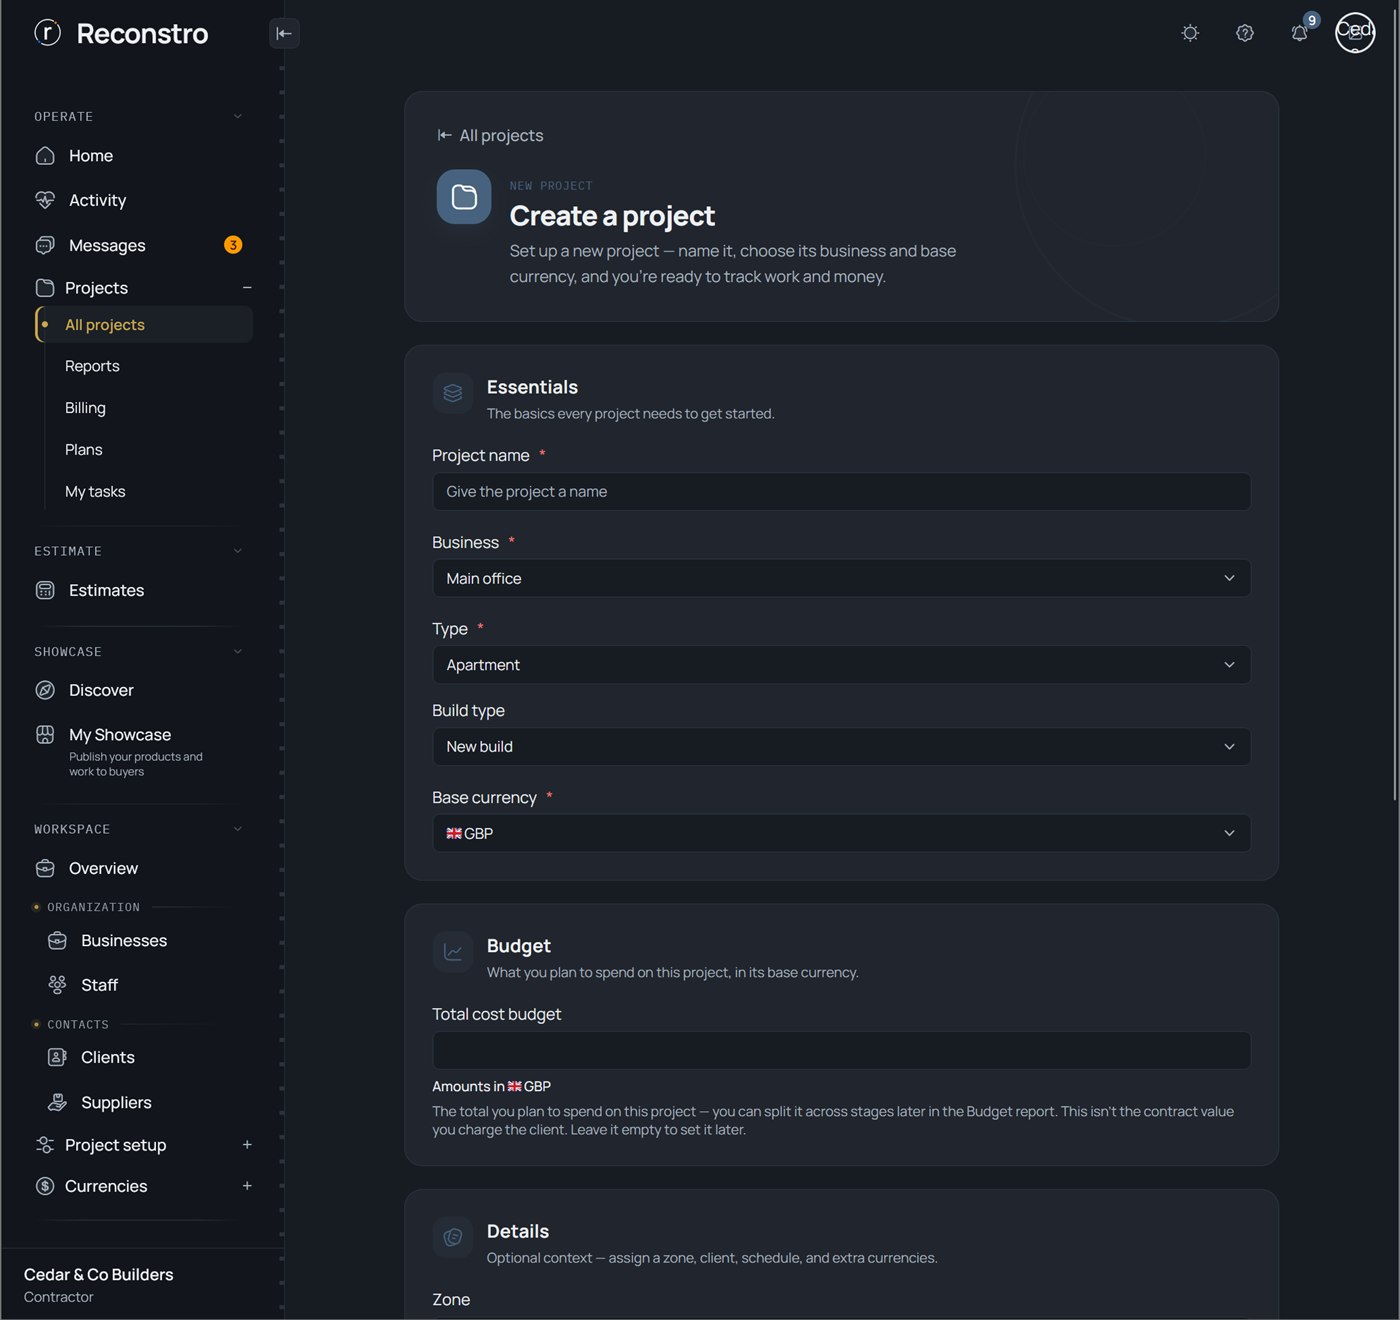
Starting a new job — giving it a name, the business it belongs to, its type, location and currency.
Every time you win or start a new job.
Step by step
- Press New project (on Home or in Projects).
- Enter a title, choose the business and project type, and optionally a zone.
- Pick the base currency and (optionally) additional currencies.
- Set start/end dates, the project owner (owner), and whether it's New build or Renovation.
- Save — the project is created and opens on its overview.
Short version: How to create a project
3.3 Activate a project
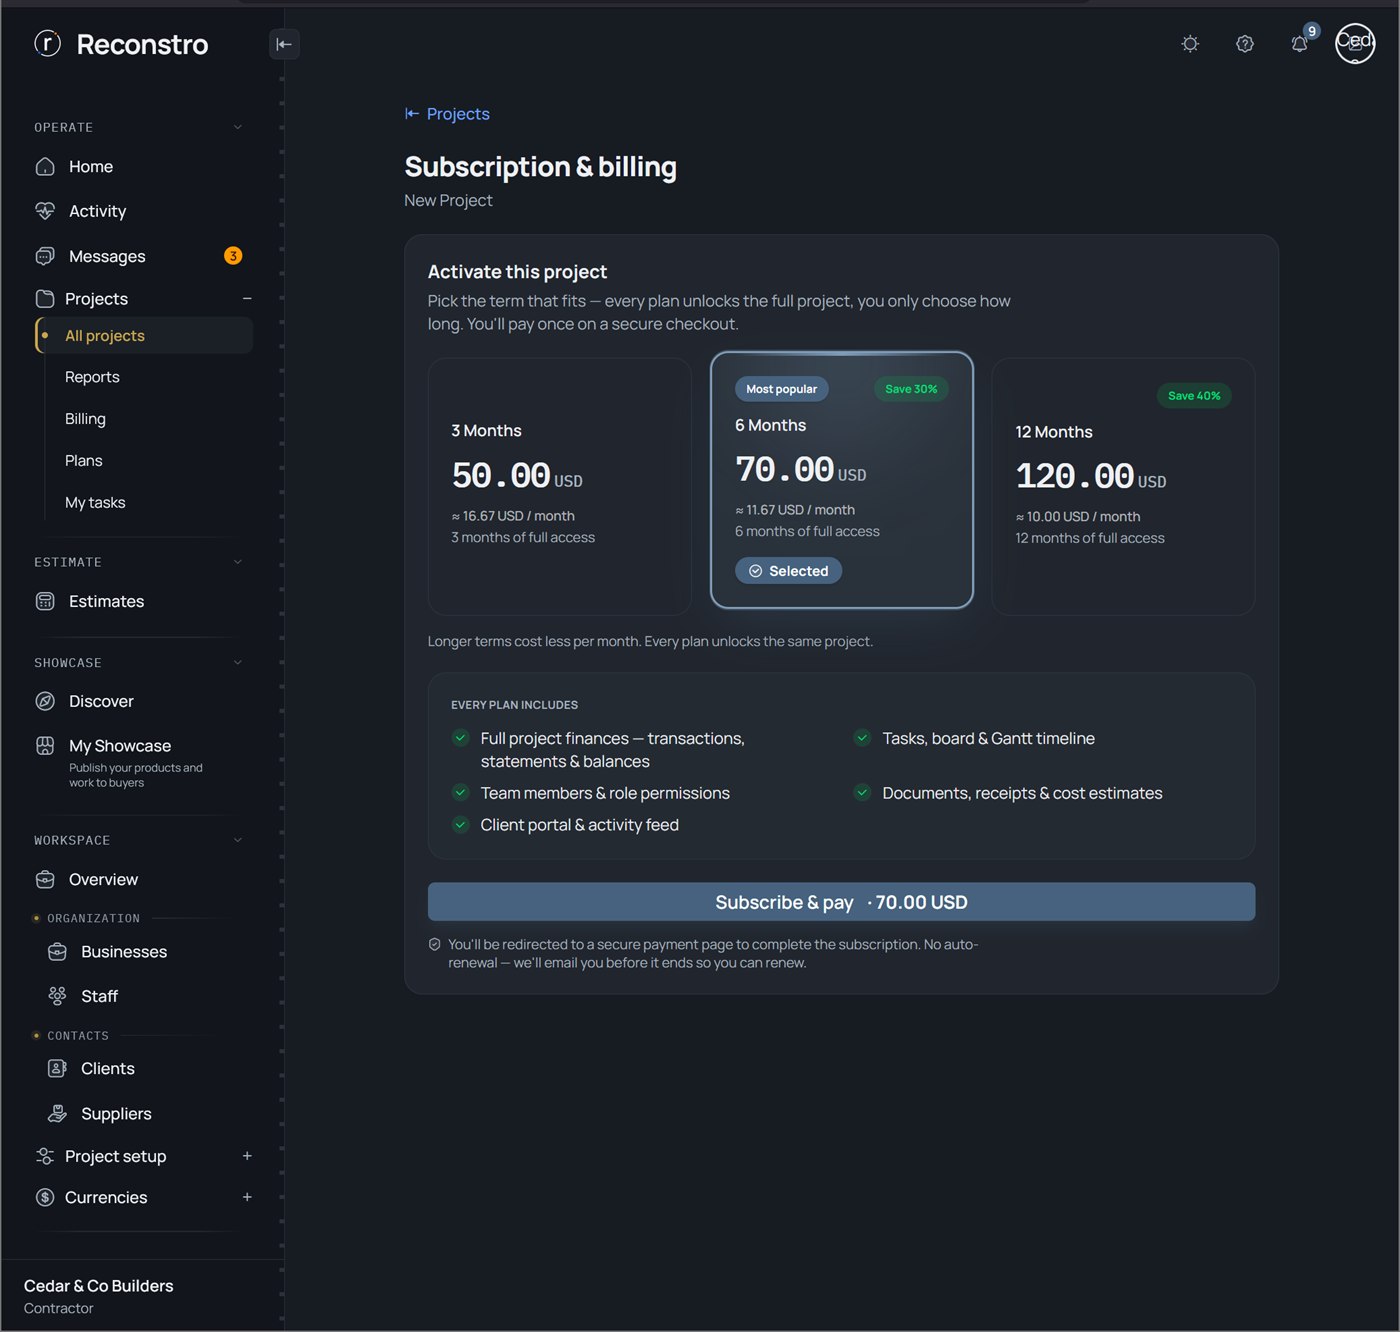
Turning a project "live" with a plan. Your first project is free to try; further projects are activated with a subscription.
Right after creating a project, before you start recording money and progress on it.
Step by step
- On a new project you'll see an Activate prompt.
- Choose a plan and complete the secure payment (or use your free first project / bundle allowance).
- Once active, an expiry card on the project shows how long it's covered, with a Renew option.
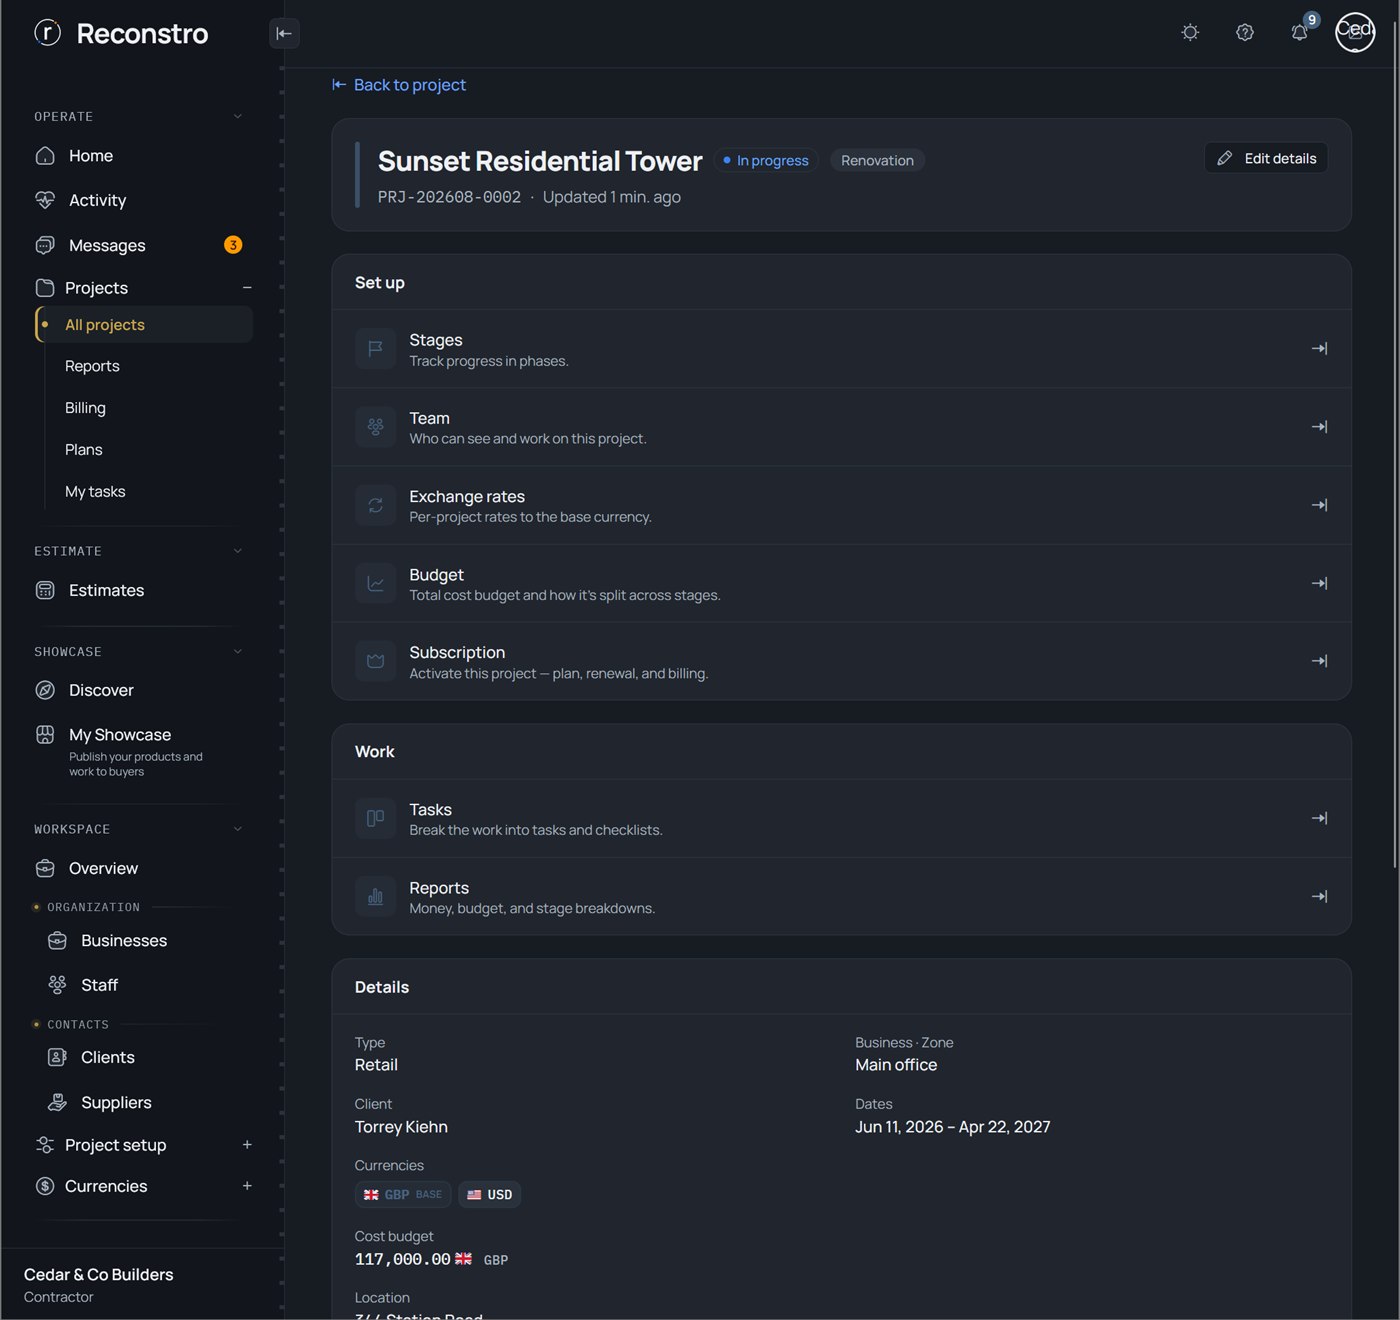
3.4 The project overview
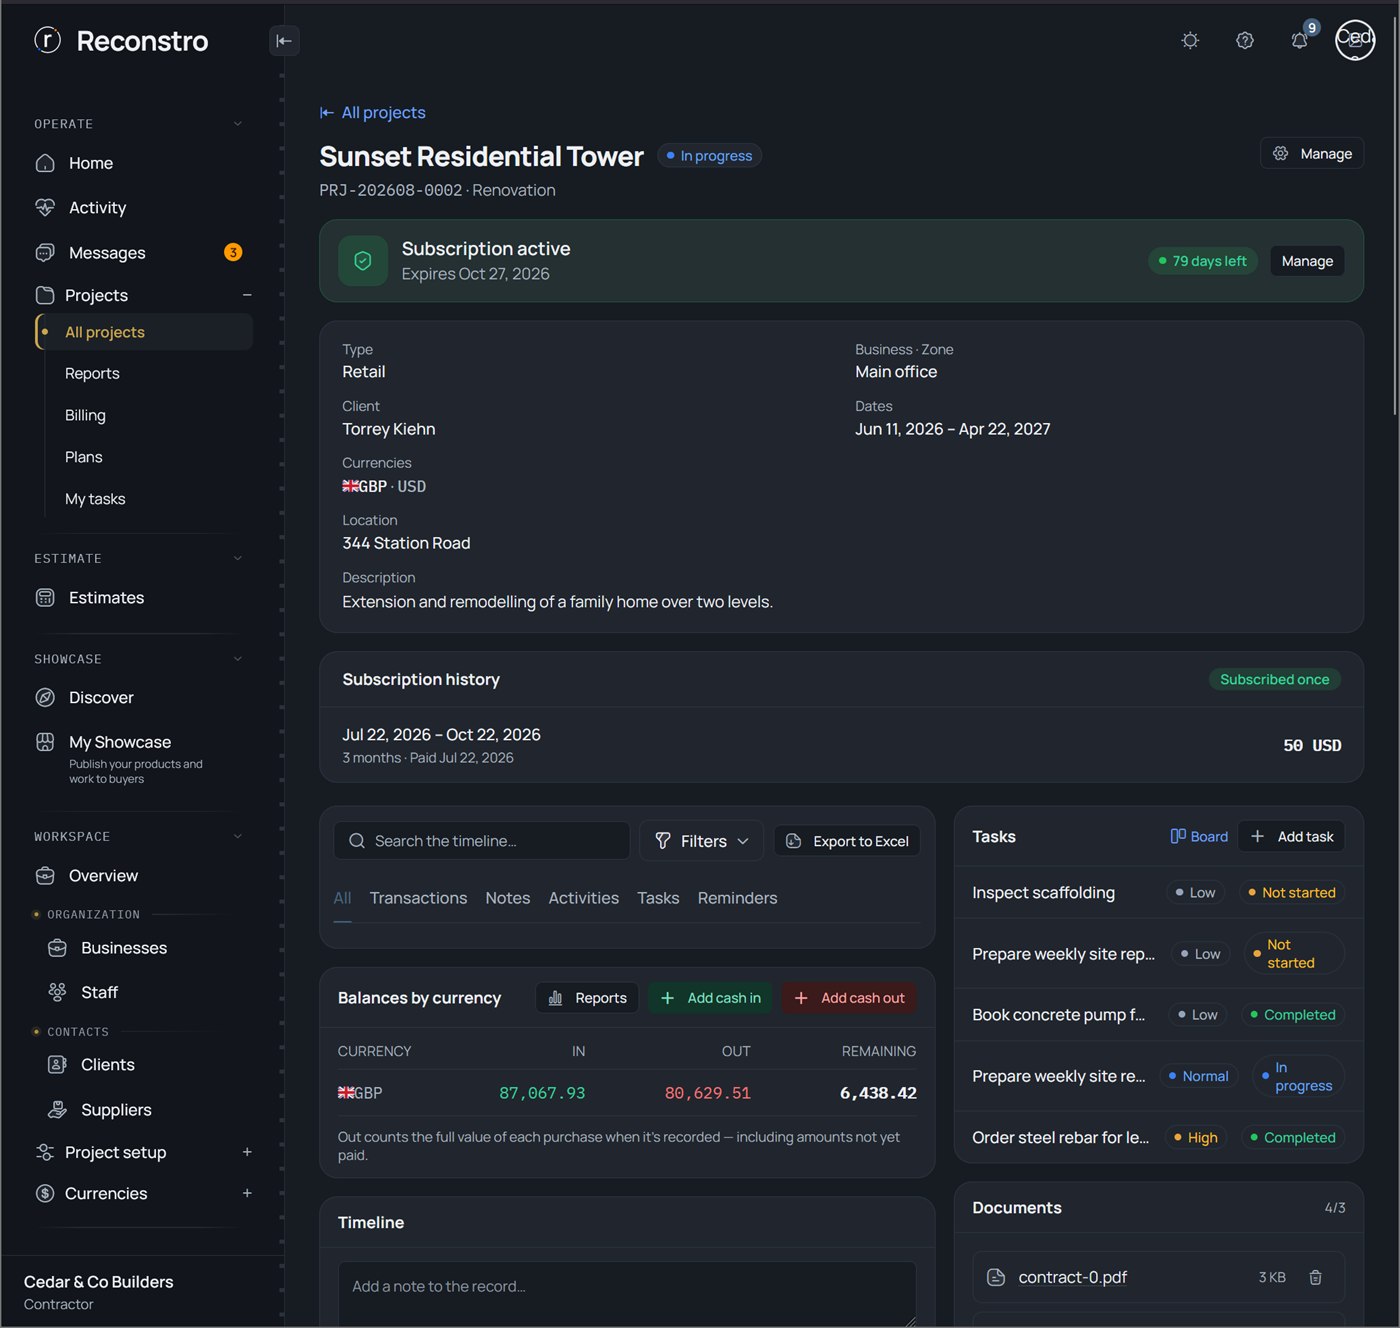
The project's home page — a summary of its money, stages, recent activity, tasks and key details, with tabs to everything else.
Every time you open a job — it's the dashboard for that one project.
Step by step
- Open Projects → All projects and select a project.
- Read the summary cards, then use the tabs to move between Money, Stages, Tasks, Activity, Documents and more.
3.5 Stages
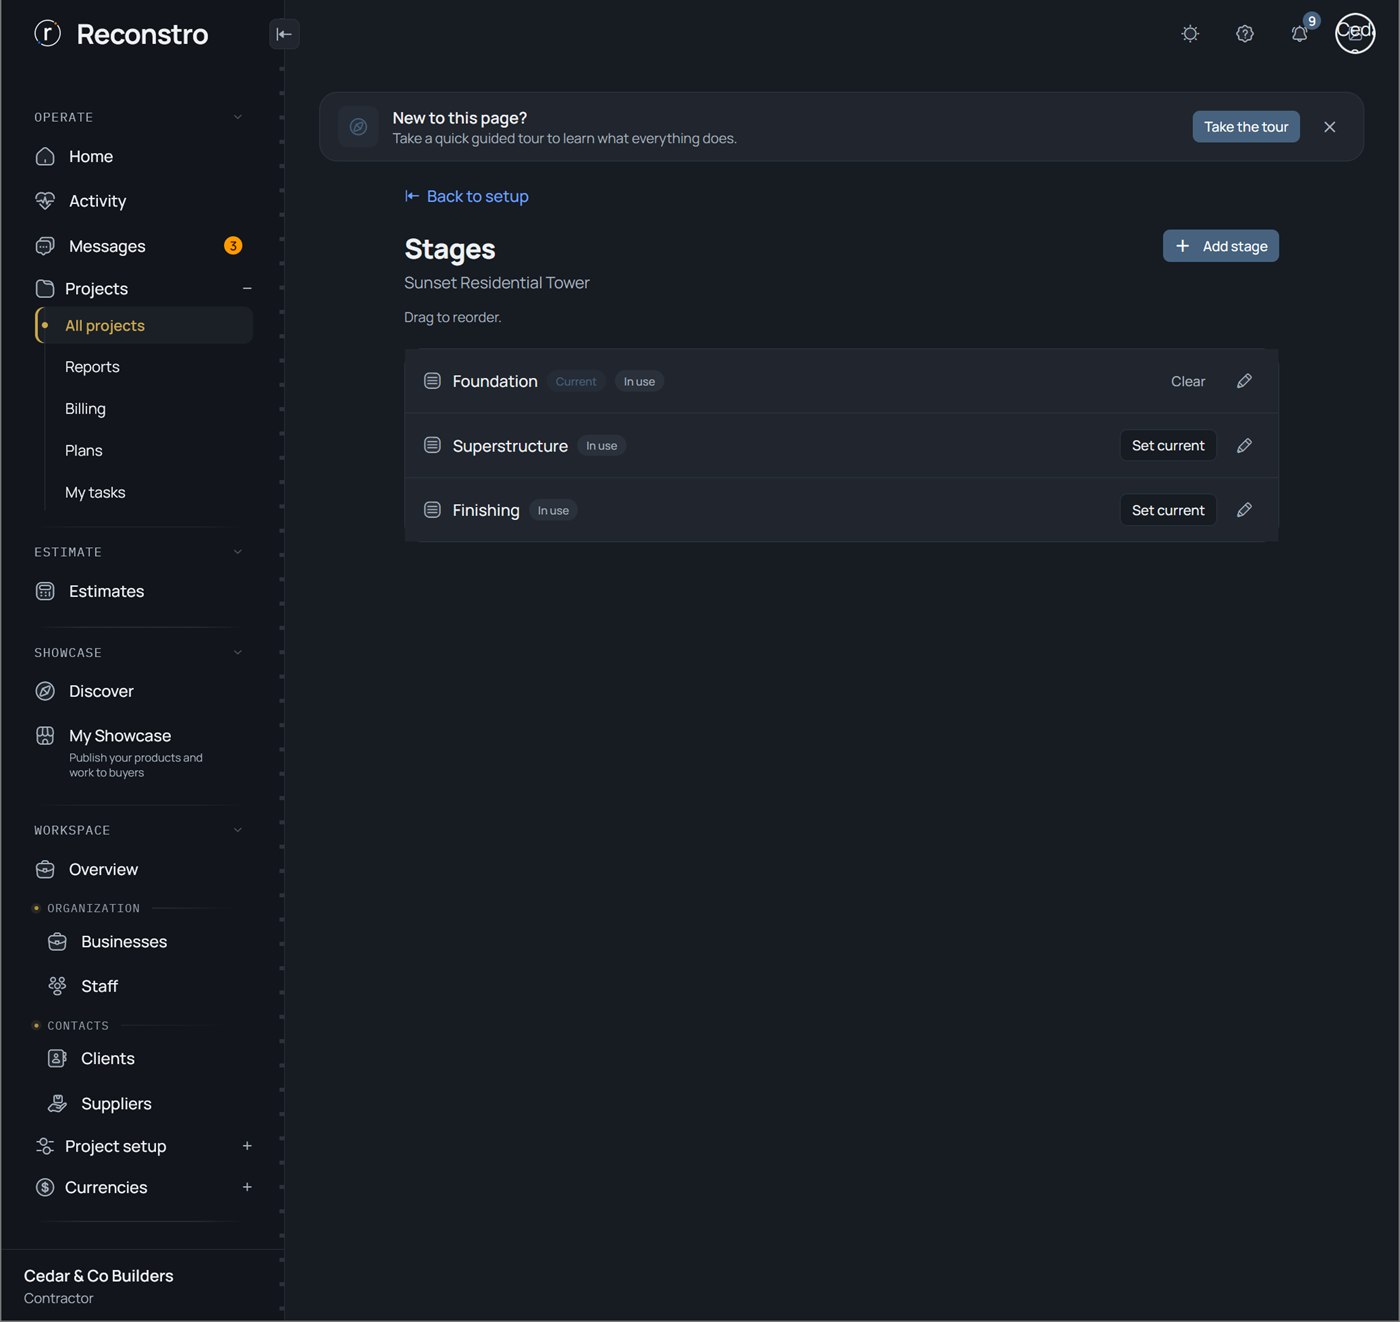
The phases of the build — Foundation, Superstructure, Finishing, and any you add. Work, costs and activity are grouped by stage.
From the start of every project — a "Foundation" stage is created automatically, and you organise the rest of the job around stages.
Step by step
- Open the project's Stages.
- Add stages, rename or reorder them to match your build sequence.
- Set the current stage so new tasks and activity default to it.
3.6 Activities
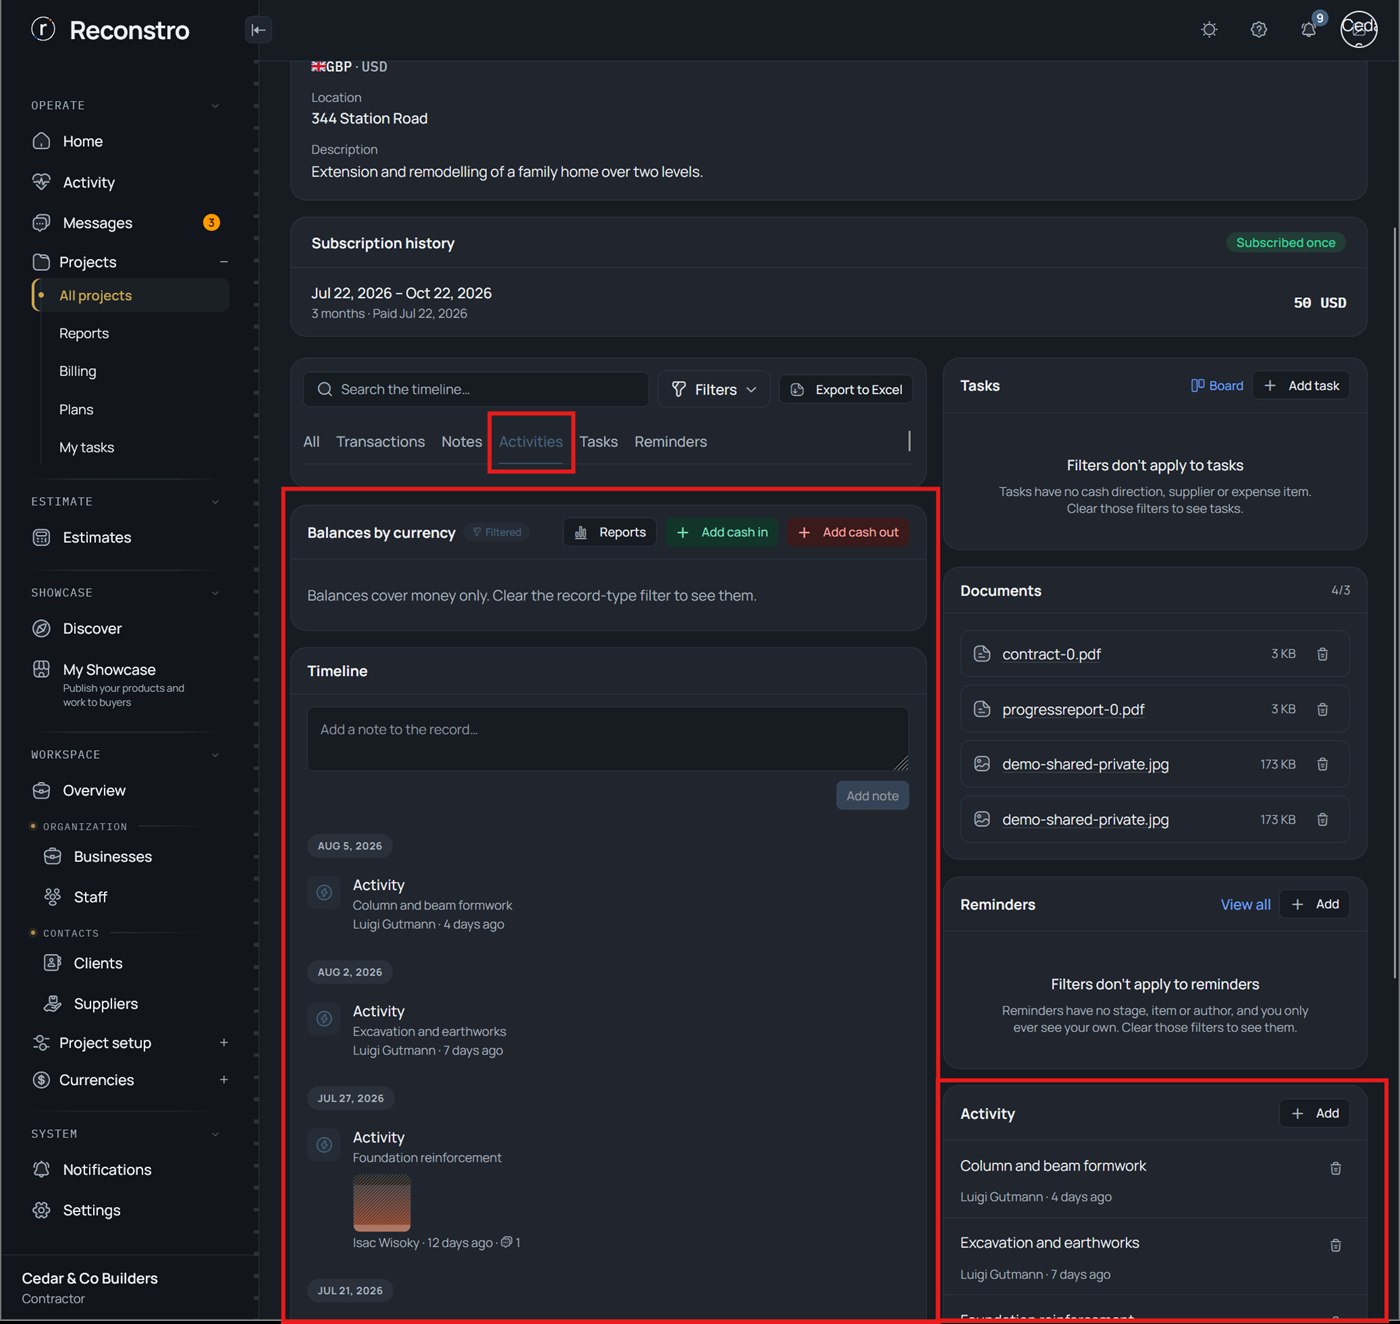
A running log of what happened on site — "Concrete pour completed", "Materials delivered" — each dated, attributed to a person and stage, and able to carry photos.
As work happens, to keep a visual, time-stamped record of progress for you and your project owner.
Step by step
- Open the project's Activity and press add.
- Write what happened, pick the stage, and attach site photos.
- Once saved, you see it in the project and in the company-wide activity feed.
3.7 Tasks
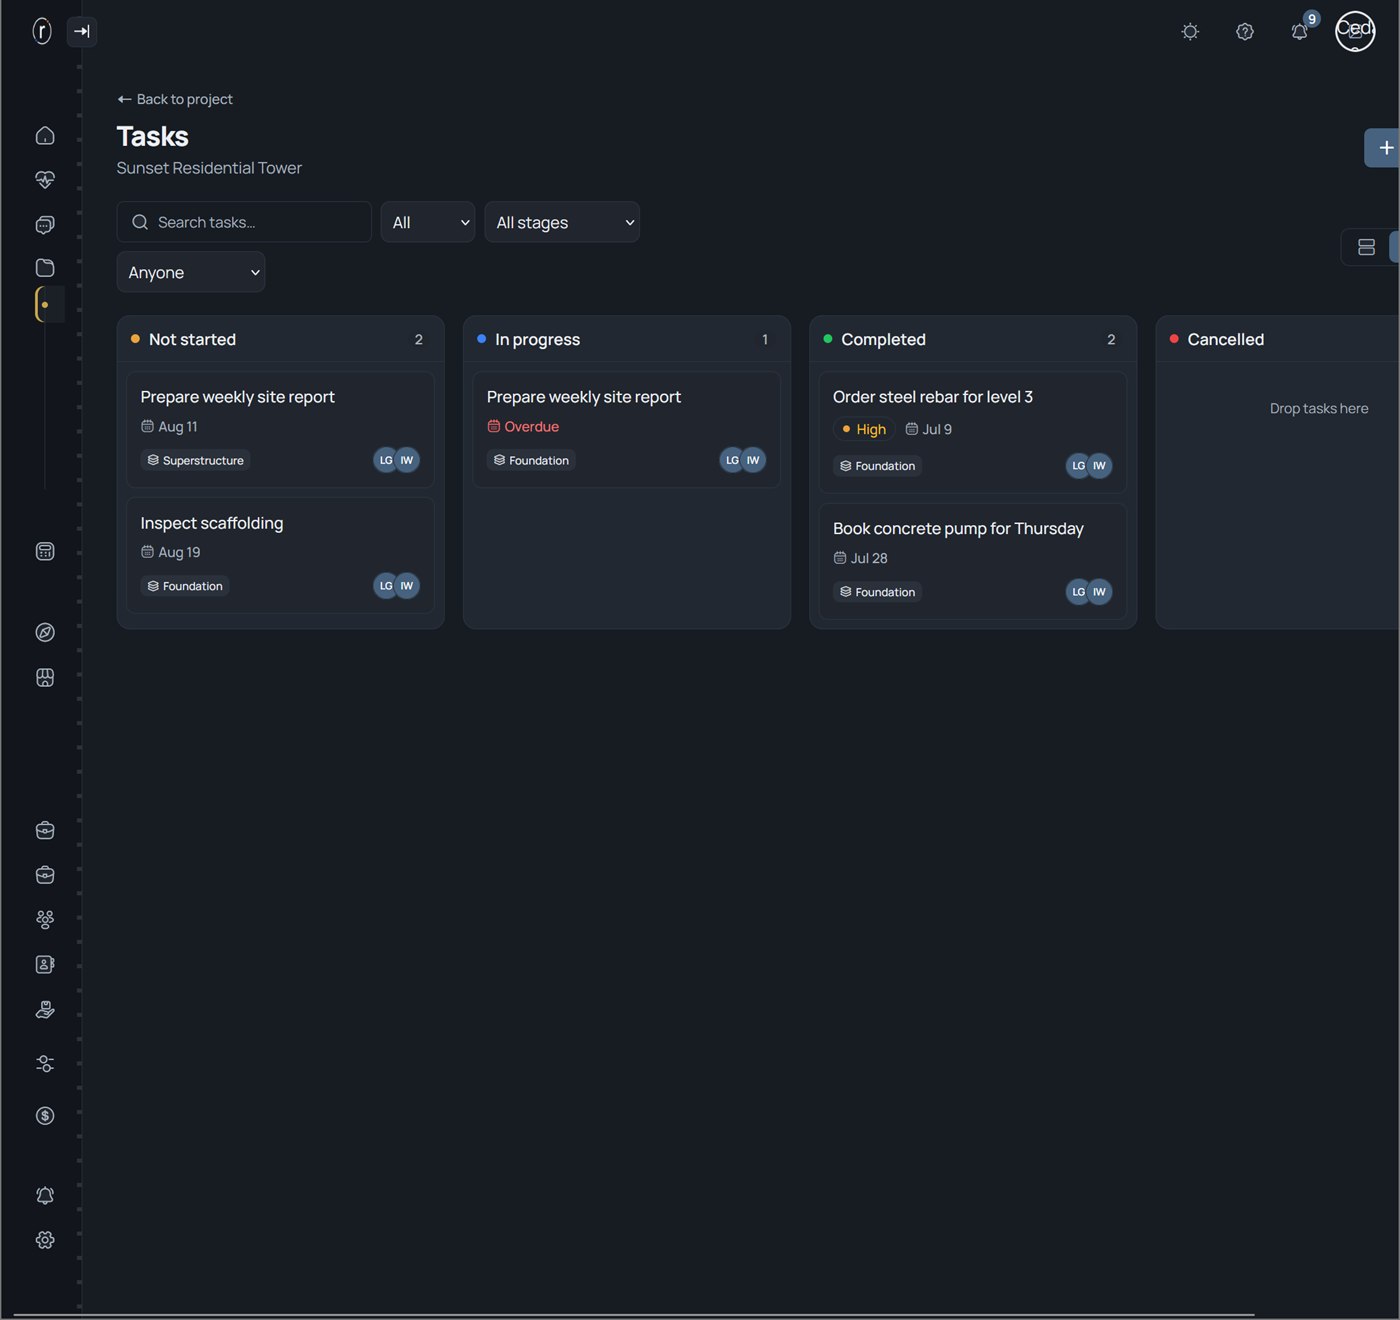
To-dos you assign to staff, each with a priority, start and due date, a status (Not started → In progress → Done) and its own comment thread.
To hand out and track work on a project so nothing is dropped.
Step by step
- Open the project's Tasks and press add.
- Give it a title, assign one or more staff, set priority, dates and stage.
- Track it as the status moves; discuss it in the task's comments.
Short version: Tasks and reminders
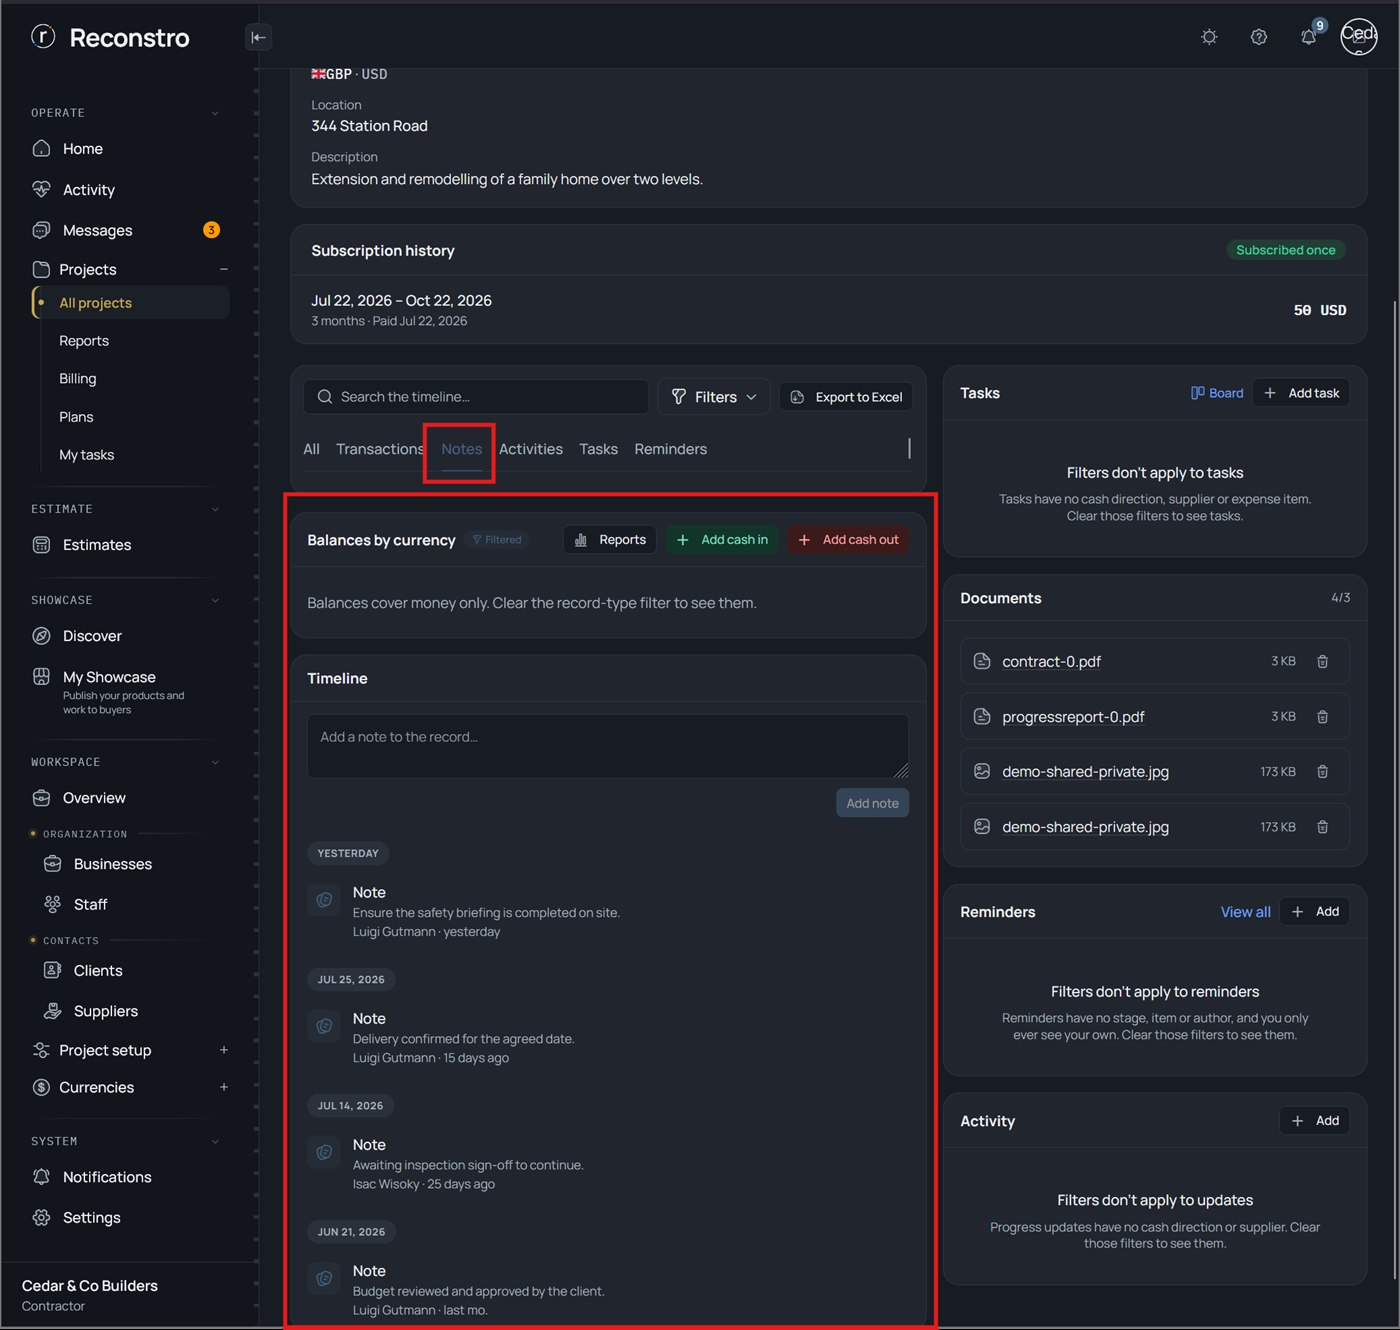
3.8 Notes
Quick written notes kept against a project and stage — decisions, reminders to yourself, things said on site.
Any time you want to jot something down that isn't a task or a formal activity.
Step by step
- Open the project and find Notes.
- Write the note, pick the stage, and save.
3.9 Money & the ledger
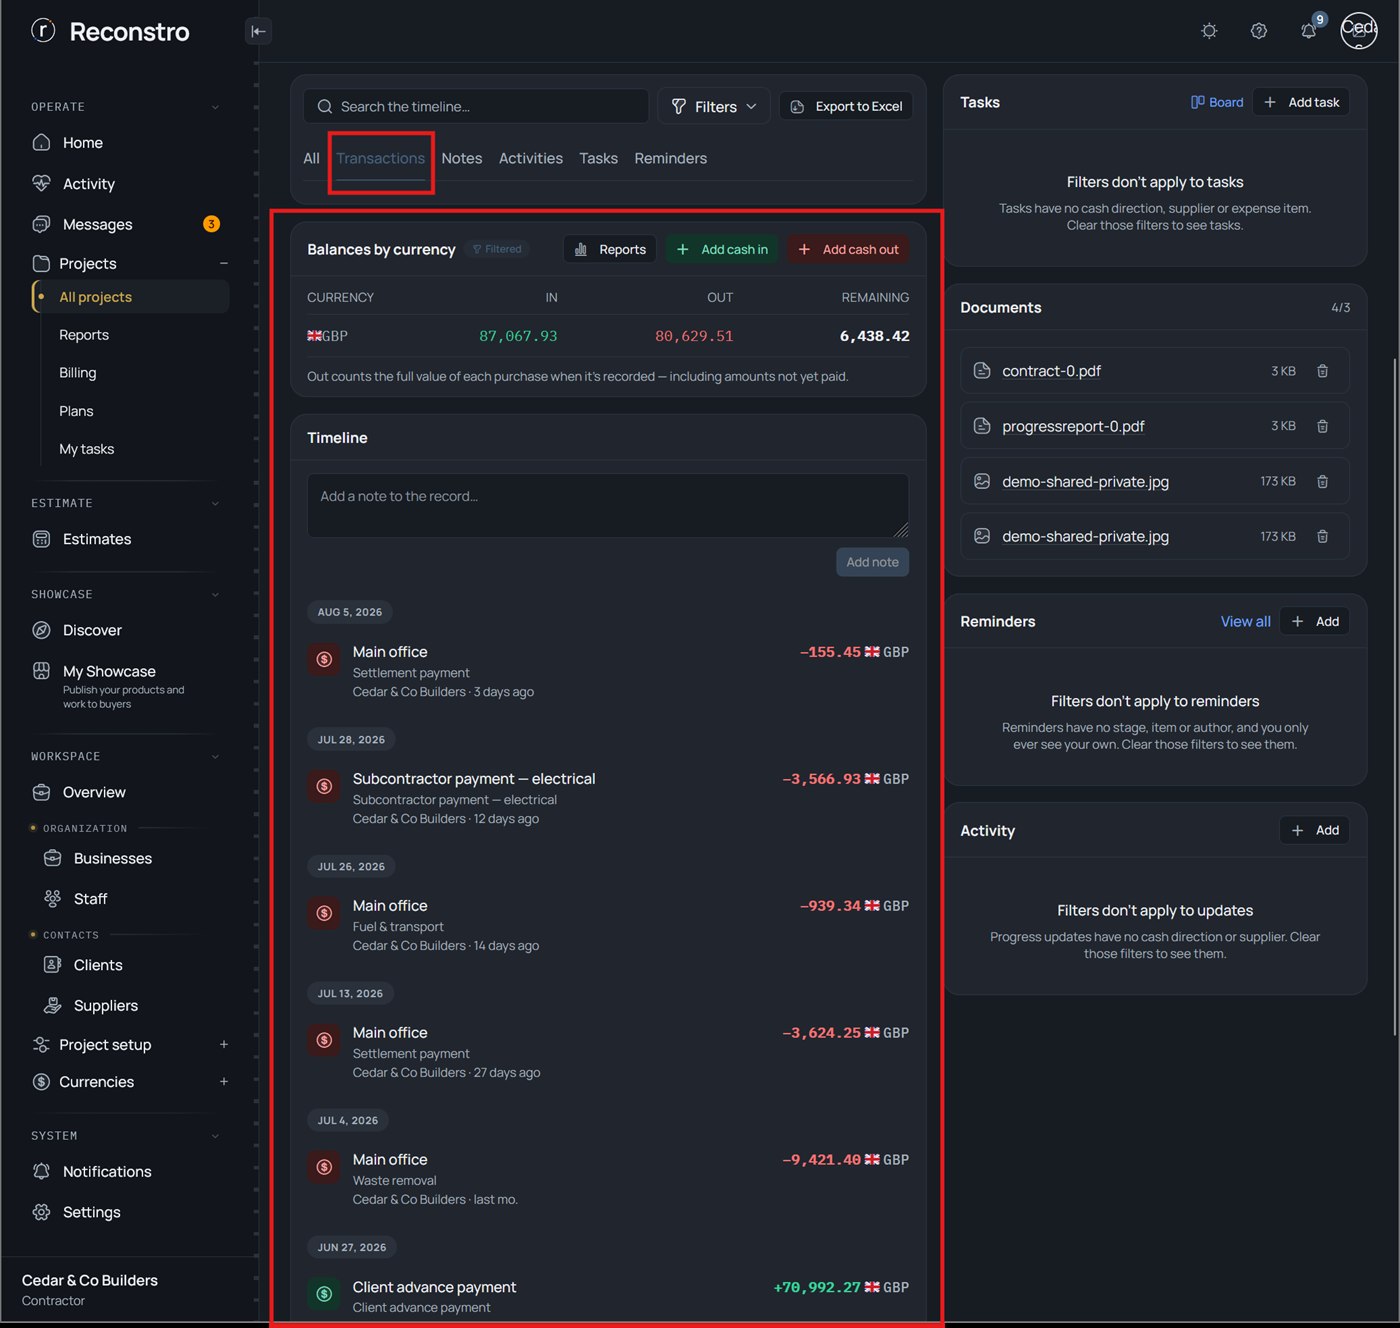
The financial heart of a project — every pound in and out, in one clear place, day by day. Money-in shows green, money-out shows red, each amount tagged with its currency.
Constantly — it's how you know a job's real cash position at any moment, and it feeds the budget and reports.
Step by step
- Open the project's Money / ledger tab.
- Press + Transaction and pick the kind (see 3.10–3.13 below).
- Filter by kind, stage or supplier; export the ledger to Excel any time.
Short version: Track money on a project
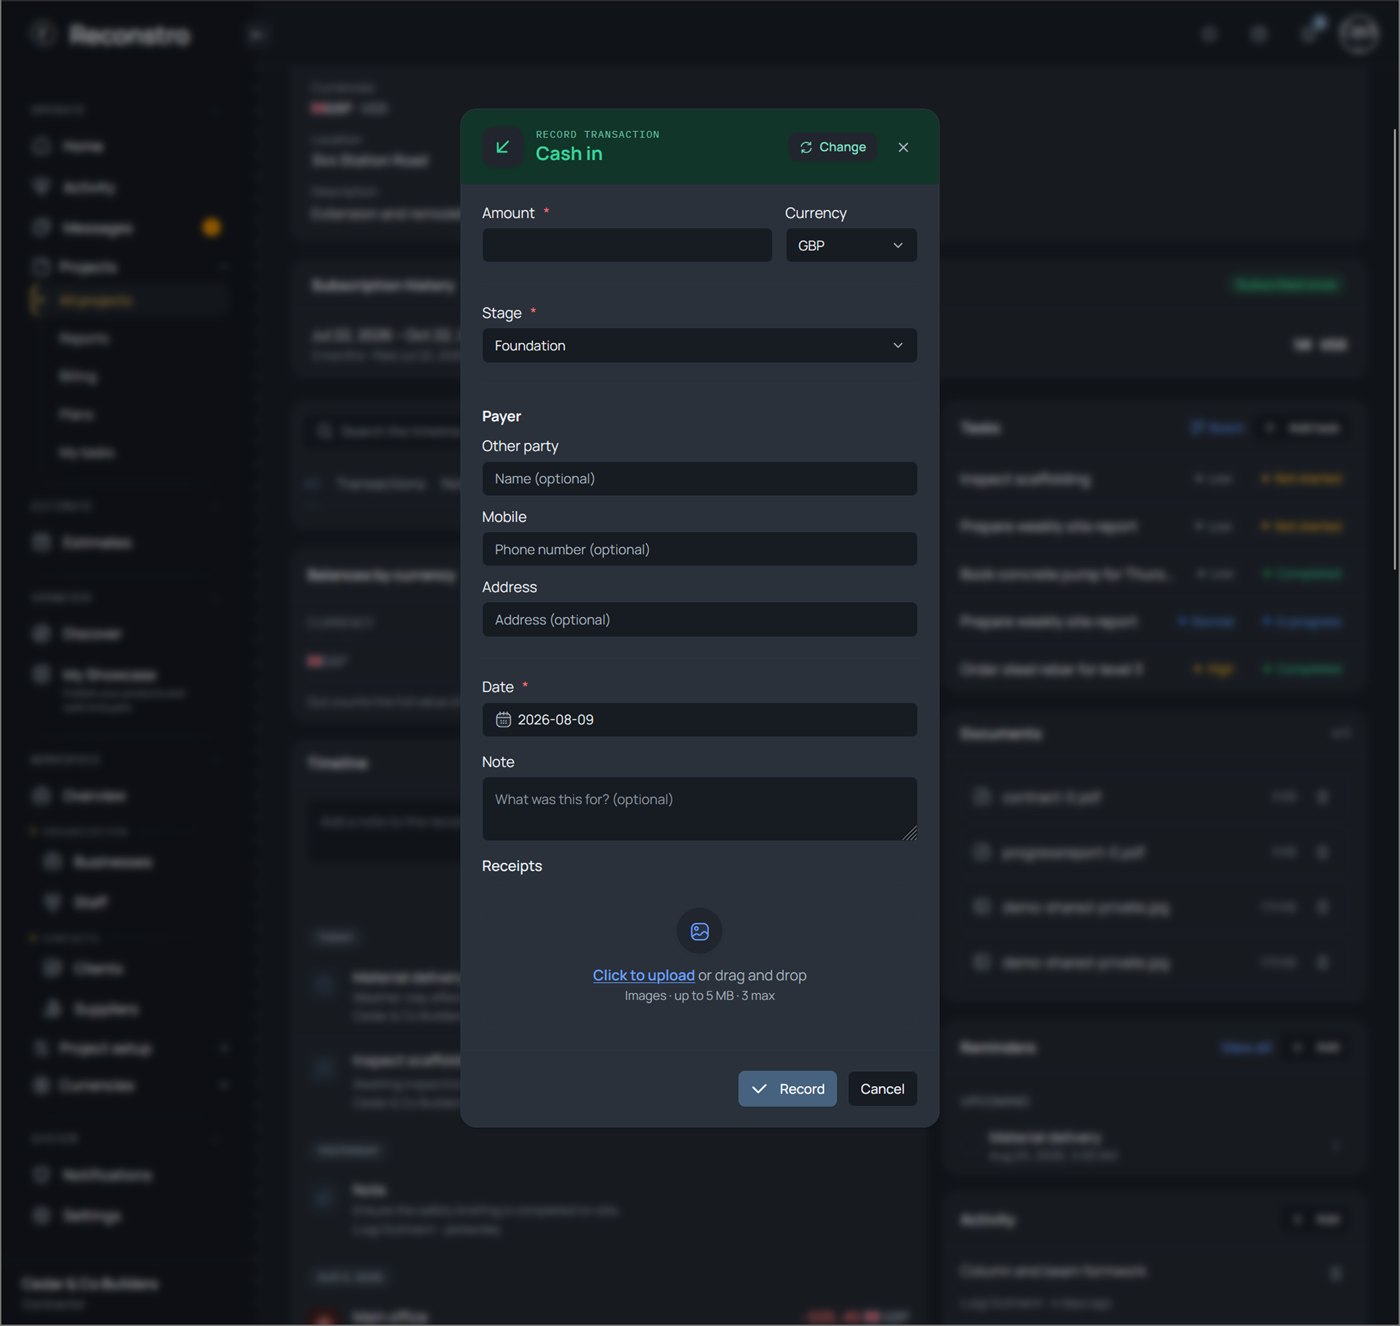
3.10 Money in — cash-in
Money the project owner pays you — advances, milestone payments, the final handover payment.
Whenever the project owner pays, so income against the job is recorded.
Step by step
- In the project ledger press + Transaction → Cash in.
- Enter the amount and currency, the date, the project owner and a note (e.g. "Milestone — foundation").
- Save — it appears green in the project's details and lifts the project's cash position.
3.11 Money out — cash-out
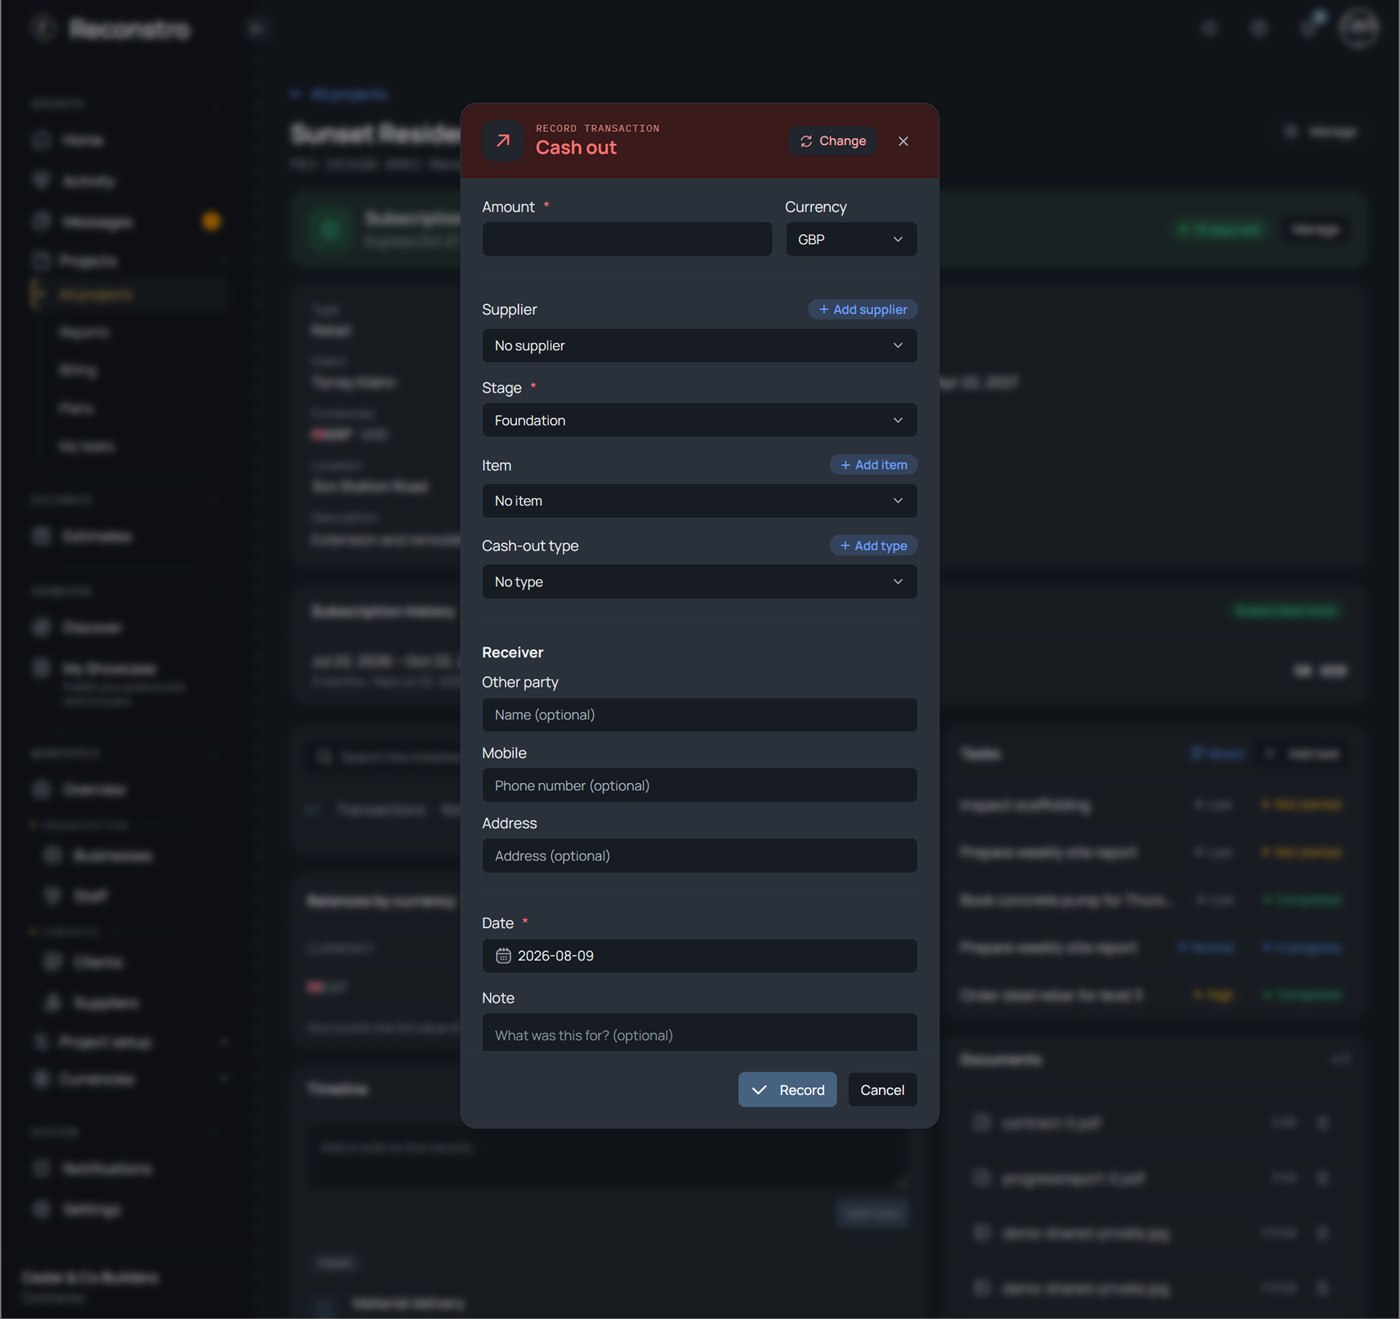
General overhead spending that isn't a supplier purchase — fuel, wages, permits, equipment hire — tagged with a cash-out type.
For day-to-day costs on the job that don't come from a specific supplier invoice.
Step by step
- Press + Transaction → Cash out.
- Enter the amount, date, a cash-out type (e.g. Fuel & transport) and a note.
- Save — it appears red in the project's details.
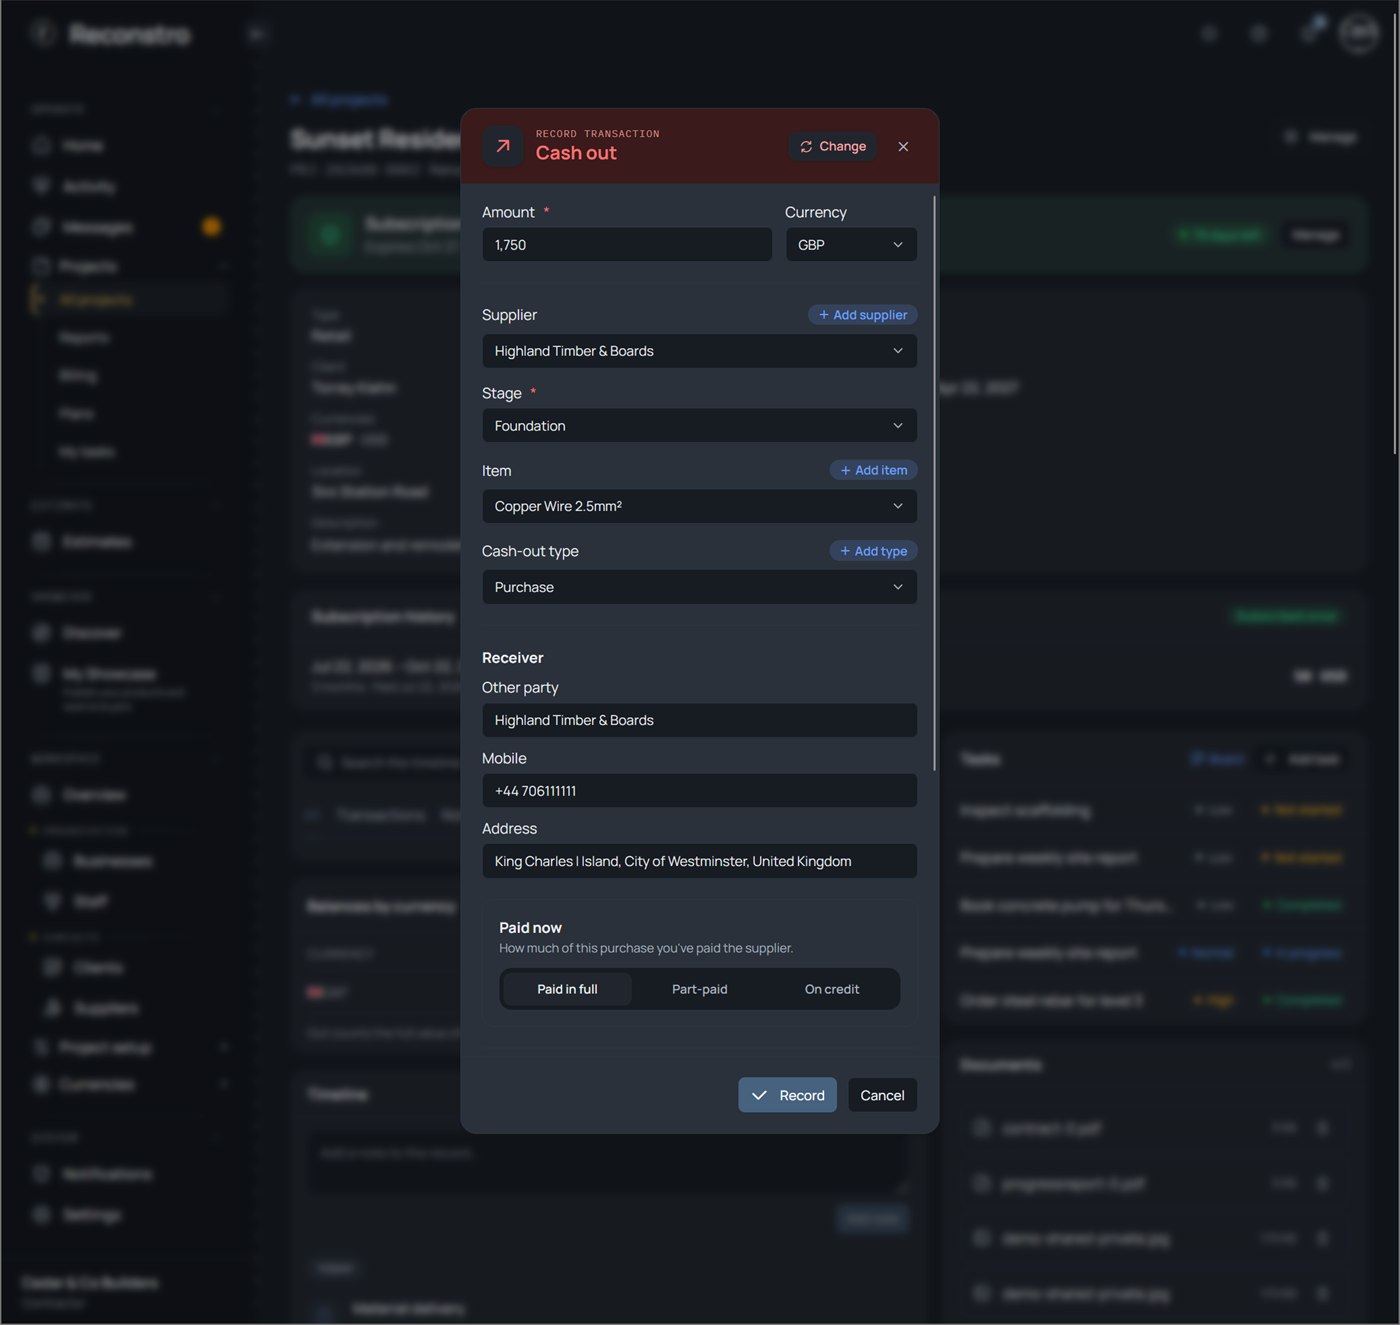
3.12 Purchases from suppliers
Buying materials or services from a supplier. You can record the full amount and how much you paid now — the rest becomes an outstanding balance the supplier statement tracks.
Every time you buy from a supplier, whether you pay in full or part now.
Step by step
- On the money page press + Add cash out, then choose a Supplier — that turns the cash-out into a purchase.
- Enter the amount, then choose Paid now: Paid in full, Part-paid, or On credit.
- Optionally attach the receipt — a photo, a PDF or an e-invoice file (XML) — and link a project item.
- Save — any unpaid balance is tracked and settled later with a payment (3.13).
3.13 Supplier payments
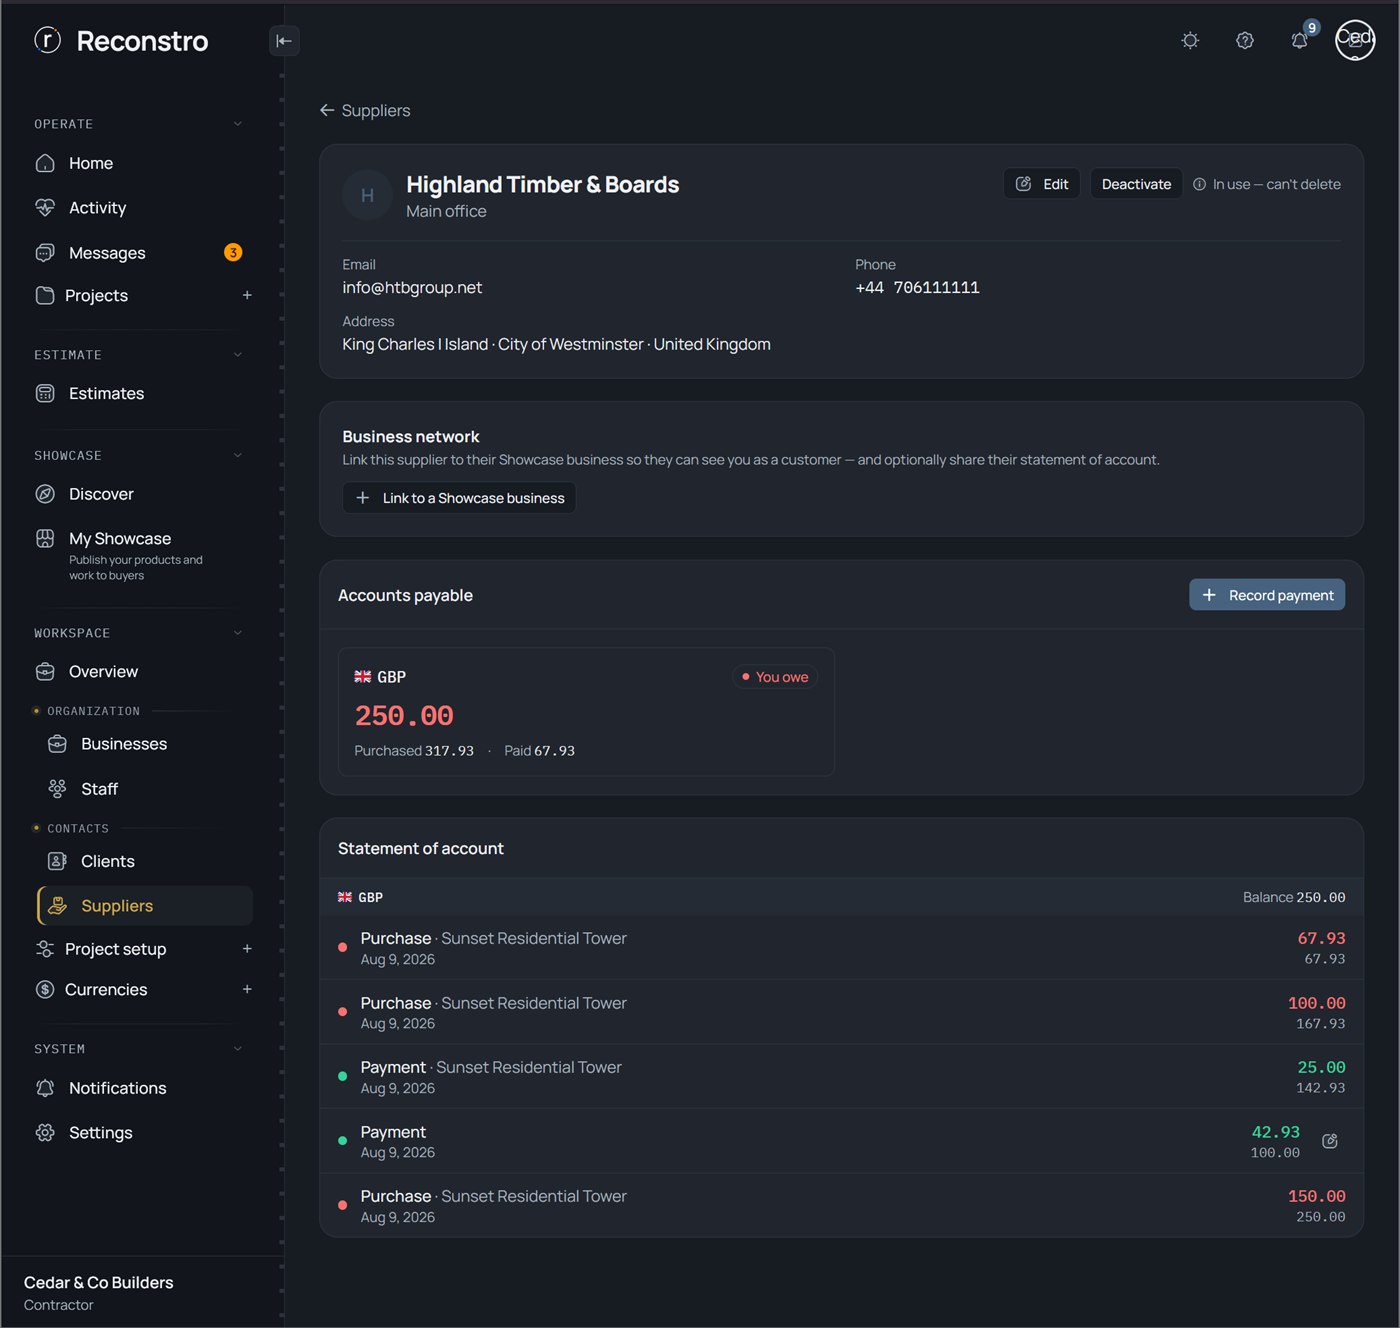
Paying down what you still owe a supplier from earlier part-paid purchases — the settlements the supplier statement reconciles.
When you clear an outstanding balance with a supplier.
Step by step
- Open the supplier under Contacts → Suppliers and record a payment against their outstanding balance.
- Enter the amount you're paying and the date.
- Save — the supplier's outstanding balance drops accordingly.
3.14 Budget vs. actual
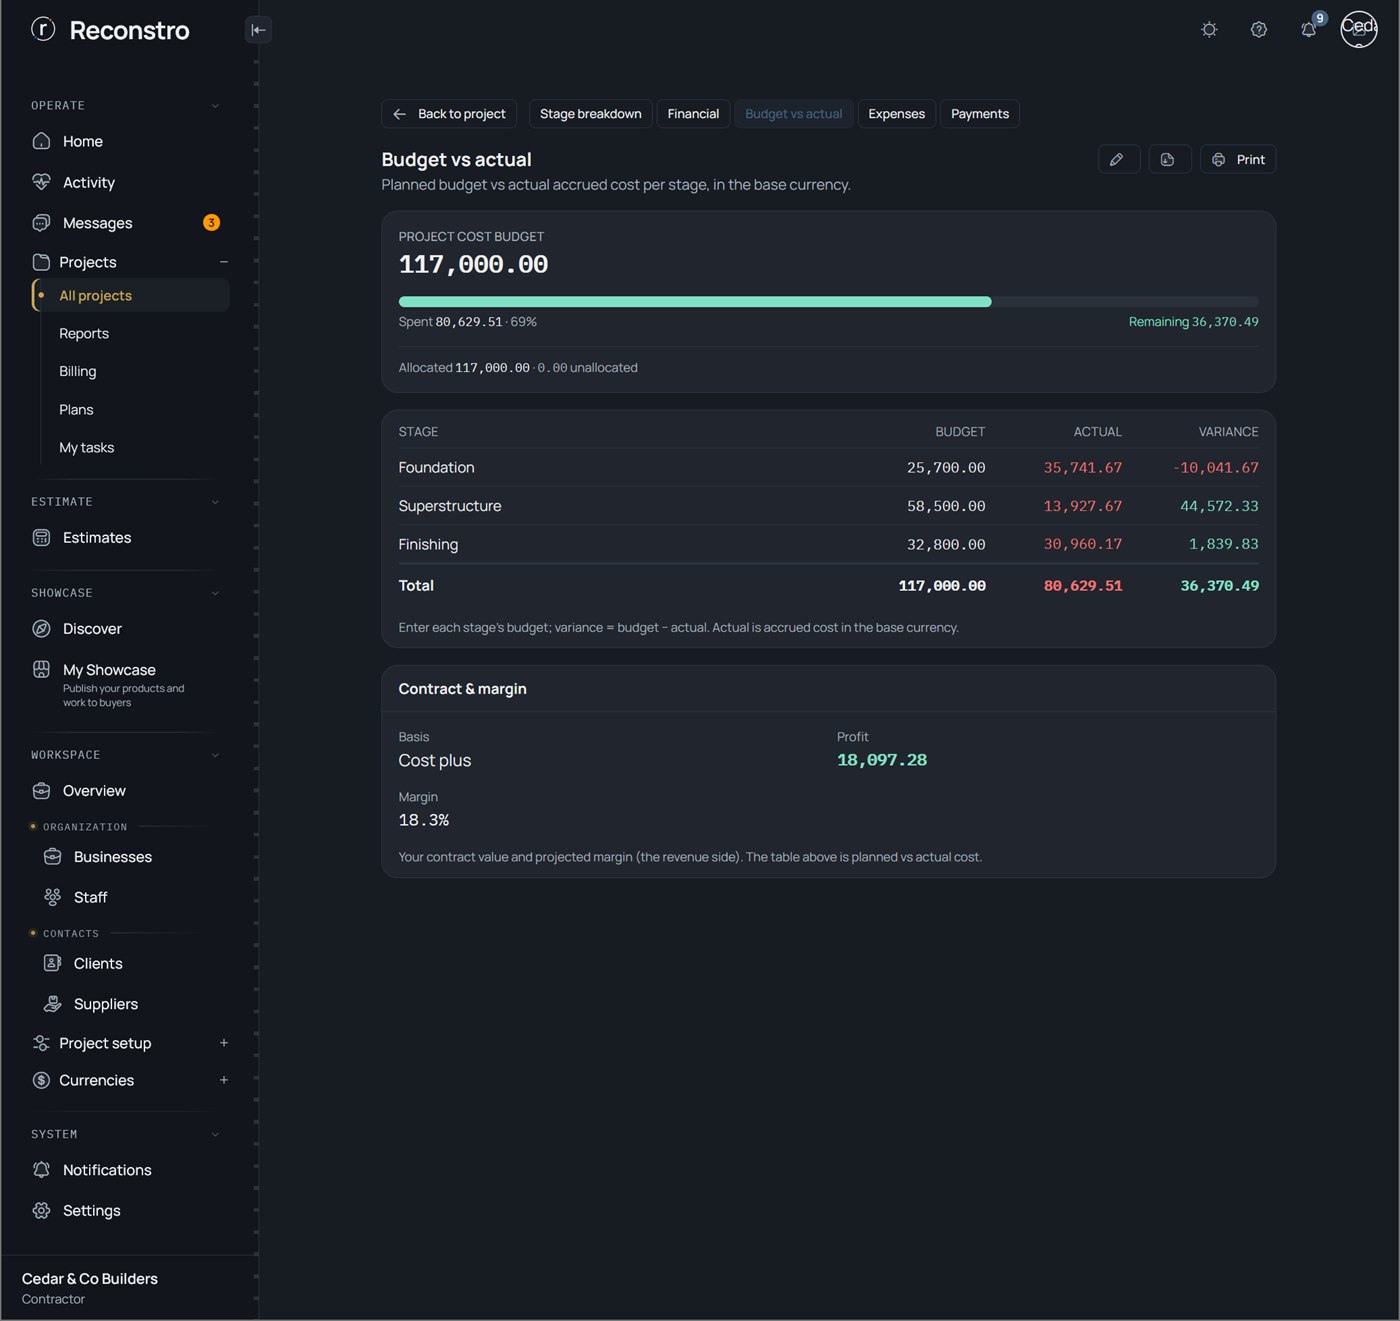
A side-by-side of what you planned to spend against what you've actually spent, based on the project's financial terms (a fixed budget, or cost-plus).
Throughout the job to catch overspend early and prove the job is on track.
Step by step
- Set the project's financial terms (Fixed budget or Cost-plus) when you create it or in its details.
- Open Budget vs. actual to see planned vs spent, with a clear on-track / over indicator.
3.15 Reminders
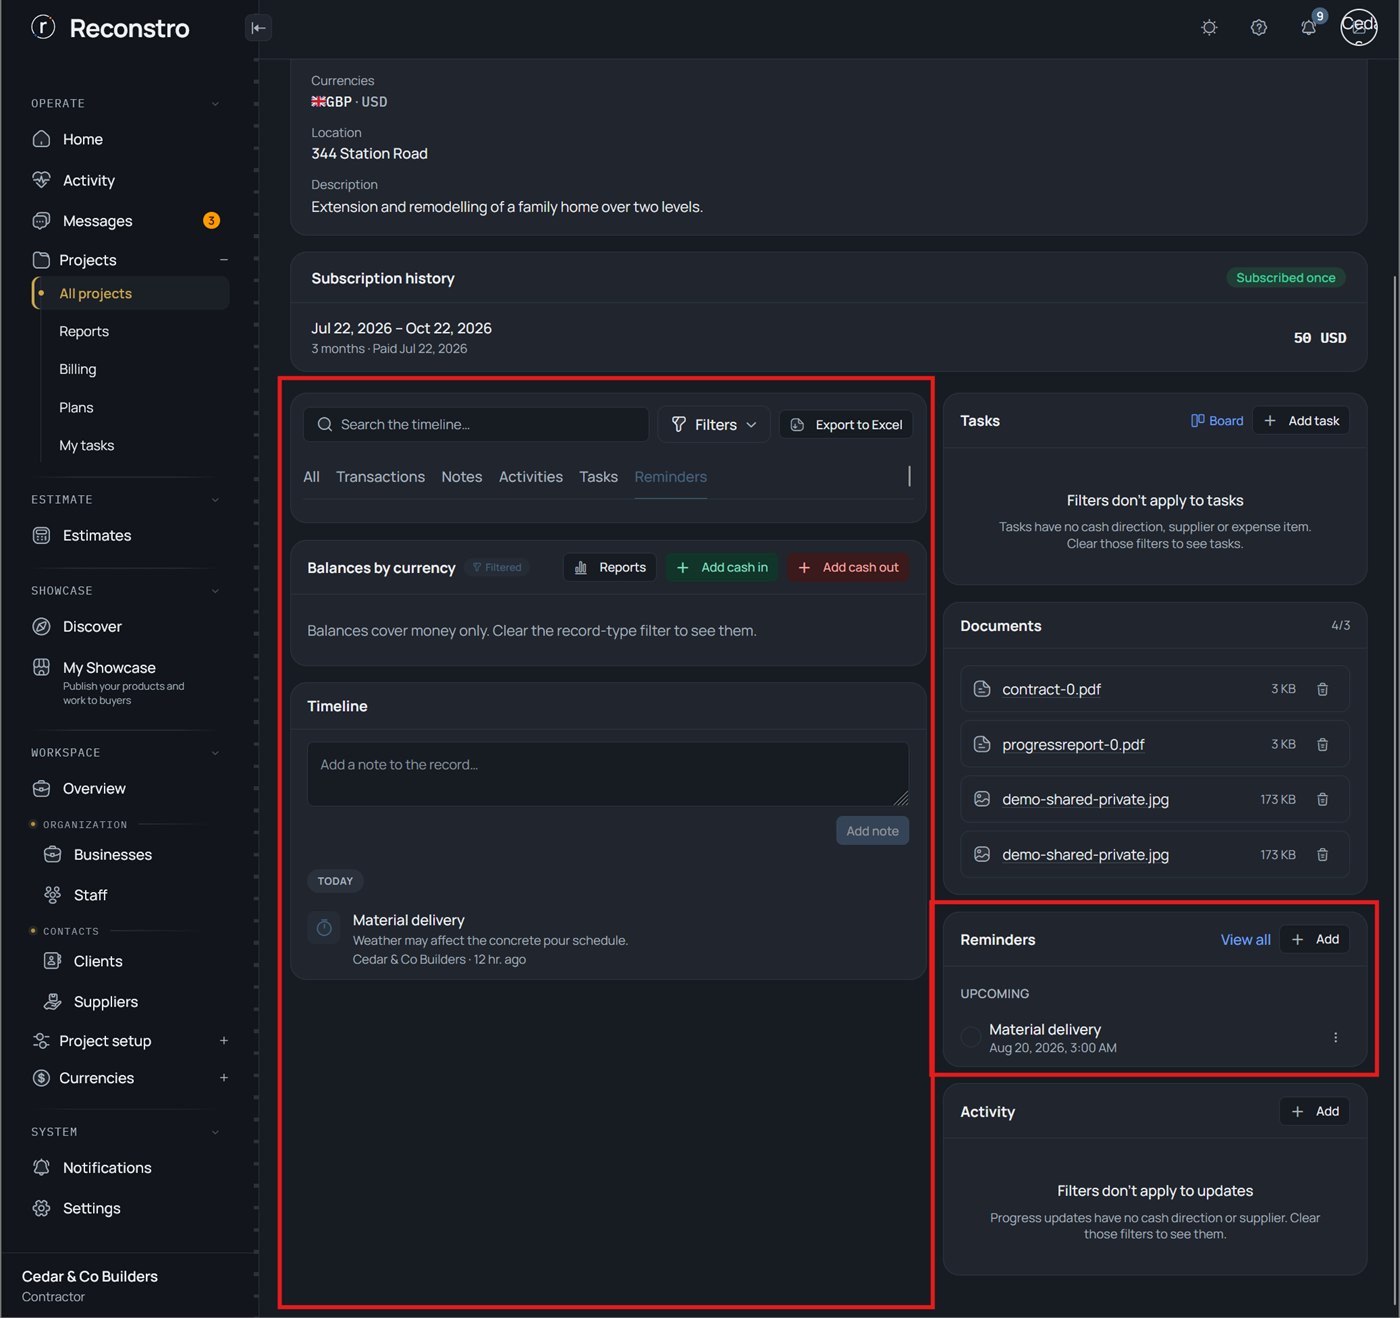
Scheduled nudges tied to a project — "Site inspection", "Project owner walkthrough" — that notify you before they're due.
For time-sensitive things you must not forget on a job.
Step by step
- Open the project's Reminders and add one.
- Set the title, due date/time and lead time, then save — you'll be notified in time.
Short version: Tasks and reminders
3.16 Documents
The project's files — the contract, plans, and site photos — kept with the job.
To store and find every document related to a job in one place.
Step by step
- Open the project's Documents.
- Upload files, then open or download them any time.
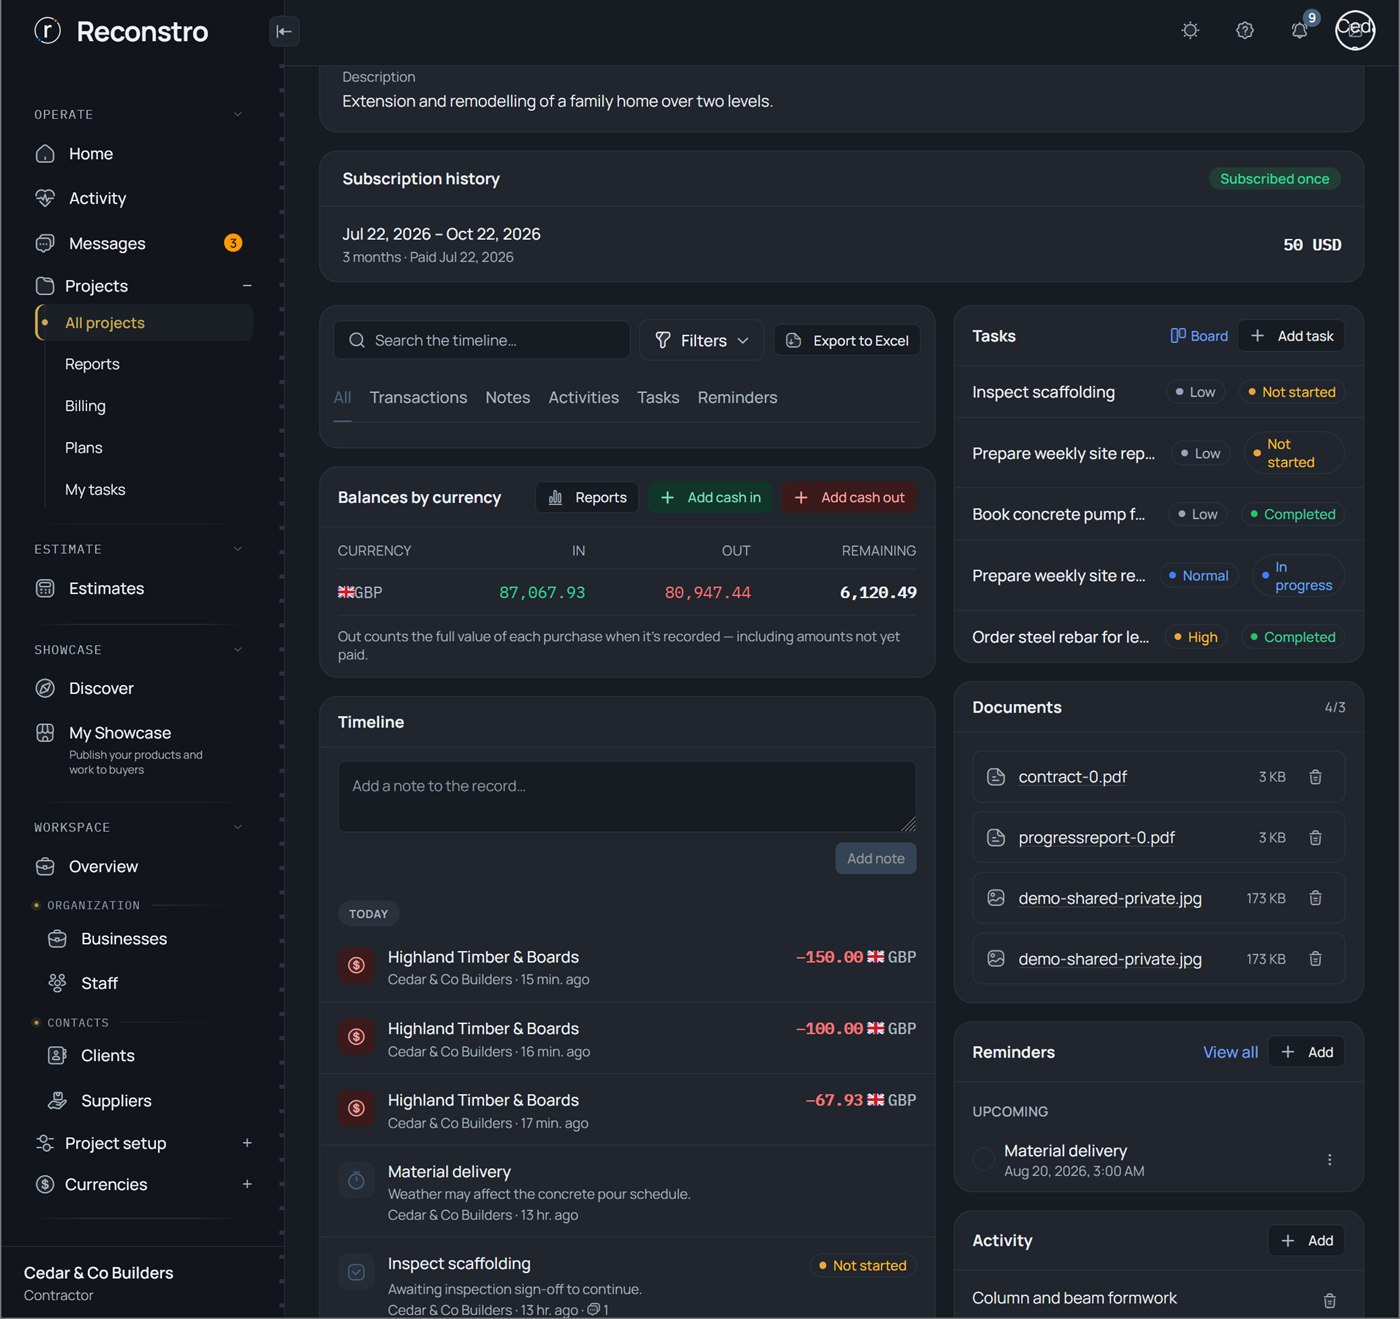
3.17 Team on the project
The staff assigned to a project — who can see it and be given its tasks.
When you set up a job, to bring the right people onto it.
Step by step
- Open the project and find its team / assignments.
- Add staff to the project; they can now be assigned its tasks.
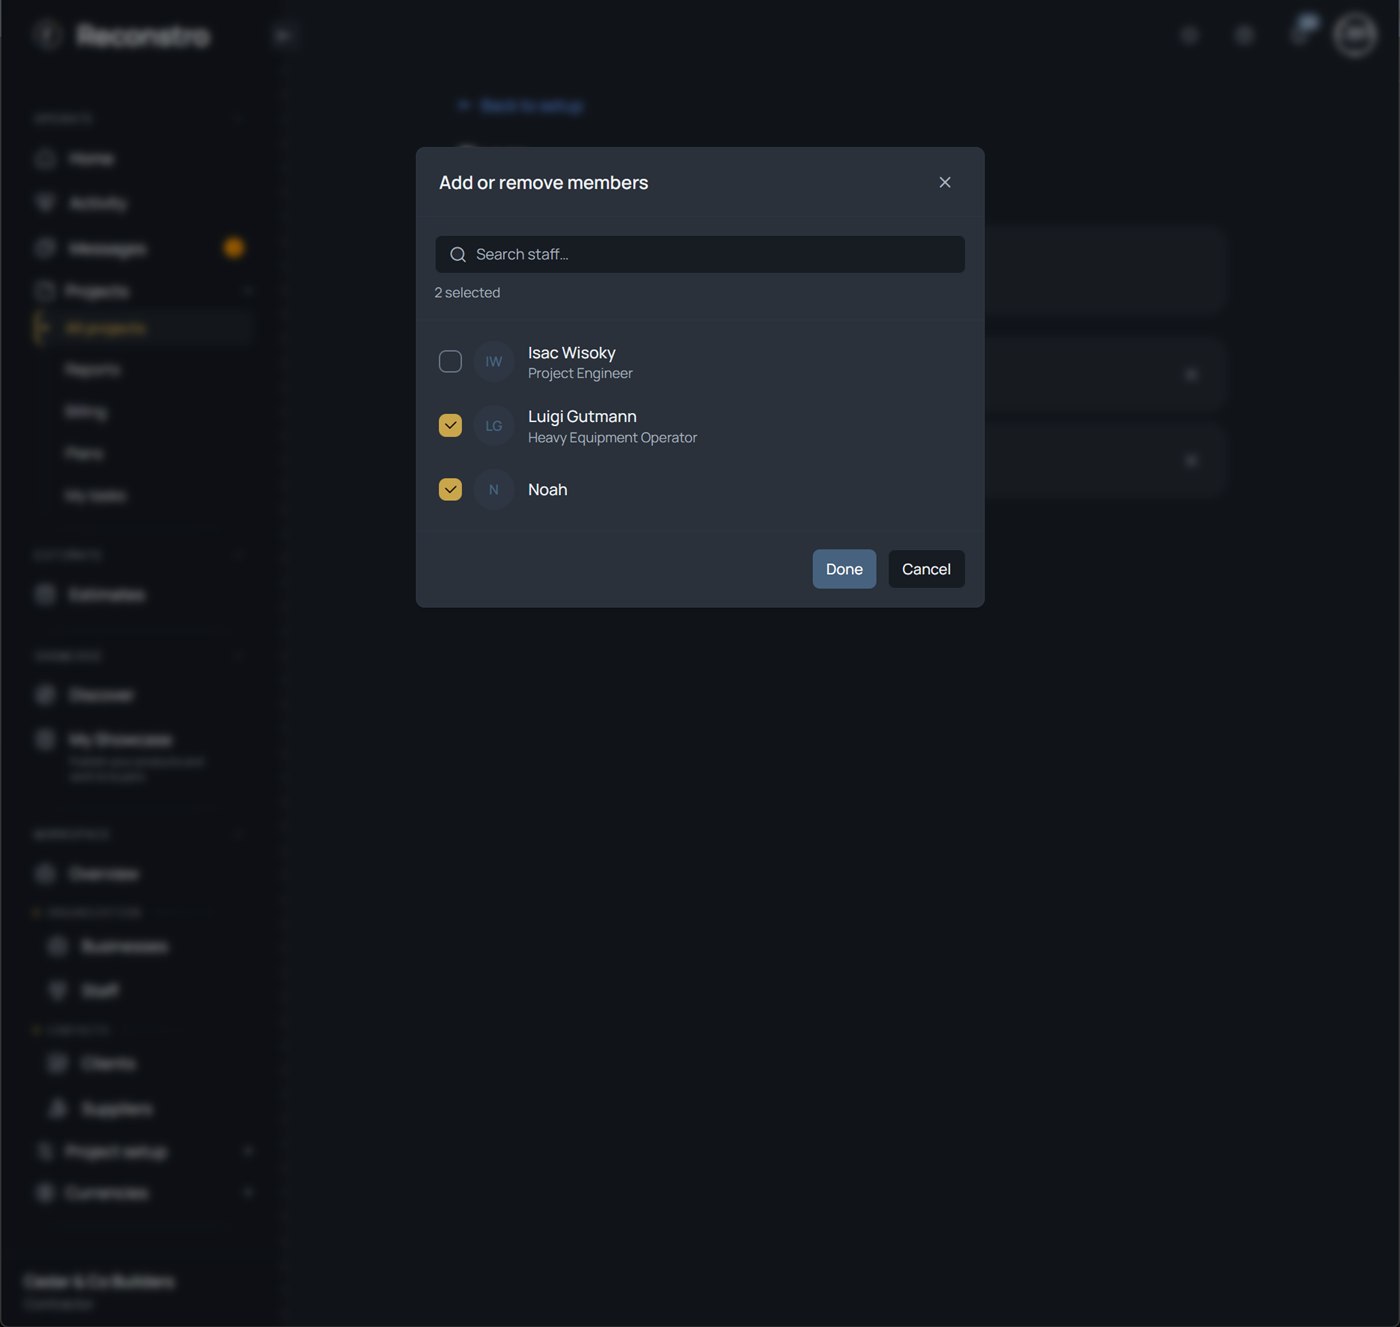
3.18 Project reports & export
Polished Excel exports of a project — financial summary, budget, full ledger, by-stage, and the details as you've filtered them — ready to send a project owner or partner.
For project owner updates, month-end, or any time you need the numbers outside the app.
Step by step
- Open Reports (or the export buttons on the project).
- Choose the report and press export — a formatted .xlsx downloads.
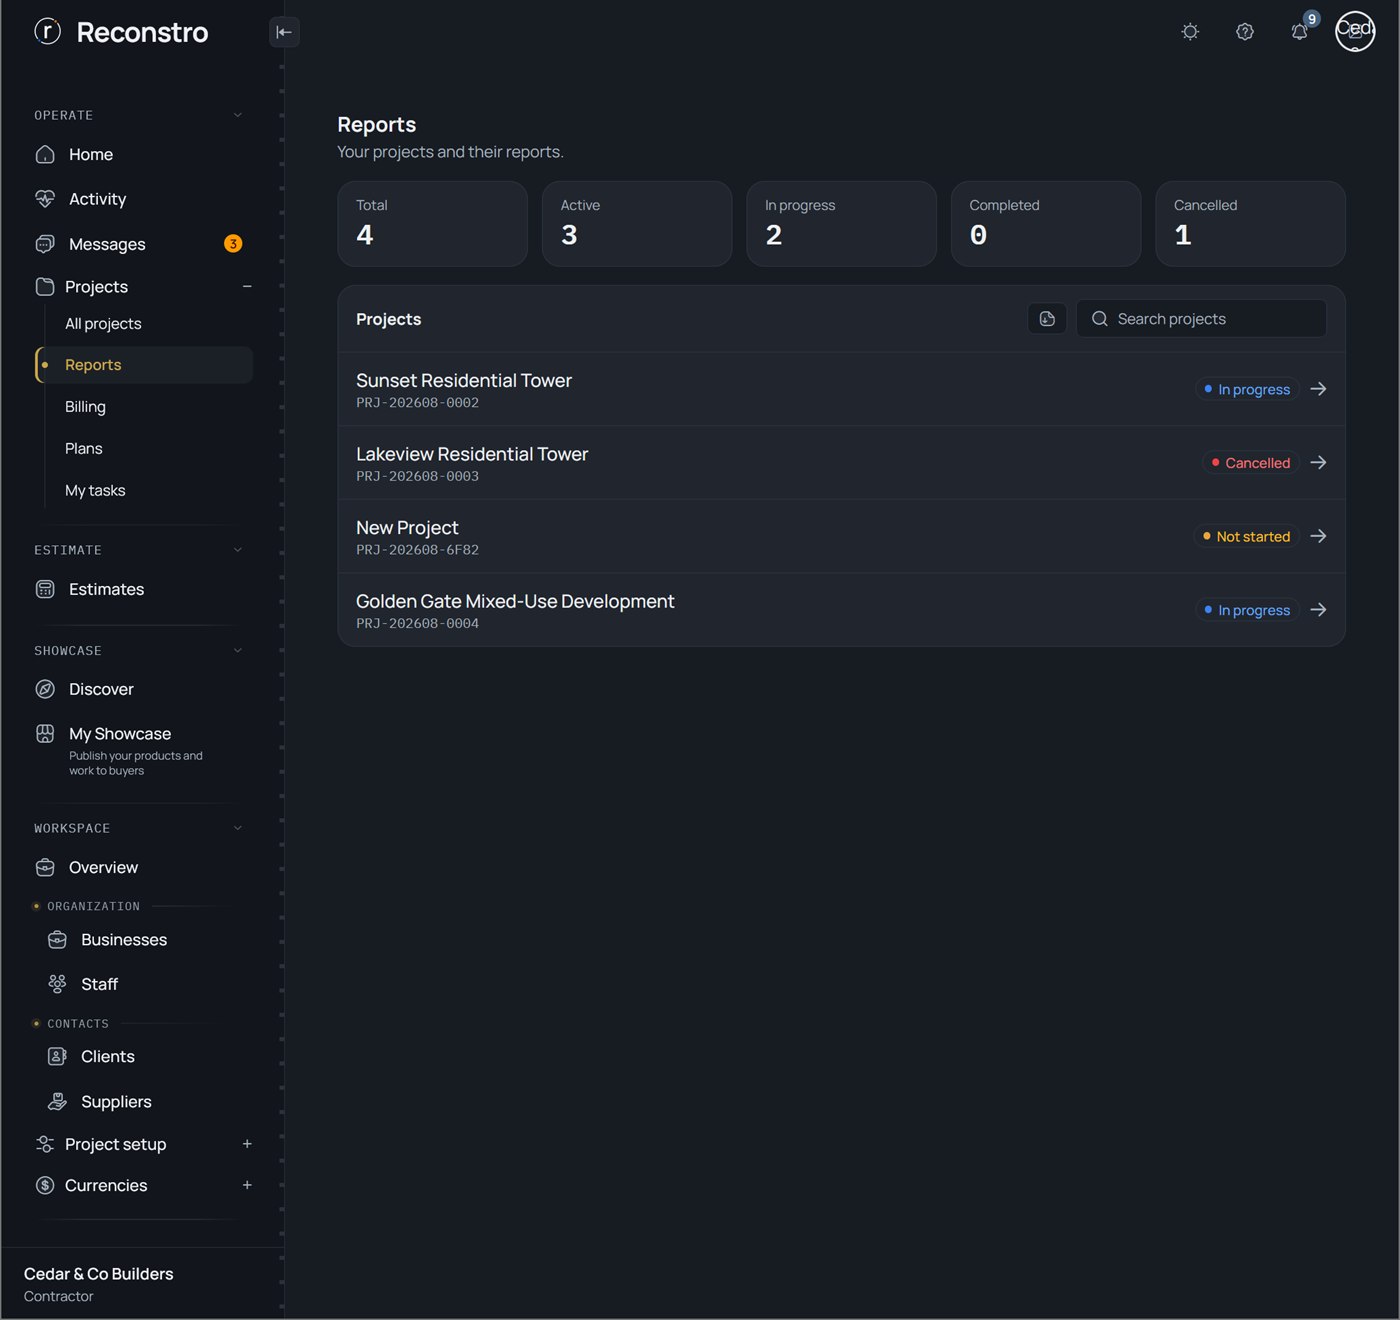
3.19 Your deal — contract terms
The deal you agreed with the project owner, written down once. It is what lets the app work out your profit, your fee, and what the project owner still owes you.
Right after you create a project, before you record any money. Until the deal is recorded the project cannot show profit or track a fee.
Step by step
- Open the project, go to the Manage tab and find Contract terms. On the phone it is the Finance section of the project.
- Press Set terms.
- Choose how you are paid — Fixed price or Cost-plus.
- Fixed price: type the Agreed price. Cost-plus: type a Fee percentage, a Fixed fee, or both.
- Cost-plus only: if the project owner agreed a ceiling, type it in Maximum price (optional). Leave it empty if you did not agree one — you can add one later with Edit terms.
- Press Save terms.
| 🧱 Fixed price | 💰 Cost-plus | |
|---|---|---|
| The deal | One agreed price for the whole job | The project owner pays your costs back, plus a fee on top |
| What you keep | Whatever is left after costs | Your fee, whatever the job ends up costing |
| Who carries the risk | You — overspend and it comes out of your pocket | The project owner — your fee is safe either way |
| You type | Agreed price (e.g. 60,000) | Fee percentage (e.g. 15) |
| Example | Price 60,000, cost 44,000 → you keep 16,000 | Spend 60,000 at 15% → fee 9,000, project owner owes 69,000 |
When the project owner agrees a maximum. Some cost-plus deals add a ceiling — cost plus 10%, but never more than 50,000. The industry calls it a guaranteed maximum price. Most cost-plus jobs have none, and that is normal, not something missing. Read this part twice: the maximum covers what you spend and your fee together, never your spending on its own.
| You spend | Your fee at 10% | Counted against the maximum | |
|---|---|---|---|
| After a while | 20,000 | 2,000 | 22,000 28,000 left |
| Further on | 40,000 | 4,000 | 44,000 6,000 left |
| The most you can spend | 45,454 | 4,545.40 | 49,999.40 nothing left |
Two things to know before you type one. A maximum is cost-plus only, and it cannot be less than a fixed fee you also charge — the app will not accept that. A fixed-price job needs no maximum, because the agreed price already is one. A fixed fee counts against the maximum in full from the first day, before you have spent anything — which is exactly why the maximum can never be smaller than it.
3.20 Your fee — earned, received, owed
On a cost-plus job, a running account of what your deal has earned you and how much of it has actually reached you. It appears as the My fee card.
Any time you want to answer one question: am I actually being paid for running this job, or only being reimbursed for it?
Step by step
- Record what you spend as normal. Your fee builds itself from those entries — you never type it anywhere.
- Open Reports → Financial on the web, or Budget vs actual on the phone, and read the My fee card.
- When the project owner pays, record the money in and answer the one question the form asks: My fee or For the job.
| The card says | It means | Example |
|---|---|---|
| Fee earned | What your deal has made you so far. Grows on its own as the project spends. | Spent 200,000 at 15% → 30,000 |
| Fee received | Fee money that has actually landed. Only entries you marked My fee count. | 18,000 |
| Owed to you now | Earned minus received — what you could ask for today. | 12,000 |
| Not yet claimed | Earned, but you have not asked for it. Nobody owes it until you ask. | 10,000 |
| Claimed, not paid | You asked and the money has not arrived. This one means chase. | 2,000 |
The one step that can quietly go wrong. On a cost-plus job a single payment is two different things wearing one shape. Say you spent 20,000, your fee is 3,000, and the project owner sends 23,000. If you tick My fee on the whole 23,000, the app will believe you earned 23,000 of fee when you really earned 3,000.
| Record it as | Amount | Answer | Why |
|---|---|---|---|
| Entry 1 | 3,000 | My fee | Money you keep — this is your income |
| Entry 2 | 20,000 | For the job | Your own spending coming back — not income |
When the project owner pays your fee early. Some project owners advance part of the fee to get started. Nothing is wrong — the card simply changes what it calls the number.
| Before you spend anything | After you spend 60,000 | |
|---|---|---|
| Fee earned | 0 | 9,000 |
| Fee received | 5,000 | 5,000 |
| The card shows | Paid ahead 5,000 | Owed to you now 4,000 |
When the deal has a maximum. If the project owner agreed a ceiling, a bar and two lines appear inside the Money for the job card, under the box that answers it. They answer one question: how close am I to the number the project owner agreed? The bar measures your spending and your fee together, so it moves every time you record spending — your fee is worked out from that spending, not recorded against the maximum separately. Say the maximum is 10,000 and your fee is 10%.
| Spent 7,000, fee 700 | Spent 10,000, fee 1,000 | |
|---|---|---|
| The bar | Part filled | Full, and amber |
| First line | 7,700 of 10,000 used — your spending plus your fee | 11,000 of 10,000 used — your spending plus your fee the fee took it past |
| Second line | 2,300 left before you reach the maximum. | You are 1,000 over the maximum. Anything above it is yours to carry, not the project owner's. |
Over the maximum? Allowed, and never blocked. Reconstro never stops you recording work you actually did. The bar turns amber and the page says how far past the number you are — which is the moment to talk to the project owner, not the moment to stop recording.
3.21 Claims — asking to be paid
A claim is your written request to the project owner for money. The construction industry calls it a payment application. It carries an amount and a date — never a month.
Every time you want to be paid: an advance before starting, monthly, every few months, when cash is needed, or once at the end. The same shape serves all of them.
Step by step
- Open the project and go to Fee requests — it sits under Contract and budget, just above Statement.
- Press Ask for your fee. The amount is filled in with what you have not yet asked for — change it freely.
- Add a Due date if you agreed payment terms. This is what lets the app tell you later that the project owner is late.
- Press Ask for your fee.
- When the money arrives, record it and pick the claim under Which claim does this pay? — that link is what closes the claim.
| The list says | It means |
|---|---|
| Claimed | You asked for it. Says nothing about whether it arrived. |
| Settled | How much of that ask has actually been paid. |
| Outstanding | What the project owner still owes you on that claim today. |
| Advance | You asked for more than you had left to claim — what you have earned, less what your earlier claims already took. Allowed, and never blocked. |
| Overdue | The due day has passed and it is still unpaid. Chase the project owner. |
When the project owner pays only part of it. You claimed 23,000 and they send 12,000. Nothing needs correcting — record what arrived and the list does the arithmetic.
| Claimed | Settled | Outstanding |
|---|---|---|
| 23,000 | 12,000 | 11,000 |
When one payment covers two claims. Claim A is owed 21,850 and claim B is owed 32,775. The project owner sends 40,000 in a single transfer. Record it as two entries, not one — the link is what closes a claim, so a single lump would leave A looking unpaid for ever.
| Entry | Amount | Linked to | Result |
|---|---|---|---|
| 1 | 21,850 | Claim A | Settled in full — outstanding 0 |
| 2 | 18,150 | Claim B | Part paid — outstanding 14,625 |
3.22 Retention — money held back
A security deposit, except the project owner holds your money. They keep a small slice of every payment until the job is finished and any faults are put right. Some contracts call it retainage.
Whenever your contract has it — most do. Set the percentage once on your contract terms and every claim works it out for you.
Why it exists: once you have been paid in full, the project owner has nothing left to make you come back and fix a leaking pipe. So they hold a slice until the fault period ends. If something breaks, they use it. If nothing breaks, you get all of it. It is not a penalty, not late money, and not lost.
Step by step
- On Contract terms, type your Retention percentage — and a limit, if your contract caps how much may be held at once.
- Raise claims as normal. Every claim now shows three lines: what you asked for, what is held back, and what the project owner actually pays now.
- Watch Held on the My fee card. That is your money, parked.
- At handover press Release retention and enter the amount — usually half. Release the rest when the fault period ends.
What a claim looks like with retention. On a cost-plus job you spent 20,000 and your fee is 3,000, so you are asking for 23,000. Retention is 5%.
| Line | Amount | Meaning |
|---|---|---|
| Total being asked for | 23,000 | Your spending back, plus your fee |
| Less retention at 5% | 1,150 | Held by the project owner — goes to Held |
| Project owner pays now | 21,850 | What actually arrives |
| Outstanding after they pay | 0 | They owe nothing today |
Retention comes off everything, not just your fee. That is worth reading twice. 5% of the whole 23,000 is 1,150. Five per cent of the 3,000 fee would be 150 — and believing the smaller number means finishing the job convinced you have been paid 1,000 that is still being held.
The limit. A limit caps the total held at once, not each payment. Once the project owner reaches it, later claims come to you in full.
| Claim | Asked | Retention | Paid you | Held so far |
|---|---|---|---|---|
| 1 | 23,000 | 1,150 | 21,850 | 1,150 |
| 2 | 34,500 | 1,725 | 32,775 | 2,875 |
| 3 | 46,000 | 2,125 not 2,300 — the 5,000 limit is reached | 43,875 | 5,000 |
| 4 | 18,000 | 0 paid in full | 18,000 | 5,000 |
Getting it back. Release half at handover and the rest when the fault period ends. Over the whole job you asked for 121,500 and received 121,500 — the last 5,000 simply arrived a year after the first claim.
3.23 Variations — when the agreed price changes
A change to the price you already agreed, made after the contract was signed. The project owner adds a rooftop terrace, or takes the landscaping out. Some contracts call it a change order.
On a fixed price job, every time the scope changes. Never type over the agreed price itself — record the change and the app works out the rest.
Why it works this way: your contract has two numbers, not one. What you originally agreed, and what is owed today. Typing over the first destroys the record of what you signed — and every claim you have already sent was worked out from it. A variation keeps both numbers, side by side.
Step by step
- Open the project's Financial report, find the Variations card and press Add a variation.
- Describe what changed, in your own words.
- Choose Adds or Removes, then type the amount as an ordinary positive number. The app puts the sign on for you.
- Add extra days if the change moves the programme. This is recorded on the variation as an agreed fact; it does not move your project dates.
- Press Save variation. The contract sum updates at once, and so does what is left to claim.
Taking work out. Choose Removes. The amount comes off the contract sum and the row shows in red with a minus in front. A deduction is a normal, agreed outcome — not a mistake.
A change that costs nothing. Leave the amount at zero. A swapped tile colour, or a delay the project owner caused, is still worth recording: the description and the extra days are what carry the value.
Getting one wrong. There is no edit. Press Void, give a reason, and record the right one instead. The wrong one stays on the record with your reason, and its number is never handed to another change — exactly like a cancelled invoice.
Claims you have already sent are never rewritten. A variation changes what you claim from now on. Anything already claimed keeps the figures it was claimed at, which is what lets an old claim still make sense a year later.
Cost-plus jobs have no variations. There is no fixed price for one to change — the project owner pays the actual cost plus your fee, so extra work simply flows through the cost.
3.24 The statement — a whole job, line by line
Every cost, every certificate and every payment on one running ledger, with the position as at each line. Open it from the project's Certificates screen, on the Statement tab.
When you want the one answer no single report gives: where does this project actually stand? Also the fastest way to explain the job to a project owner, an accountant or yourself in six months.
Why it is one table and not two: a project has two money stories running at the same time. Cash — what moved, and what is left. And the project owner account — what you asked for, and how much has come back. Read apart, each is half a truth. A healthy bank balance can sit on top of work you never billed.
Step by step
- Open the project and go to Certificates.
- Switch to the Statement tab.
- Read the top line — newest first, so that is where the job stands today.
- Read downwards to see how it got there. Every line shows the position as at that moment, not just what changed.
- Tap any certificate line to open it and see exactly which payments have been received against it.
The six figures
Every line of the statement carries all six. The short name is the column heading you will see in the worked example below; the grey word beside it is what the app prints on screen.
| Figure | What it answers | Do not read it as |
|---|---|---|
| Out Money out | What this line paid out. Materials, wages, a supplier. | — |
| In Money in | What this line brought in from the project owner. | — |
| Hand In hand | Everything in, less everything out. What you are actually holding right now. | Not profit. Unspent project owner money is in here too. |
| Certified | The running total you have asked the project owner for, after retention. | Not cash. It is paper until they pay. |
| Owed Project owner owes | Certified, less what has come back against certificates. The number to chase. | Not everything unpaid — retention is held by agreement, not late. |
| Adv Held in advance | Money that arrived against no certificate. A deposit, or a project owner paying ahead. | Not earned yet. You are holding it. |
A real job, line by line. Fixed price 80,000. Every column is filled on every row, so you can read any single line and know exactly where the job stood at that moment. The app lists newest first, so on screen you read this table upwards.
| # | What you do | Out | In | Hand | Certified | Owed | Adv |
|---|---|---|---|---|---|---|---|
| 1 | Foundation — your own money | 5,000 | −5,000 | 0 | 0 | 0 | |
| 2 | 📄 Certify 6,000 | −5,000 | 6,000 | 6,000 | 0 | ||
| 3 | Project owner pays 6,000 | 6,000 | +1,000 | 6,000 | 0 | 0 | |
| 4 | Structure | 10,500 | −9,500 | 6,000 | 0 | 0 | |
| 5 | 📄 Certify 9,000 | −9,500 | 15,000 | 9,000 | 0 | ||
| 6 | Project owner pays 8,000 | 8,000 | −1,500 | 15,000 | 1,000 | 0 | |
| 7 | Project owner pays 5,000 no certificate | 5,000 | +3,500 | 15,000 | 1,000 | 5,000 | |
| 8 | Project owner pays 3,000 no certificate | 3,000 | +6,500 | 15,000 | 1,000 | 8,000 |
Read line 8. You are holding 6,500, you have asked for 15,000 so far, the project owner still owes 1,000 of it, and 8,000 of what you hold was never asked for at all. Four different facts, none of which you could work out from any of the others.
A certificate moves no money. Look at lines 2 and 5 — Out and In are both empty and Hand does not budge. Only Certified and Owed change. That is the whole difference between asking and being paid, and it is why the two stories sit side by side.
Lines 7 and 8 are money with no paperwork behind it. A deposit, or a project owner paying ahead. Record it as cash in and leave the certificate box empty. Hand goes up because the money is real — but Owed does not move, because none of it was against Certificate 2. It lands in Adv instead, and stays there until you certify that work and link the payment to it.
Left to certify is the last piece: 80,000 agreed, 15,000 certified, so 65,000 of the job is still to ask for. If you have added variations, it counts against the new agreed price, not the original one.
Overpaying is refused, not absorbed. If the project owner owes 1,000 and you try to record 3,000 against that certificate, the app will not let you: a certificate cannot report money it never asked for. Record the 1,000 against it and the other 2,000 as an advance, and the statement stays true.
3.25 One payment, several certificates
A single payment from the project owner that clears more than one certificate at once — and, often, leaves a little over. You record it as ONE entry and tell the app how it lands.
Whenever a project owner pays a round figure rather than one certificate at a time. Very common: they clear the small balance on an old certificate and the new one together.
What actually gets recorded. One line per certificate, plus one for anything left over — so a 12,000 payment across two certificates with 2,000 spare shows as three lines in the activity feed. They are written together, all or nothing: you can never end up with half a payment recorded. Each line carries its own certificate, which is what lets the app say exactly how much has been received against each document.
Step by step
- Open Cash in on the project. Before you type anything, the form tells you how much the project owner still owes and across how many certificates.
- Type what actually arrived — the figure on your bank statement, not a tidier one.
- Press Settle all. The app spreads the money across the certificates for you, oldest debt first.
- Read the rows. Change any figure by hand if the project owner meant something different; each row is capped at what that certificate has left.
- Check Left over, then press Save transaction.
If the project owner owes exactly what they paid, press Settle all on an empty form — it fills the amount for you and there is nothing left over.
A worked example. Certificate 2 was for 9,000 and 8,000 has already been received, so only 1,000 is left on it. Certificate 3 is for 9,000 with nothing received. The project owner sends 12,000.
| # | Applies to | Certified | Left to pay | This payment puts |
|---|---|---|---|---|
| 1 | Certificate 2 the older debt | 9,000 | 1,000 | 1,000 |
| 2 | Certificate 3 | 9,000 | 9,000 | 9,000 |
| Left over held, ready for the next certificate | 2,000 |
Oldest first, and that is deliberate. A project owner clearing their account is paying off what they have owed longest. The list shows certificates newest-first because that is what you look for; the money goes at them oldest-first because that is what the project owner is doing.
The 2,000 does not reduce what they owe. After this payment the project owner owes nothing on certificates — both are settled — and you are holding 2,000 that was never asked for. It sits in Held in advance on the statement until you certify that work and point the money at it. See 3.24.
You cannot over-allocate. Putting more against a certificate than it has left is refused, and so is allocating more than arrived: a certificate must never report money it did not receive. Allocating LESS is fine — the remainder is simply held.
Where the invoice goes. Attach the project owner's invoice or transfer slip as normal — it is filed against the first line of the split, the one paying the oldest certificate. One bank event has one piece of paper behind it, so it is stored once rather than copied onto every line. In the example below, look on the 1,000 line.
Correcting one later. A split is recorded as one entry, so it is edited as one. Re-slicing an existing receipt is not offered — if the split was wrong, void it and record it again the way it really landed.
3.26 Invoices — a numbered PDF for the project owner
A certificate, a retention release or a fee request can each become one numbered invoice: a PDF with your business's details and the project owner's, and VAT on top on a project that uses VAT. The amount is the document's own and the number is your business's next one — you never type either.
When the project owner needs a proper invoice to pay against — usually right after you certify work or ask for your fee.
Step by step
- Open the project and go to Certificates — or Fee requests on a cost-plus job.
- Open the certificate, or find the fee request in its list, and press Create invoice.
- Check the Invoice date and the Due date. On a project that uses VAT, pick the VAT rate. Add a note if you like.
- Press Create invoice, then Download PDF, and send the file to the project owner.
| On the invoice | Where it comes from |
|---|---|
| Invoice number | Your business's next number. Numbers run in order and never skip. |
| Amount | The certificate or fee request itself — what it asks for after retention. VAT is added on top. |
| From | Your business: its address, Tax number and bank account, from the business's Invoice details. |
| Bill to | The project's Project owner. Until the project has one, Create invoice stays off. |
When the money arrives. Record it as cash in and pick the certificate or the fee request it pays. On a project that uses VAT the entry takes the invoice's rate, so the invoice and the money agree.
Who can: the account owner, or a team member with View financial reports.
Short version: Track money on a project
Everything outside a project
Estimates, messages, your public storefront, reports and settings — each explained the same what / when / step-by-step way.
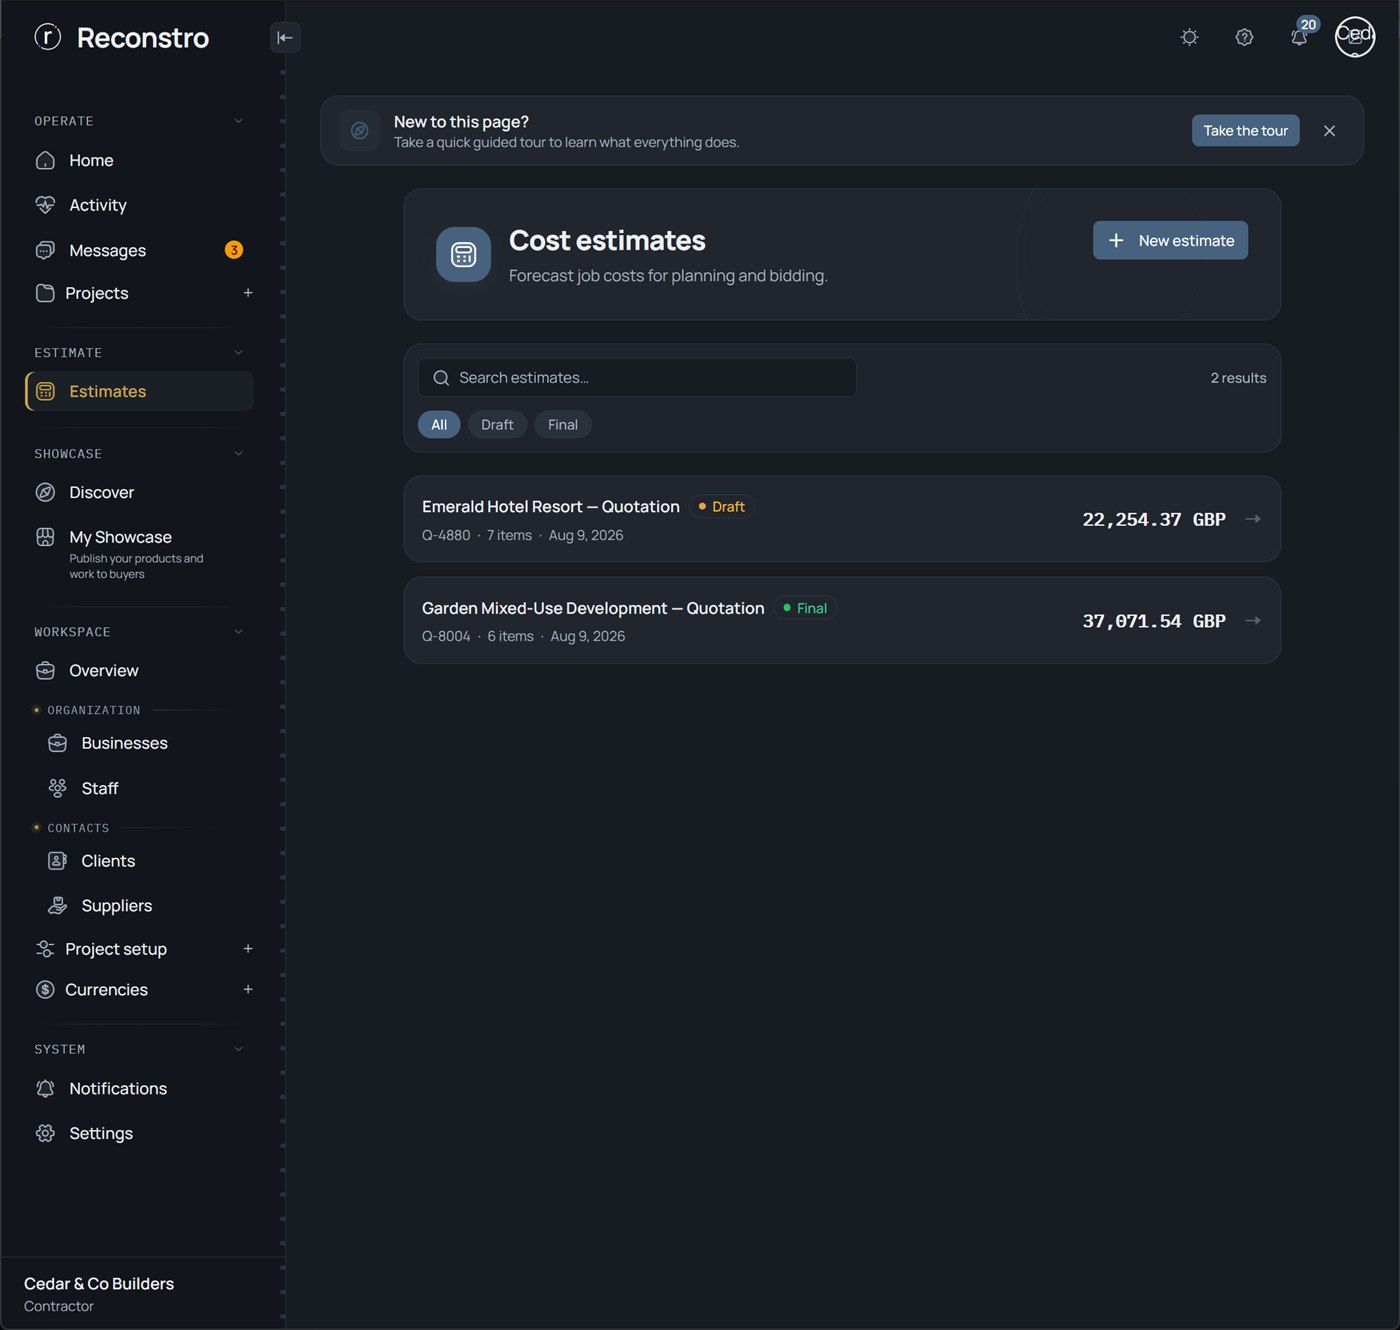
4.1 Estimates & quotations
Before you win a job you need a price. An estimate is where you build that price from line items; a quotation is that same estimate dressed as a branded offer — on your business letterhead, addressed to the project owner, and exported to Excel to send.
① Build a cost estimate
A working sheet that forecasts a job's cost from individual line items (quantity × rate), with adjustments for markup, contingency, discount and tax. Each estimate stays Draft until you finalise it.
When you're planning or bidding a job and need a defensible number — before any project exists.
Step by step
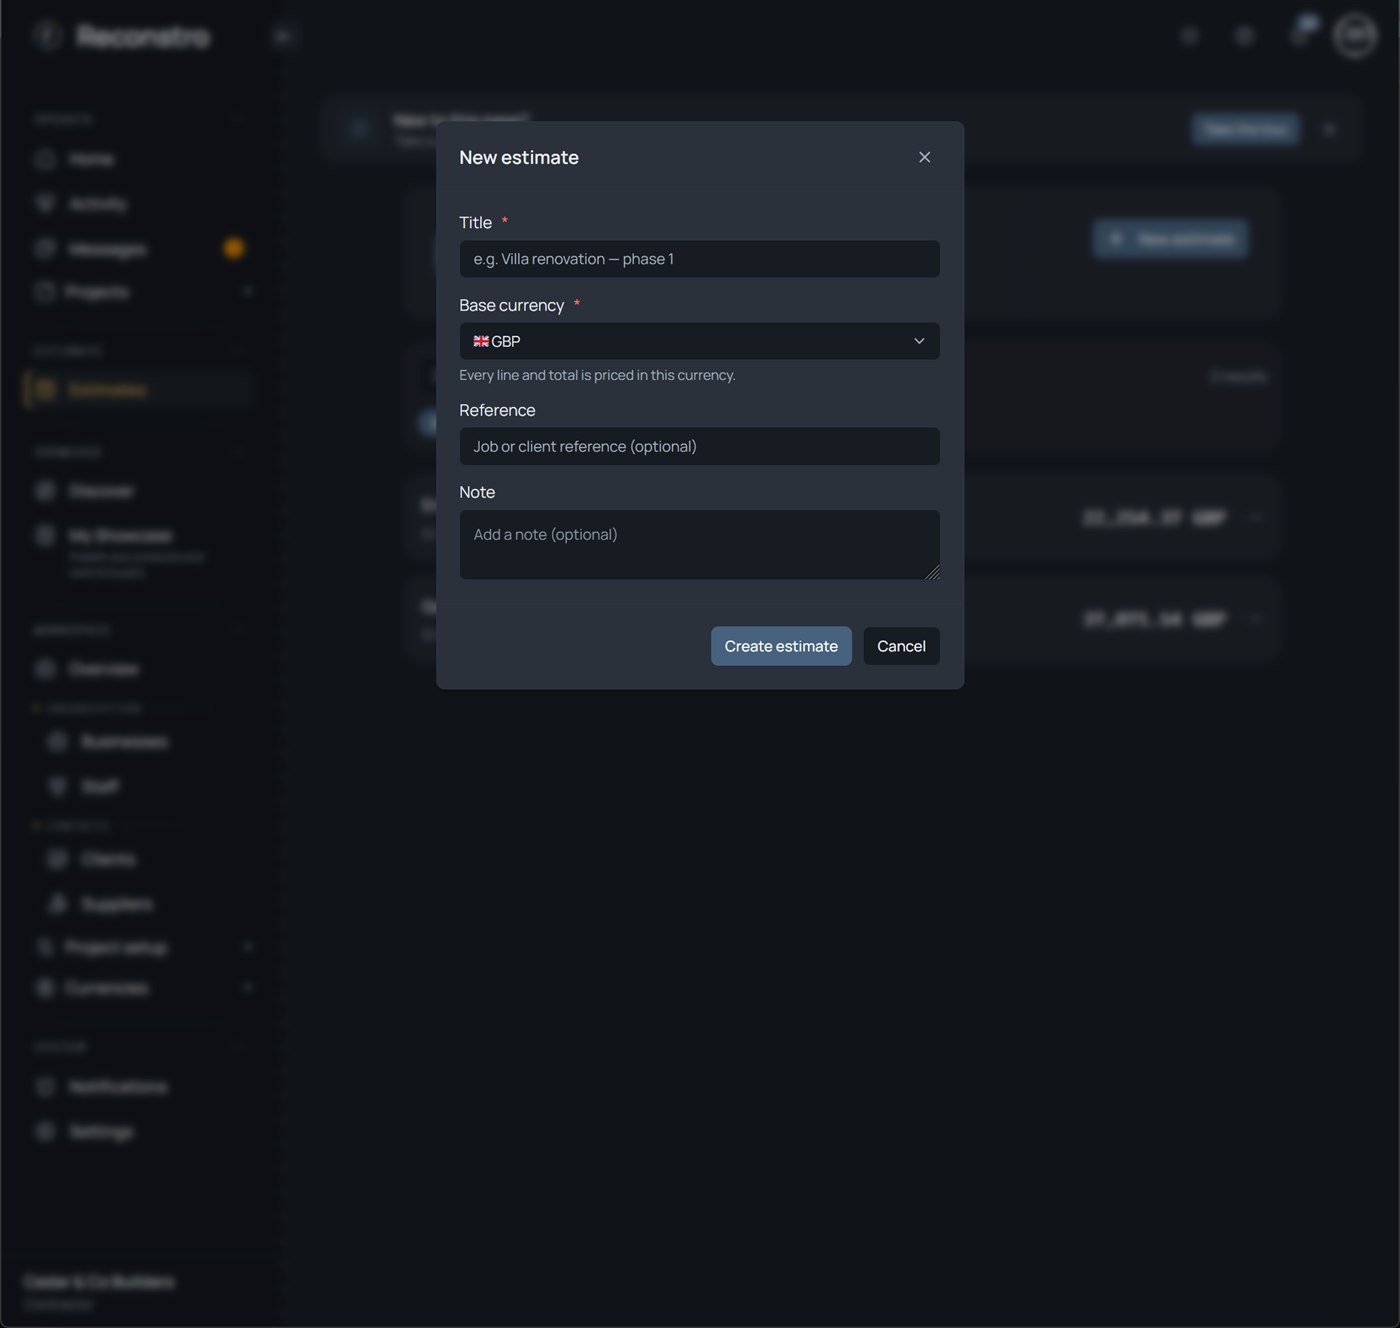
- Open Estimate → Estimates and press + New estimate.
- Give it a title and a base currency (every line and total is priced in it), plus an optional reference or note, then Create.
- Add line items — type them in, Add products from your catalogue, use Measure to work out a quantity, or Paste rows from a spreadsheet. Each line is quantity × rate in a unit (m², m³, sheet, unit…).
- Open Edit adjustments for markup, contingency, discount and tax — the cost breakdown (subtotal → grand total) updates live.
② Turn it into a Quotation — the branded offer
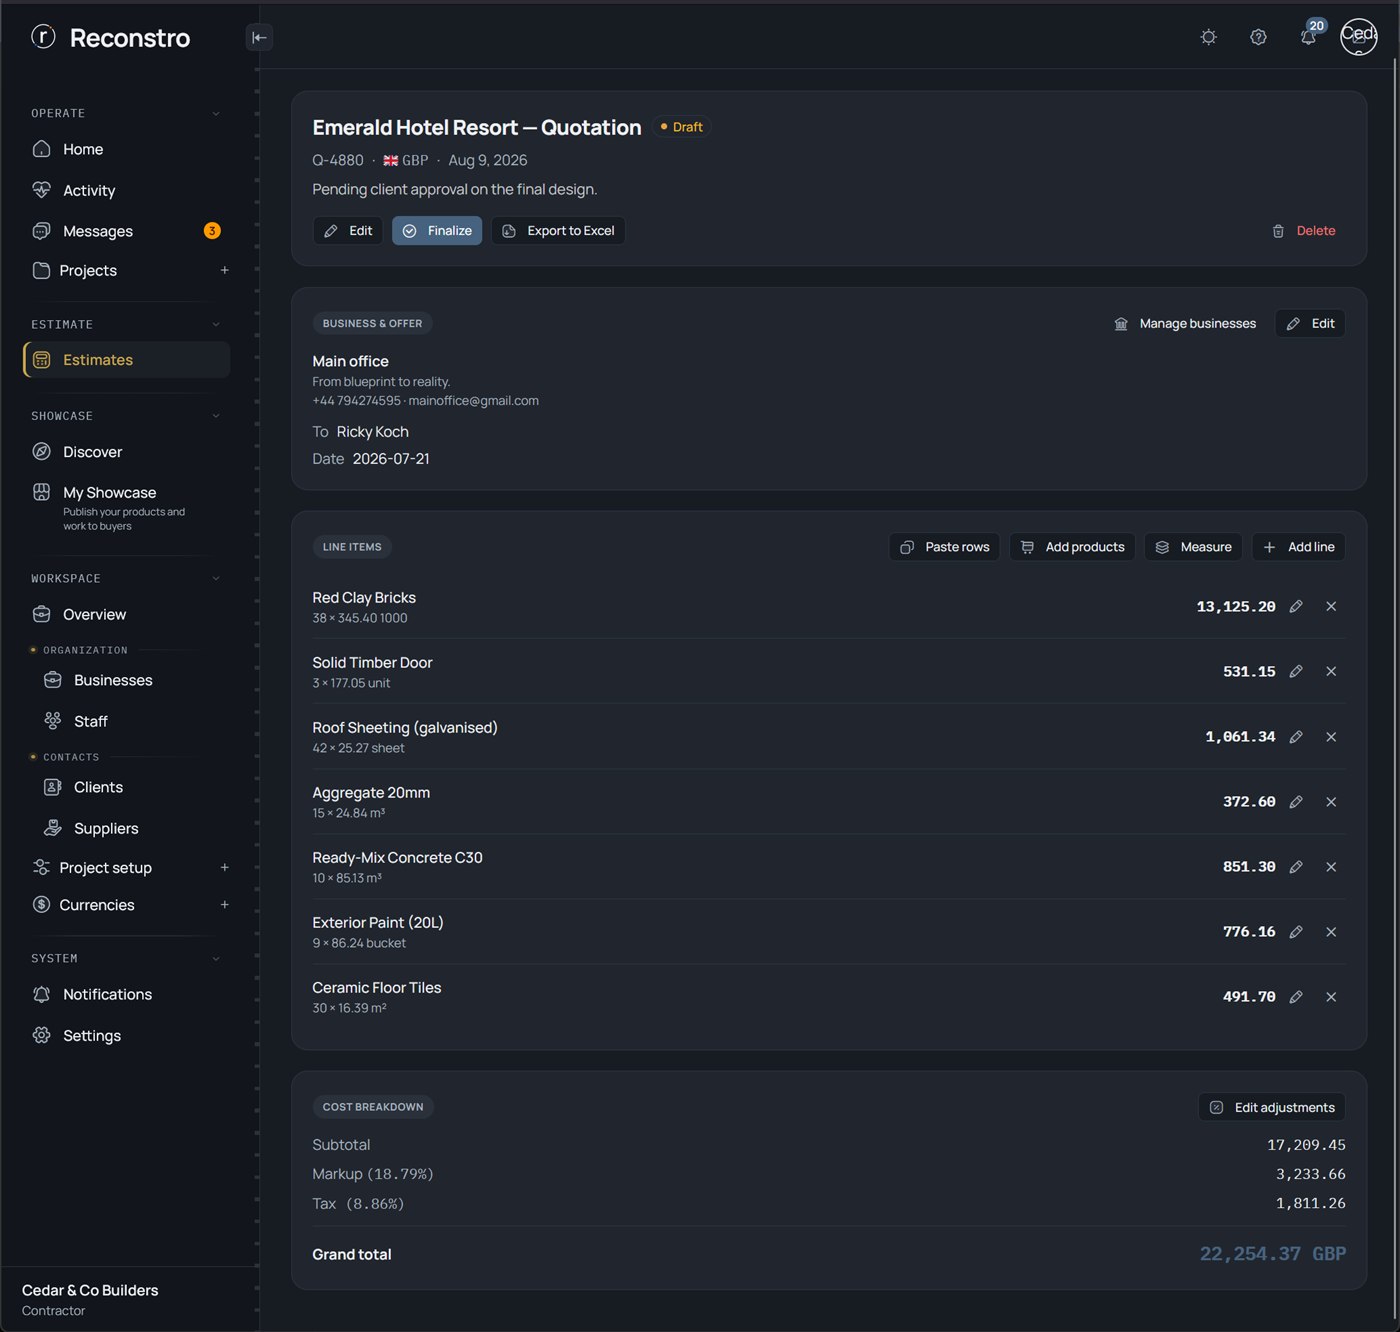
The project owner-facing version of your estimate — the same line items and totals, but headed by your business (name, logo, phone, address), addressed To a project owner, and exportable as a clean Excel offer. This is what you actually send.
When the numbers are ready and you want to send a professional quote the project owner can sign off on.
Step by step
- On the estimate, fill in Business & offer — pick which of your businesses is the letterhead (its Used for → Quotation must be on), the project owner under To, and the offer date.
- Check the line items and the cost breakdown: Subtotal → Markup → Tax → Grand total, all in your currency.
- Press Finalize to lock the quotation (Draft → Final) so the figures can't drift.
- Press Export to Excel to download the branded offer, and send it to your project owner.
Short version: Estimate a project's cost
4.2 Messages & notifications
Two ways Reconstro keeps you in the loop: Messages for talking to people, and Notifications for everything the app wants to tell you.
① Messages — talk to your team, project owners and suppliers
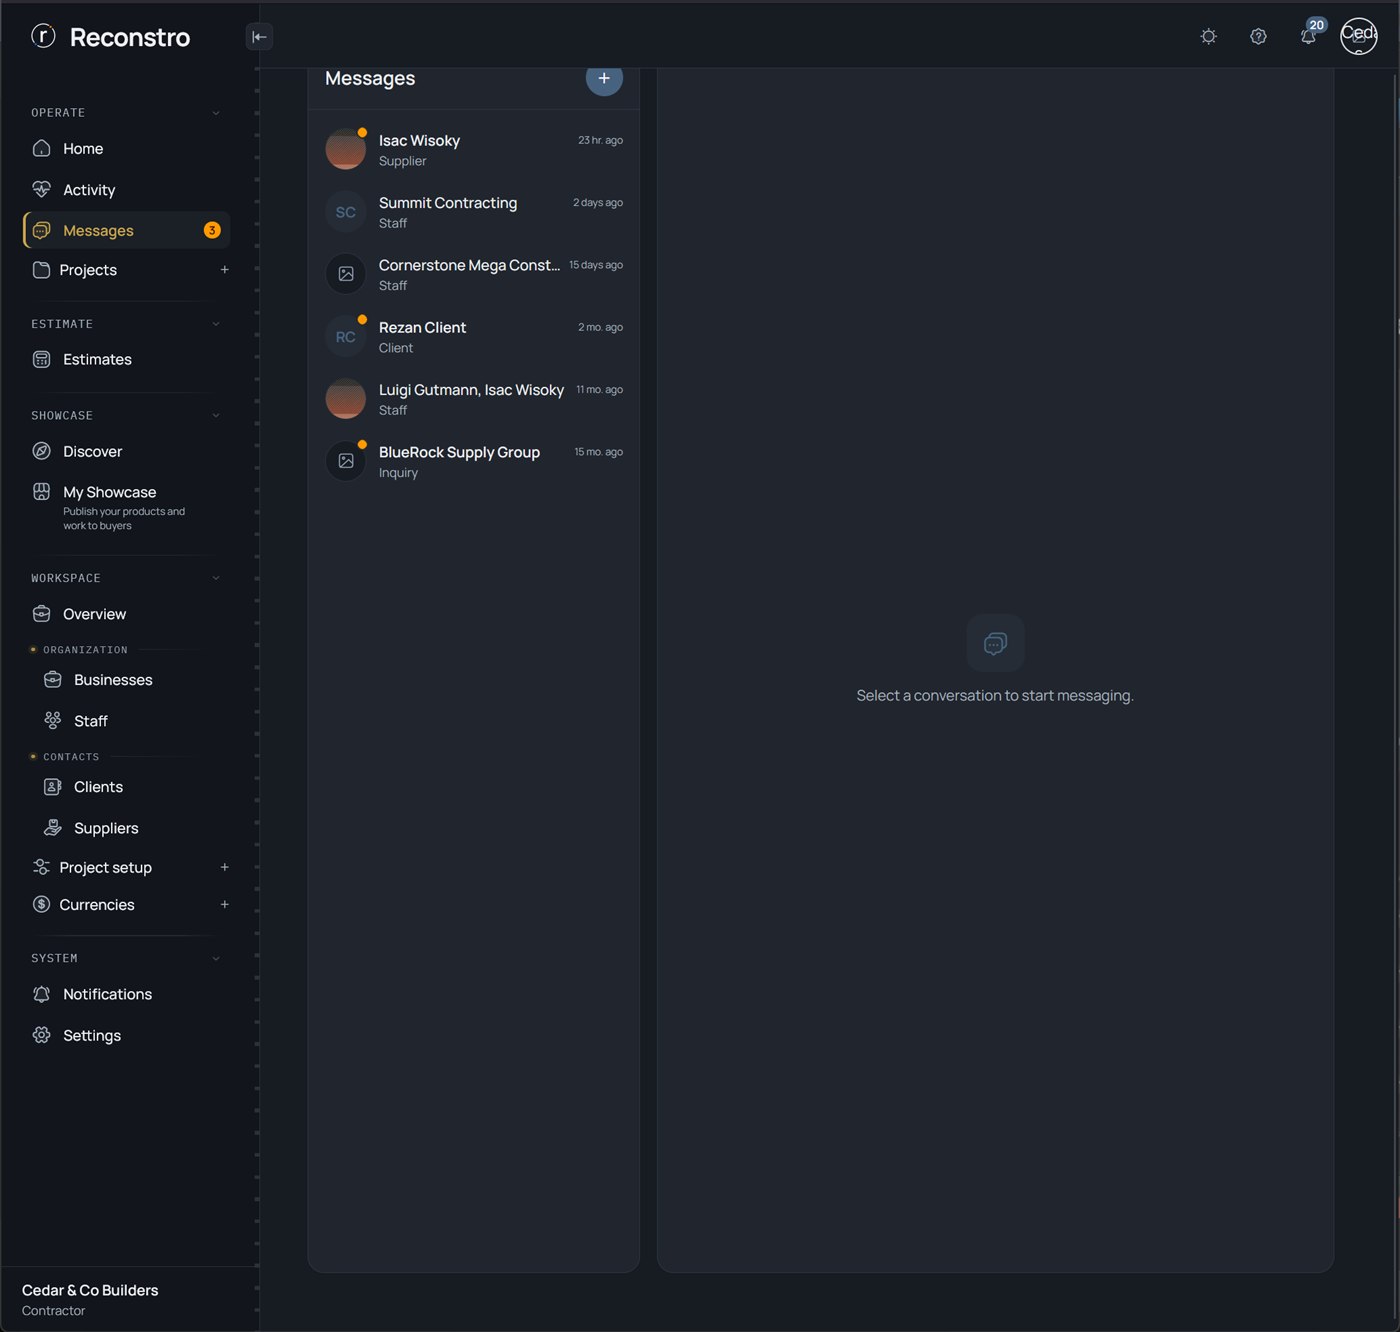
Built-in chat, so work conversations live next to the job instead of scattered across WhatsApp. Messages arrive in real time while the page is open, and the sidebar shows an unread count.
Day to day — chasing a supplier quote, answering a project owner, or coordinating the site team — whenever you want the conversation on the record.
Step by step
- Open Messages in the sidebar. The left pane lists your conversations; pick one to read it.
- Press + for a New conversation, then choose Team, Project owner or Supplier — see the table below — and press Start conversation.
- Type in the box and press Send message. Enter sends, Shift + Enter starts a new line.
- Scroll up and press Load earlier messages to read back through the history.
Who you can message
| 👥 Team | 🏠 Project owner | 🚚 Supplier | |
|---|---|---|---|
| Who it reaches | Your own staff | The project owner of one project | The owner of a supplier's company |
| You search by | Staff name (the owner is pinned to the top) | Project — Reconstro finds its project owner | Supplier name |
| Requirement | An active staff member | The project owner must already be invited to the project portal | The supplier must be linked to a business on Reconstro |
| Typical use | "Can you check the scaffolding today?" | "Here's this week's progress." | "Do you have 200 blocks in stock?" |
② Notifications — what needs your attention
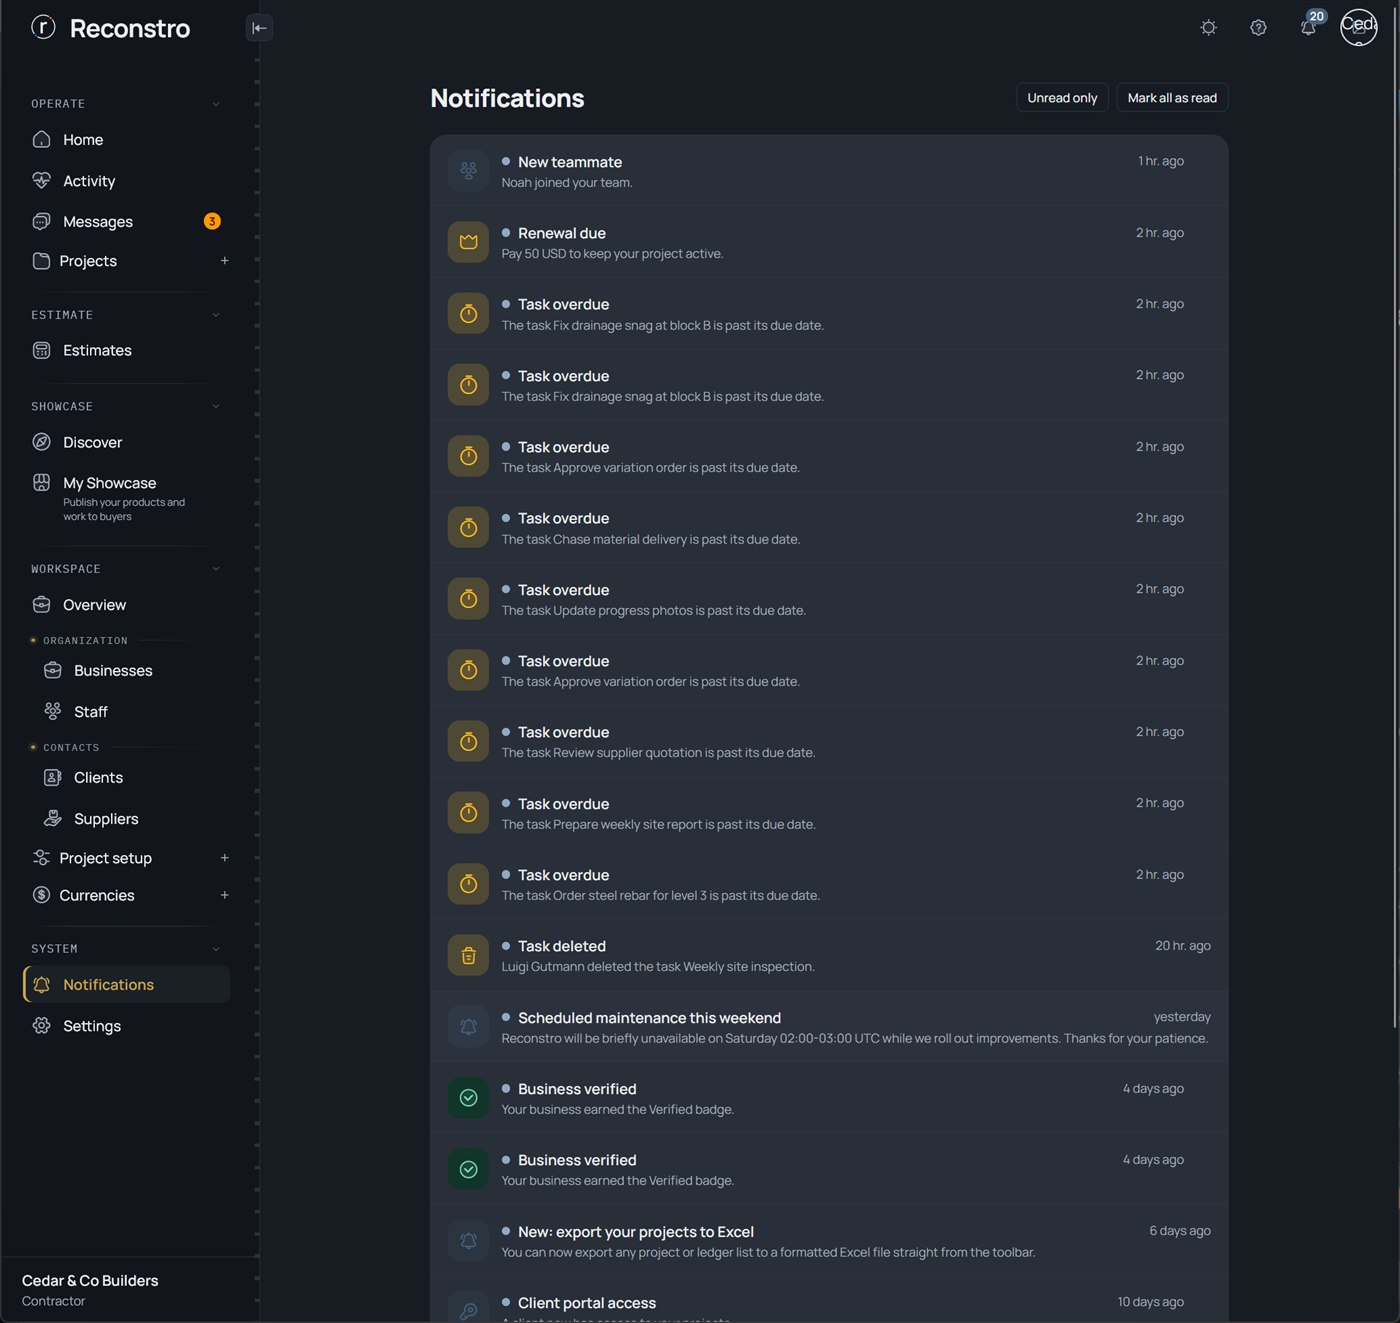
One feed of everything that happened across your workspace — money recorded, tasks assigned or overdue, reminders due, comments, staff joining, subscriptions and exchange-rate changes. Each one links straight to the thing it's about.
First thing in the morning, or whenever the bell in the top bar shows a count — it's the fastest way to catch up without opening every project.
Step by step
- Click the bell in the top bar for a quick look, then View all notifications — or open Notifications in the sidebar.
- Turn on Unread only to hide what you've already seen.
- Click any row to jump straight to the project, task or transaction it refers to — it's marked as read at the same time.
- Press Mark all as read to clear the badge in one go.
- Keep scrolling to load older notifications.
4.3 Showcase & Discover
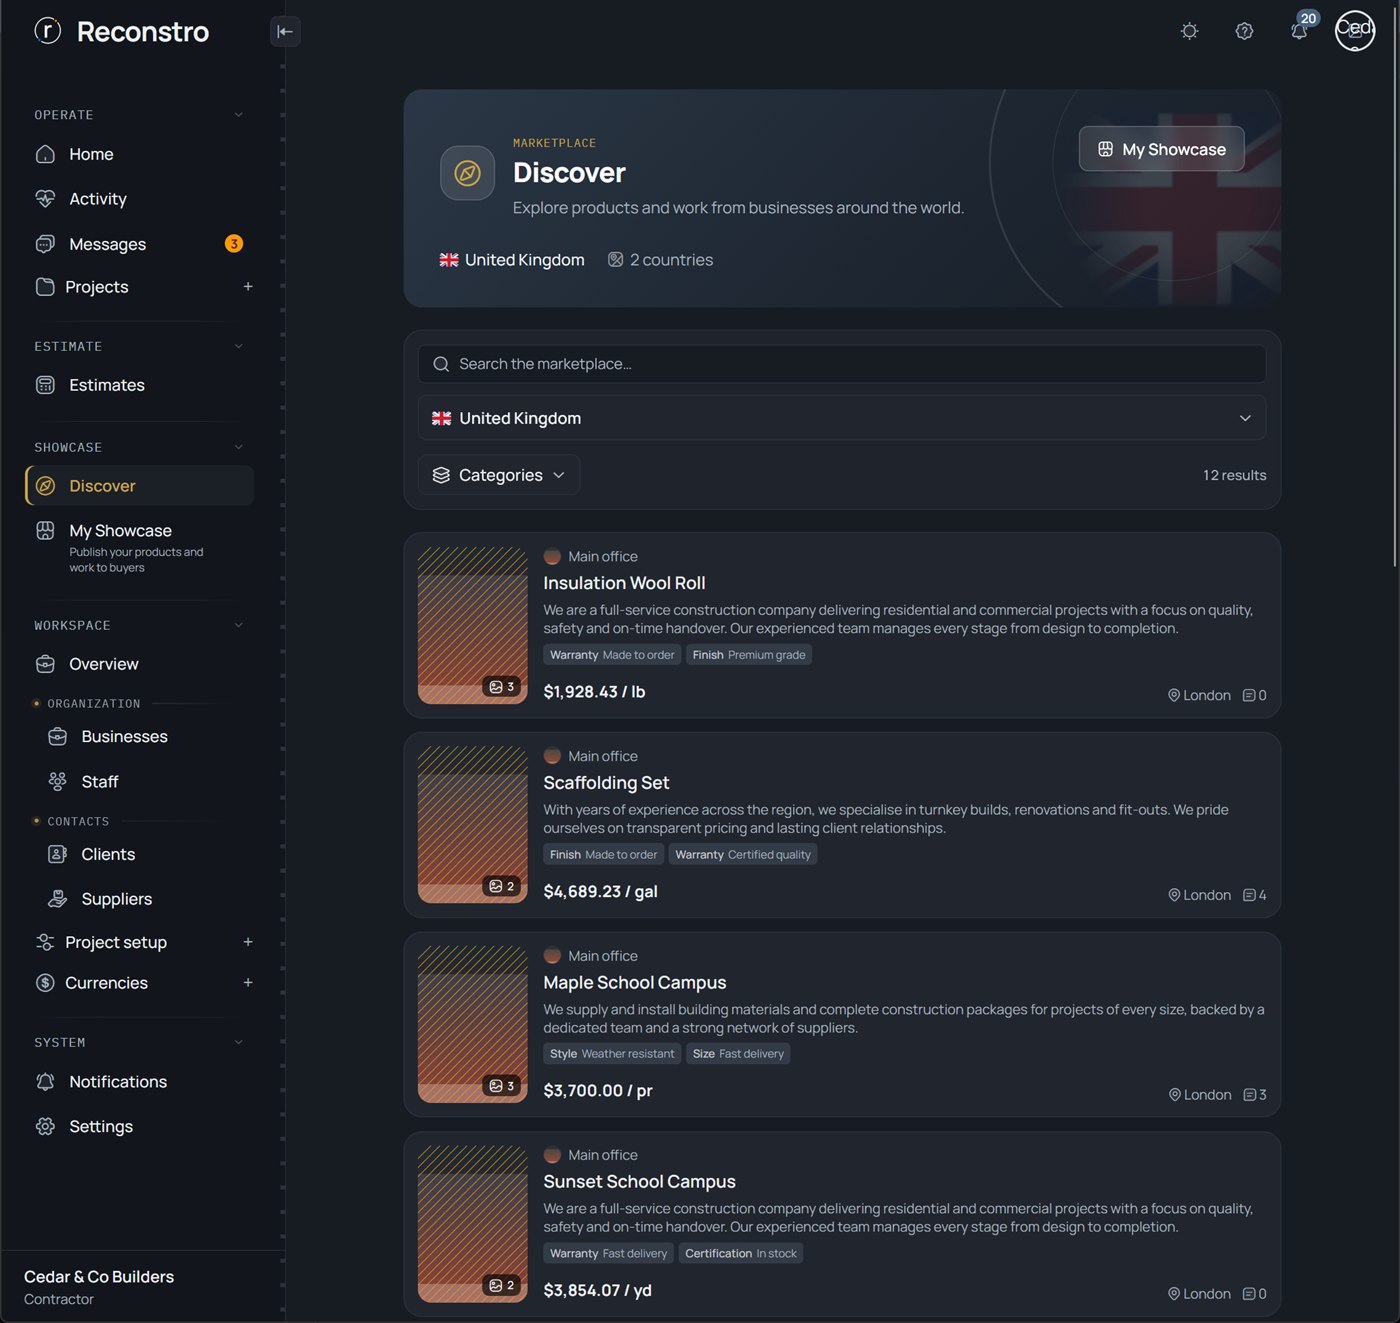
Showcase is Reconstro's built-in marketplace — a public place to show what you sell and the work you've built, and to find other businesses. It has two sides: Discover (browse everyone) and My Showcase (your own storefronts). Any business you switch on for Showcase becomes a public storefront here.
① Discover — the marketplace
A public feed of products and portfolio work from businesses around the world. Each card shows the item, the business behind it, a price, photos, tags, its location and how many comments it has.
When you want to find suppliers, materials or inspiration — or simply see how your own storefront looks to buyers.
Step by step
- Open Showcase → Discover in the sidebar.
- Search the marketplace, or narrow it by Country and Category — the result count updates as you filter.
- Open any card to see the full product or work, its photos, and the business behind it.
- Leave a comment, or open that business's storefront to see everything they've published and their star reviews.
② My Showcase — your storefront
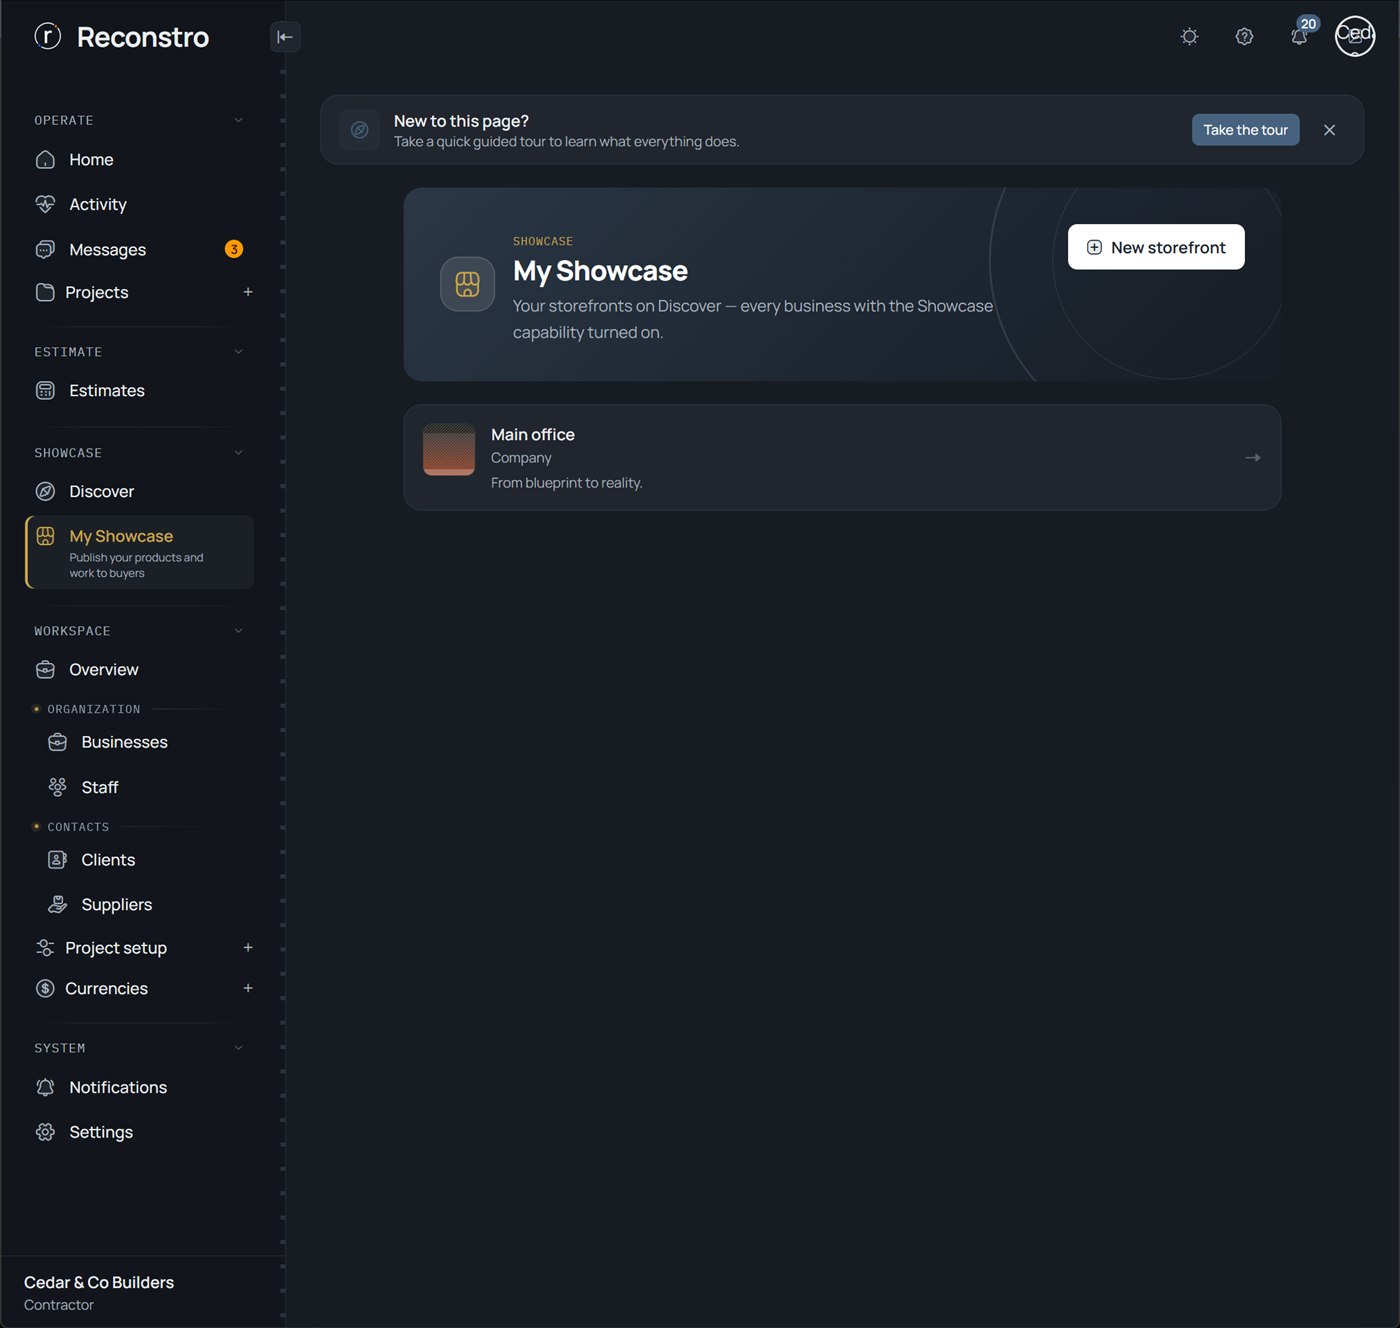
Where you manage your own storefronts — one for each business that has Showcase turned on. From a storefront you publish Products (your catalogue) and Work (your portfolio), and read the reviews buyers leave.
When you want to market your business publicly — list what you sell, show finished projects, and let buyers find and message you.
Step by step
- Open Showcase → My Showcase. You'll see a storefront for each Showcase-enabled business — or press New storefront to turn one on.
- Open a storefront (e.g. Main office) to manage it.
- Add a post: choose Product (something you sell, with a price) or Work (a finished project for your portfolio), then add photos and details.
- Your posts now appear on Discover. Check back for comments and star reviews, and request a verified badge to build trust.
Short version: Set up your Showcase
4.4 Reports, plans & billing
Three tools grouped under Projects in the sidebar: Reports (how every project is doing), Plans (activate & renew projects), and Billing (what you've paid).
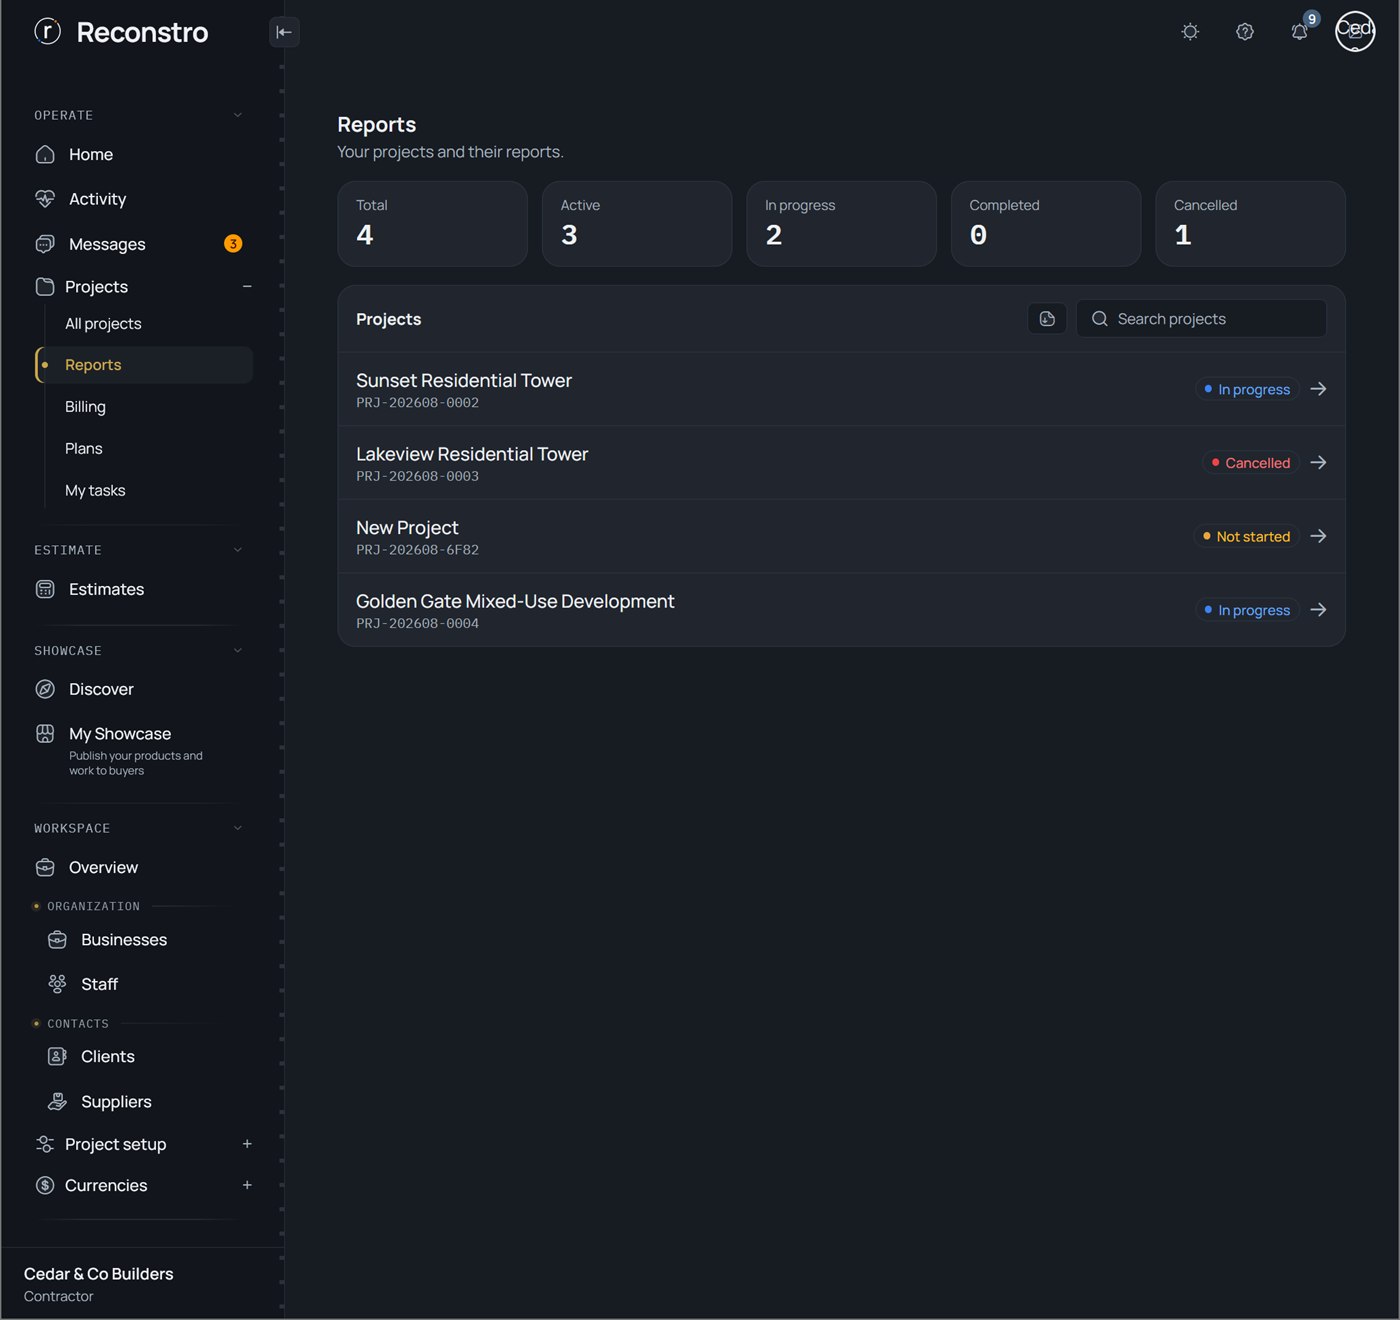
① Reports — across every project
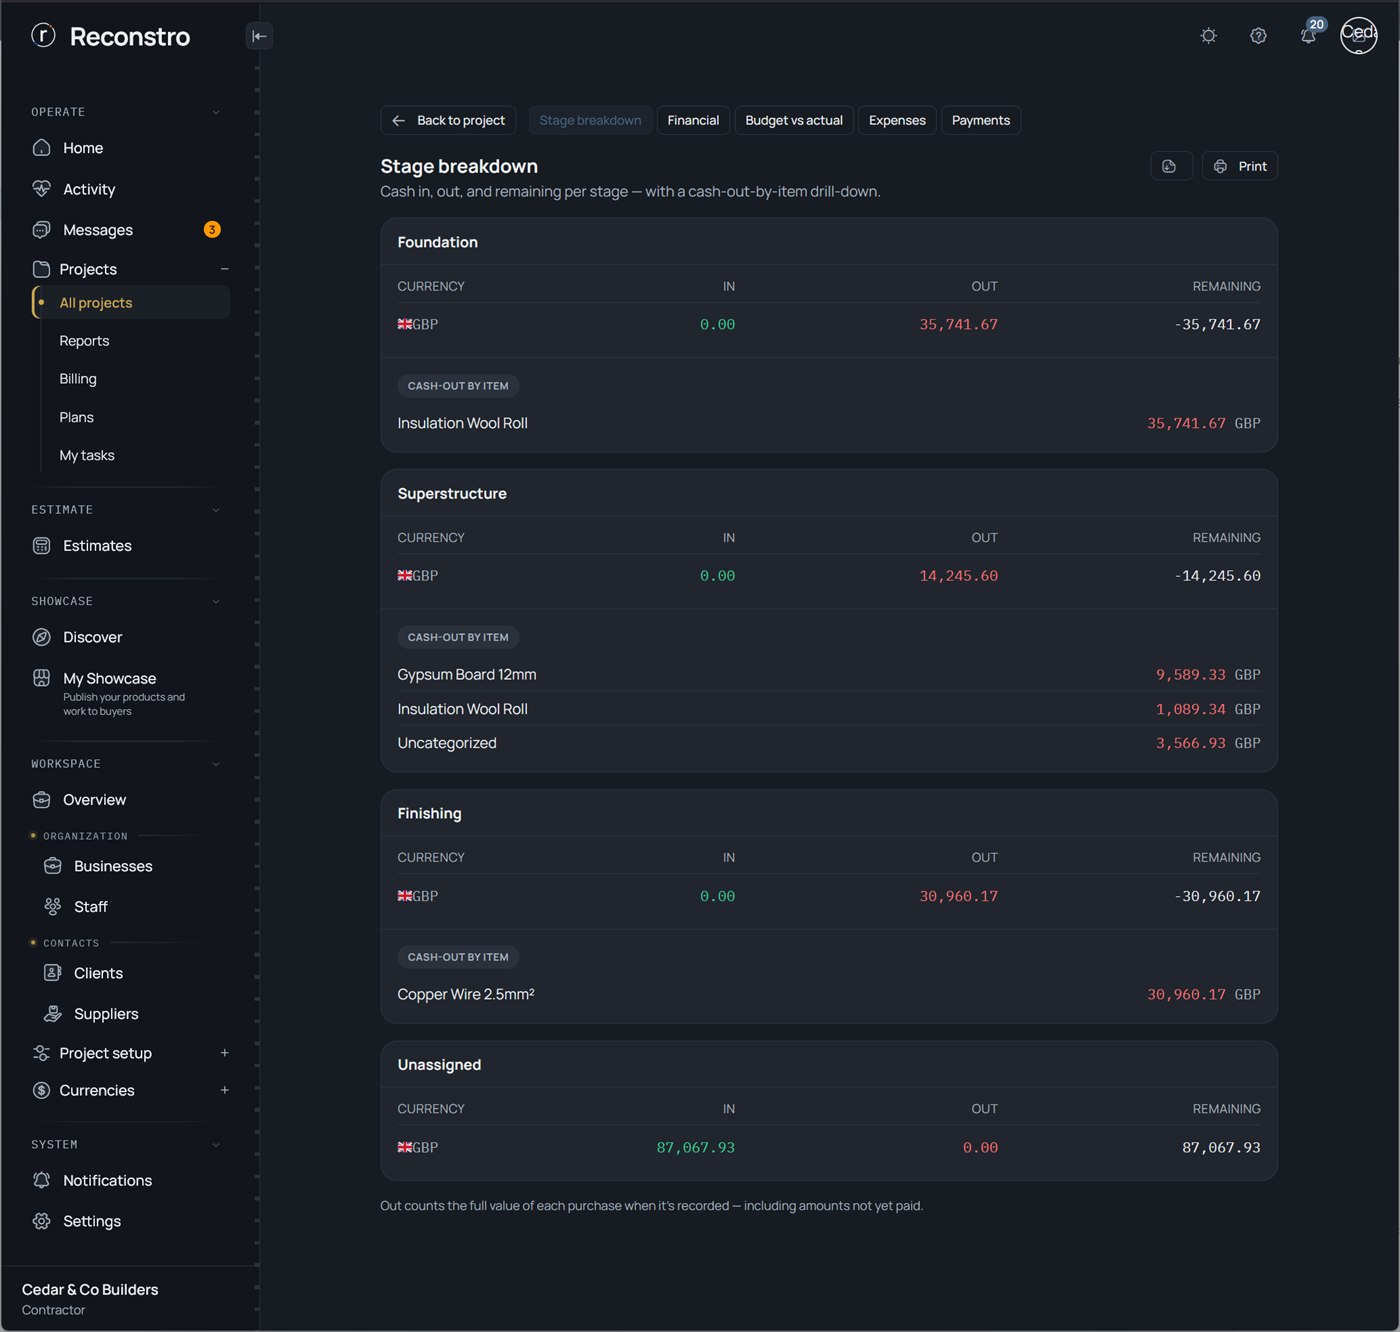
A reporting hub over all your projects. Open any project for five ready-made reports — Stage breakdown, Financial, Budget vs actual, Expenses and Payments — each with a cash-out-by-item drill-down, and each printable or exportable to Excel.
When you want the numbers behind a job — for a project owner update, a lender, or just to see where the money went.
Step by step
- Open Projects → Reports and pick a project.
- Switch between the tabs — Stage breakdown, Financial, Budget vs actual, Expenses, Payments.
- Expand a stage's cash-out by item to see exactly what the money bought.
- Print or Export the report to send it on.
② Plans — activate your projects
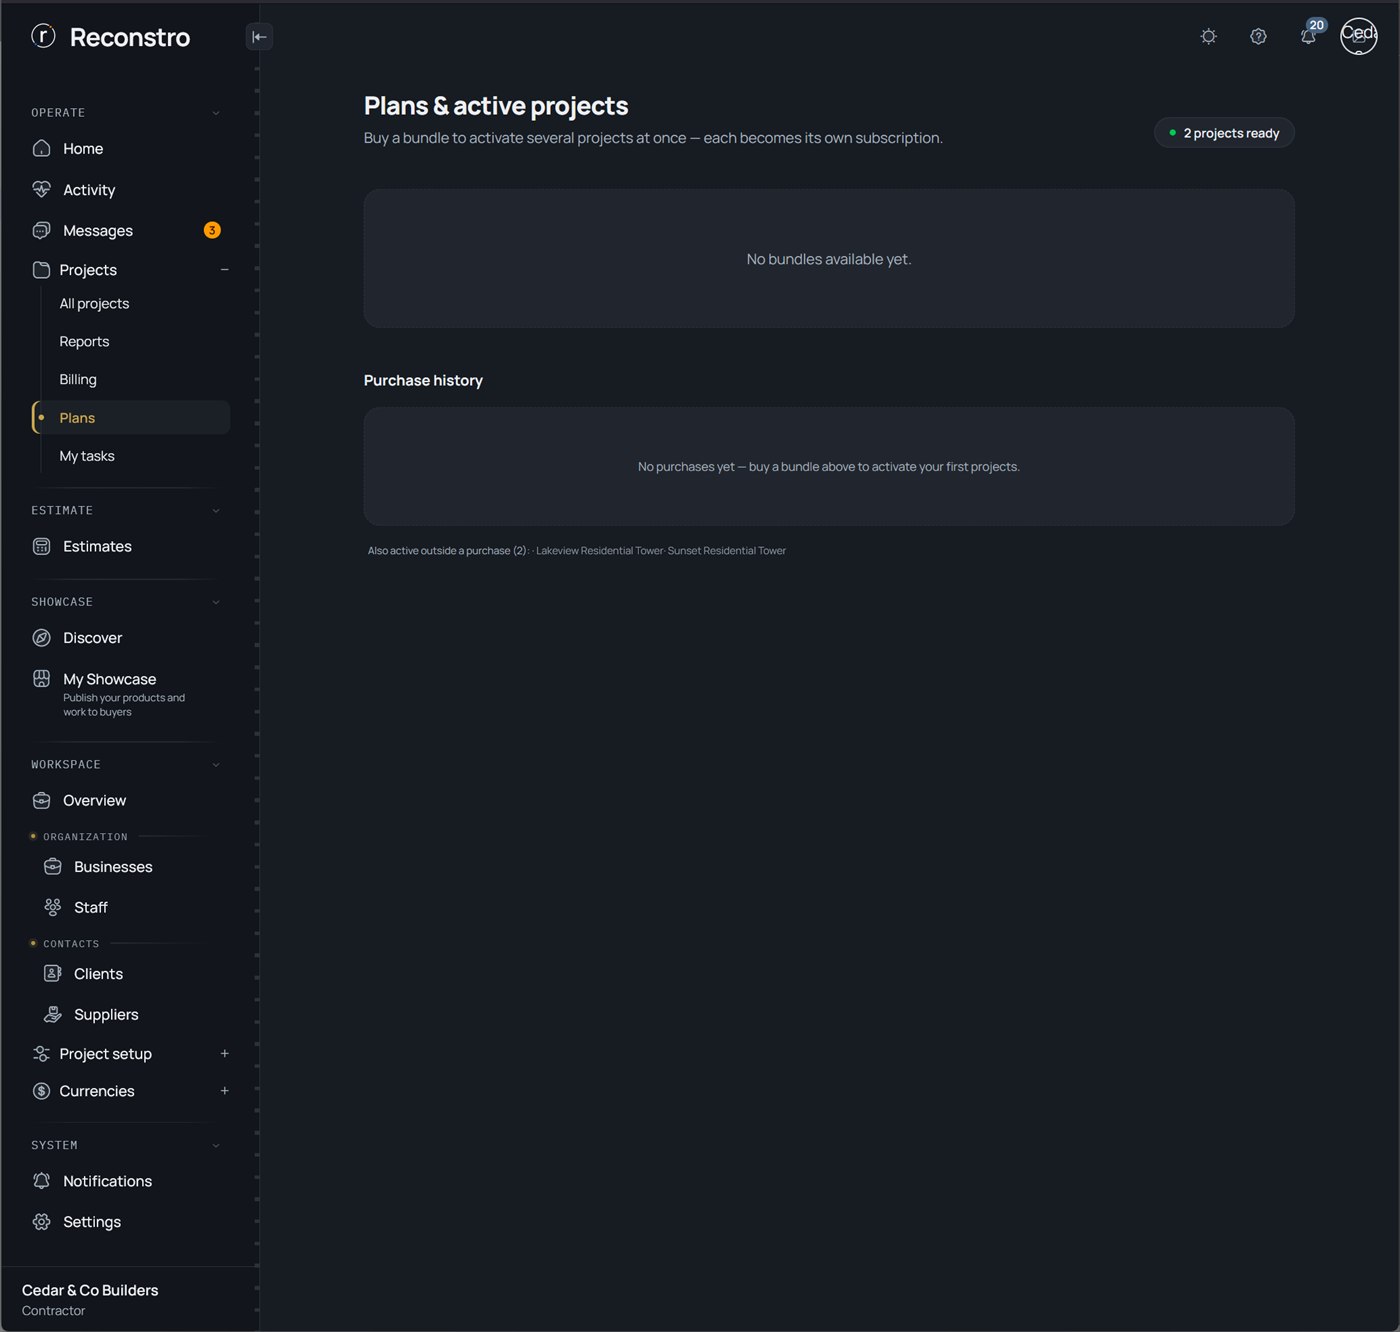
Where you activate projects. Buy a bundle to switch several on at once — each becomes its own independent subscription. It shows how many projects are ready to activate and your purchase history.
When you start new projects and need to unlock them — your first project is a free trial; the rest need a plan.
Step by step
- Open Projects → Plans — the badge shows how many projects are ready to activate.
- Buy a bundle to activate several projects in one purchase, or activate a single project from its own page (see Activate a project).
- Each activated project becomes its own subscription; past purchases sit in Purchase history.
③ Billing — your receipts
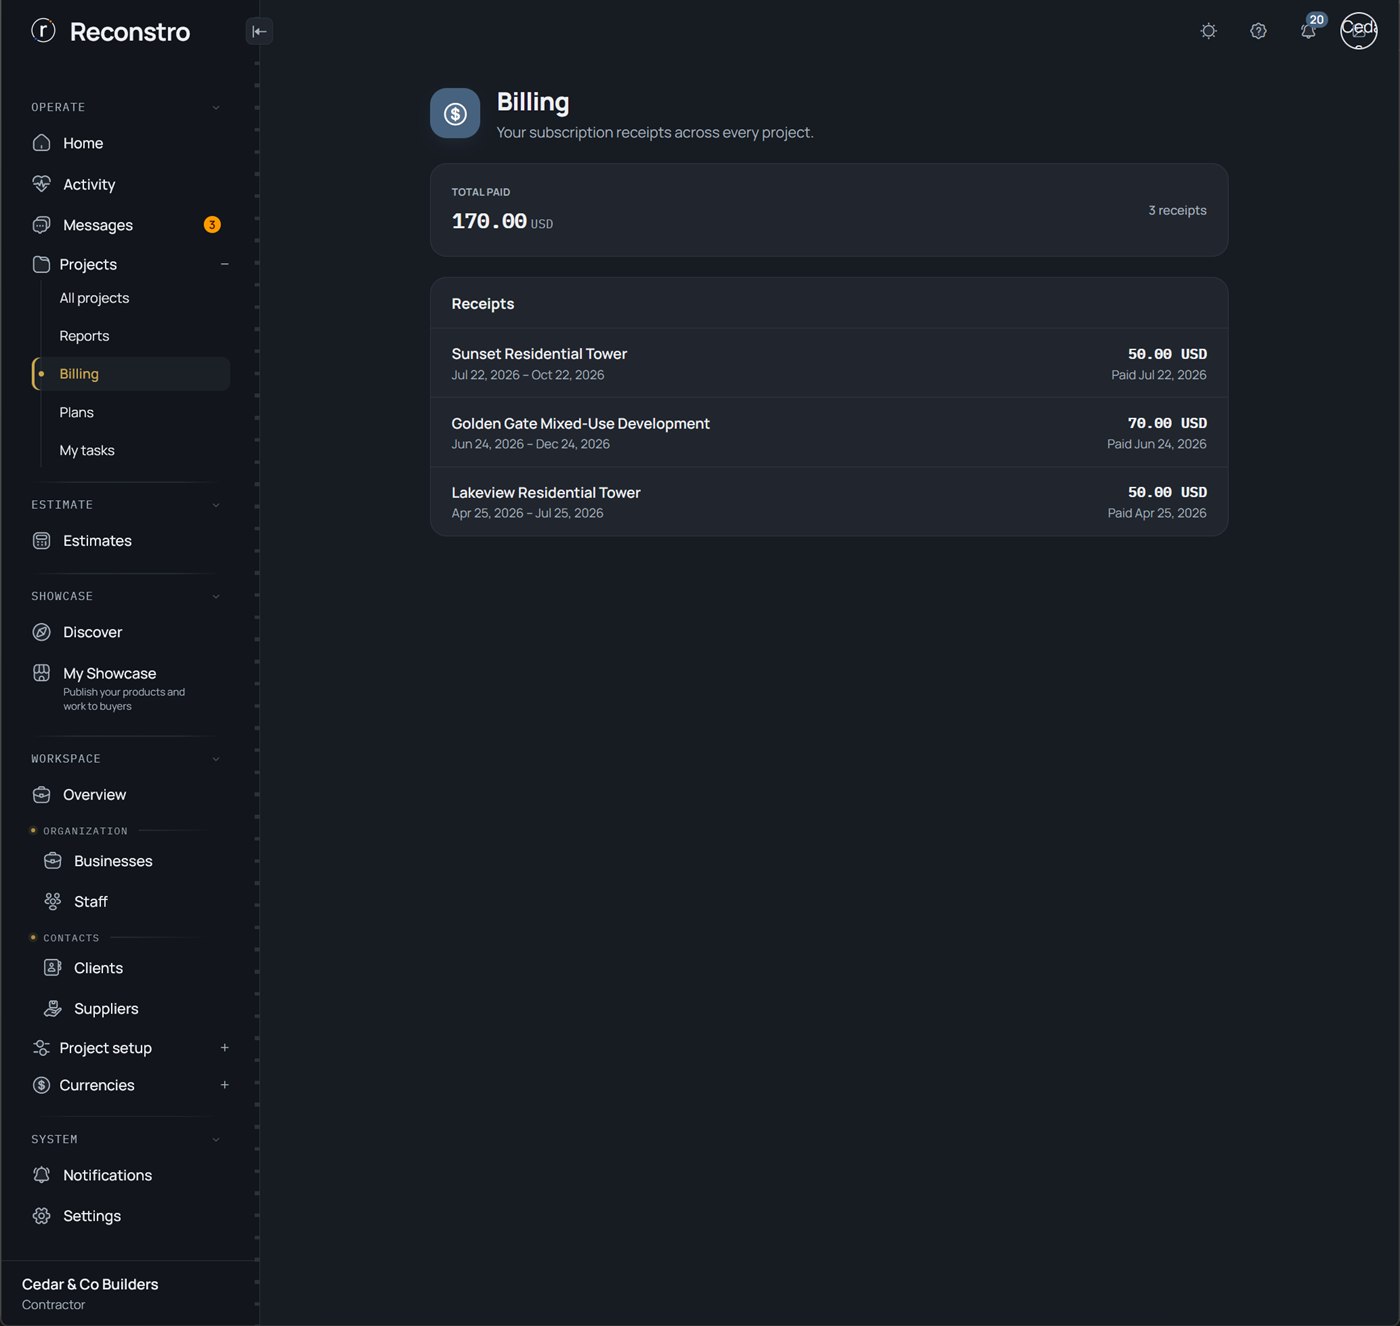
A read-only receipts ledger of every subscription payment across every project, with a running total paid. Each receipt shows the project, the period it covers and when you paid.
For your records — to see what you've spent on Reconstro and keep proof of payment.
Step by step
- Open Projects → Billing.
- See your Total paid and how many receipts you have.
- Read each receipt — project, subscription period and paid date.
4.5 Export for accountant
Everything one business recorded in a period — every project, every currency — in one zip file for your accountant: a workbook to read, CSV files to import into accounting software, and the receipts.
At the end of a month, a quarter or a year, when your accountant asks for your books — instead of copying the ledger by hand or sending screenshots.
Step by step
- Open Workspace → Overview in the sidebar and press Export for accountant in the Accountant card. On the phone it is under You → Workspace.
- Choose the Business. You are asked only when you have more than one.
- Choose the Period: Last month, This month, Last quarter, This quarter, This year, Last year or Custom. One export covers at most one year.
- Choose the Layout: Universal works with any accounting software; a layout you saved matches your accountant's own file.
- Look at In this pack: how many Entries, Invoices and Receipts it holds, how big the receipts are, and anything To check — costs without a receipt, receipts with more than one VAT rate, and supplier payments not on a project.
- Press Download pack and send the zip file to your accountant.
What is in the zip file
| Inside | What it is for |
|---|---|
Accountant.xlsx | To read, in the app's language. Sheets: Summary, Money out, Money in, Invoices, Exchanges, Voided and Late changes — entries of an earlier period that were recorded or changed during this one, listed but not counted. |
import folder | CSV files to import into accounting software. Always in English, with the same columns every time. With a custom layout, one more file in your accountant's own columns. |
receipts folder | The receipt files, each named after its row's Reference. The Receipts column lists a row's files. Photos come as pictures that open on any computer; PDF and e-invoice files are exactly as the supplier sent them. |
Your accountant's own layout
- Under Layout, press Custom layout.
- Type the Layout name and choose the Sample file — a CSV or Excel file from your accountant. Only its column names and first row are read; the file is not kept.
- Under Match the columns, check what fills each column. A column shown in amber was not matched: choose a field for it, or Leave empty.
- Choose the Entries in this file and the File settings: the separator, the decimal mark, how a date is written, and an optional first line. When a column is filled from Account code or Tax code, give each cost type and each VAT rate its code under Codes.
- Press Save layout. The layout is now a choice under Layout, next to Universal; choose it and press Edit layout to change or delete it.
Who can export: the account owner, or a team member with both Manage projects and View financial reports.
missing.txt in the receipts folder names it.Short version: Track money on a project
4.6 Settings
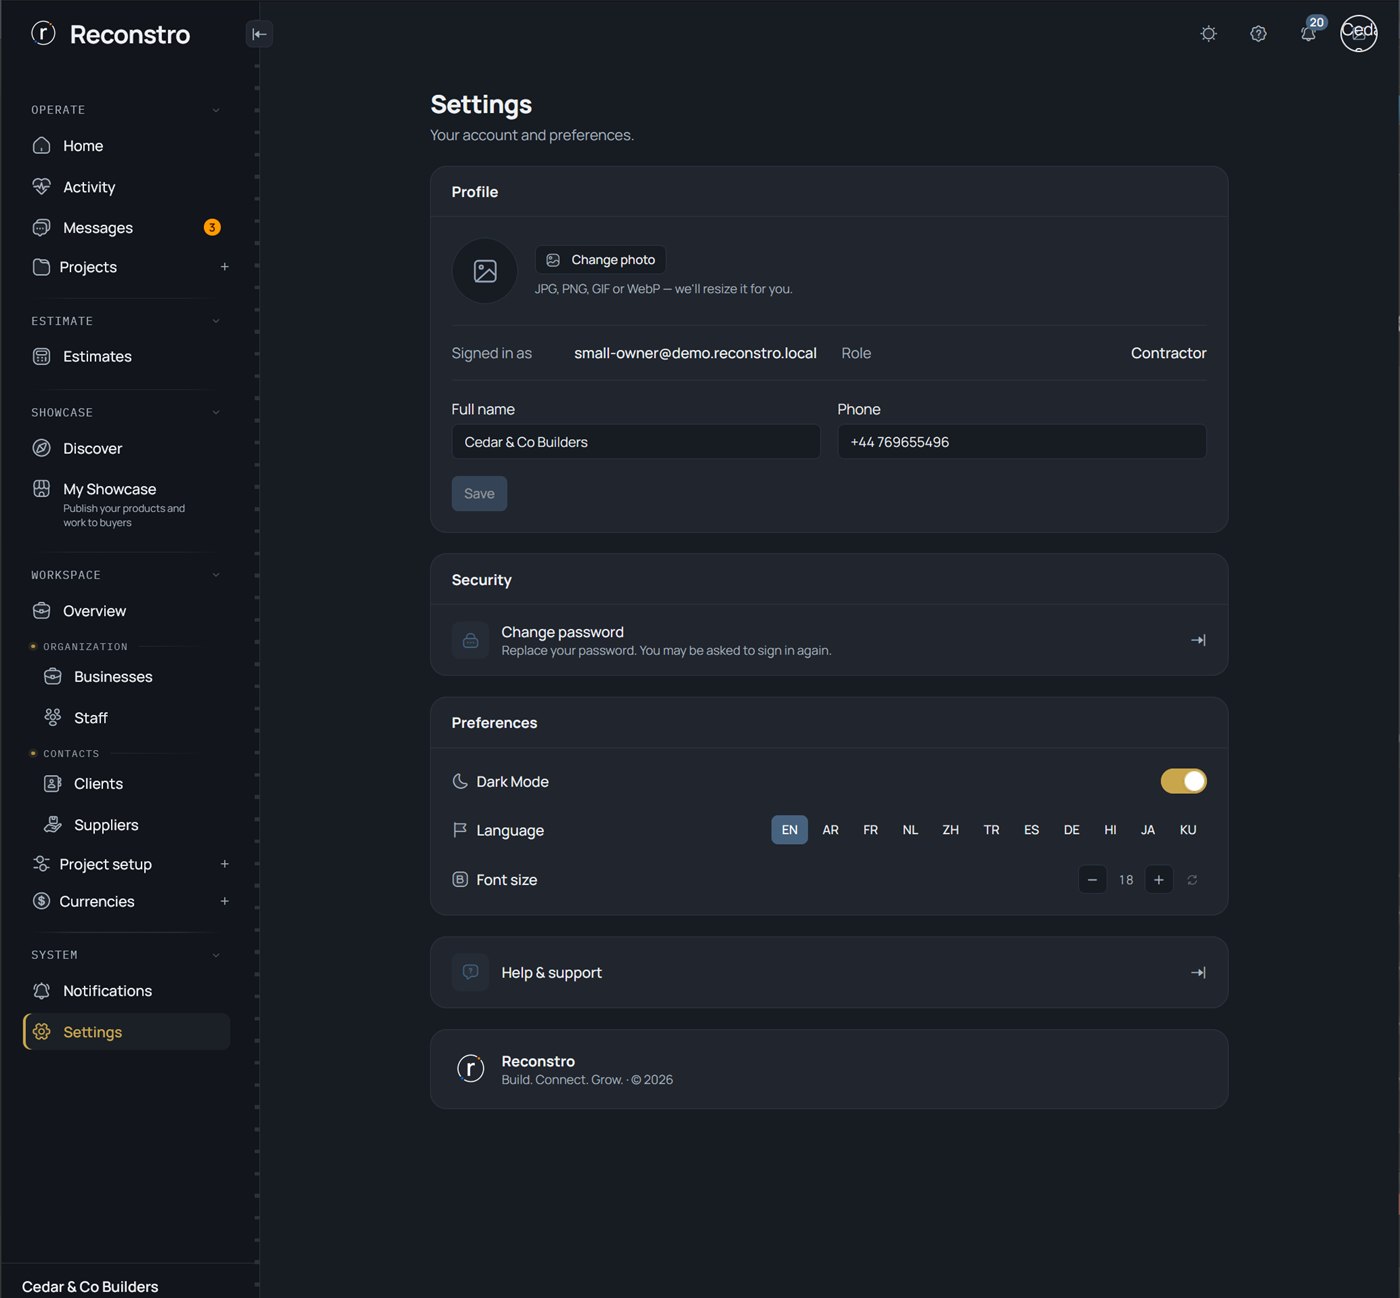
One page for your account and how the app looks — your profile, your password, and your language, theme and text size. It's a single scrolling page, not a set of tabs.
When you first set up your account, and any time you want to change your photo, switch language, or turn on dark mode.
Step by step
- Open Settings at the bottom of the sidebar.
- Profile — press Change photo to upload a picture (JPG, PNG, GIF or WebP; Reconstro resizes it for you), edit your Full name and Phone, then press Save. Your email (or staff code) and your Role are shown here too, read-only.
- Security — press Change password. You may be asked to sign in again afterwards.
- Preferences — turn Dark Mode on or off, pick your Language, and set the Font size (with a reset button to go back to normal).
- Help & support — opens the searchable help articles, an FAQ, and a button to email support.
Short version: Make the app your own